1. Create a Project
In the GCP console, create a new project where your chat app will live.2. Set up Service Account Credentials
Create a service account for the project, giving it an appropriate name. Then go to the Keys tab of your service account and create a new JSON key. The key will be downloaded after creation. Opal uses the non-sensitivehttps://www.googleapis.com/auth/chat.bot scope for most operations. However, the chat app also needs domain-wide delegation for the readonly directory scope in order to find users and send them direct messages.
To do that, go to domain-wide delegation, select Add New, and enter your service account’s client ID, granting it the following scope:
3. Set up Google Chat App
Enable the Google Chat API for the project in the APIs library. Then configure the chat app settings. Set the Application Info with the following:- App Name:
Opal - Avatar URL:
https://opal-logos.s3.us-east-2.amazonaws.com/opal-thumbnail-logo.png - Description: Chat app for Opal notifications.
Self-hosted
For self-hosted customers, Opal supports interaction through Google Chat messages directly to take actions like approving or denying requests. To do so, we will use pub/sub. First, create a pub/sub topic in your project here. Keep Add a default subscription enabled and leave the other options as the defaults.- Name your topic
opal-chat. - This creates a topic and an associated subscription named
opal-chat-sub. - Edit the subscription and ensure that the retry policy is Retry after exponential backoff.
chat-api-push@system .gserviceaccount.com.
Assign the Pub/Sub Subscriber role on the subscription to the service account you created for the chat app above.
Go back to the Google Chat API configuration, toggle on Enable Interactive Features and enter the following settings:
- Enable Receive 1:1 messages and Join spaces and group conversations.
- Select Cloud Pub/Sub and enter your topic’s name, e.g.,
projects/<project-name>/topics/opal-chat.
Cloud
For cloud customers, Opal’s Google Chat integration does not yet support interactivity. To allow the app to be published and installed into your workspace, go to the Google Chat API configuration, toggle on Enable Interactive Features and enter the following settings:- Enable Receive 1:1 messages and Join spaces and group conversations.
- Select Cloud Pub/Sub and enter the topic name, e.g.,
projects/<project-name>/topics/opal-uninteractive-chat.
4. Publish the Chat App
Enable the Google Workspace Marketplace SDK** API on your project. On the App configuration tab, enter the following:- App Visibility:
Private - Installation Settings:
Individual + Admin Install - App Integration:
Chat app - For the OAuth scopes, enter
https://www.googleapis.com/auth/admin.directory.user.readonly.
- Developer Name:
Opal - Developer Website URL:
https://www.opal.dev/ - Developer Email:
support@opal.dev
- User Type:
Internal - App Name:
Opal - User Support Email: Select an appropriate support contact from the dropdown.
- Developer Contact Information: support@opal.dev
- Select Save and continue, then skip the scope section for now by selecting it again.
Google Workspace Marketplace SDK API page, where you should no longer see the warning about the OAuth screen. Go to the Store Listing tab to publish the app. Enter the following:
- Category: Communication
- Graphics Assets: Download Opal’s logo and banner
- Screenshots: Use this screenshot
- Terms of Service URL:
https://www.opal.dev/tos - Privacy Policy URL:
https://www.opal.dev/privacy-policy - Support URL:
https://opal.instatus.com/ - Regions: Select
All Regions.
5. Install the Chat App to your workspace
Go to the admin console to view apps installed in your workspace. Search forOpal and select the app. Select Admin Install, make sure Everyone at your organization is selected, and select Finish.
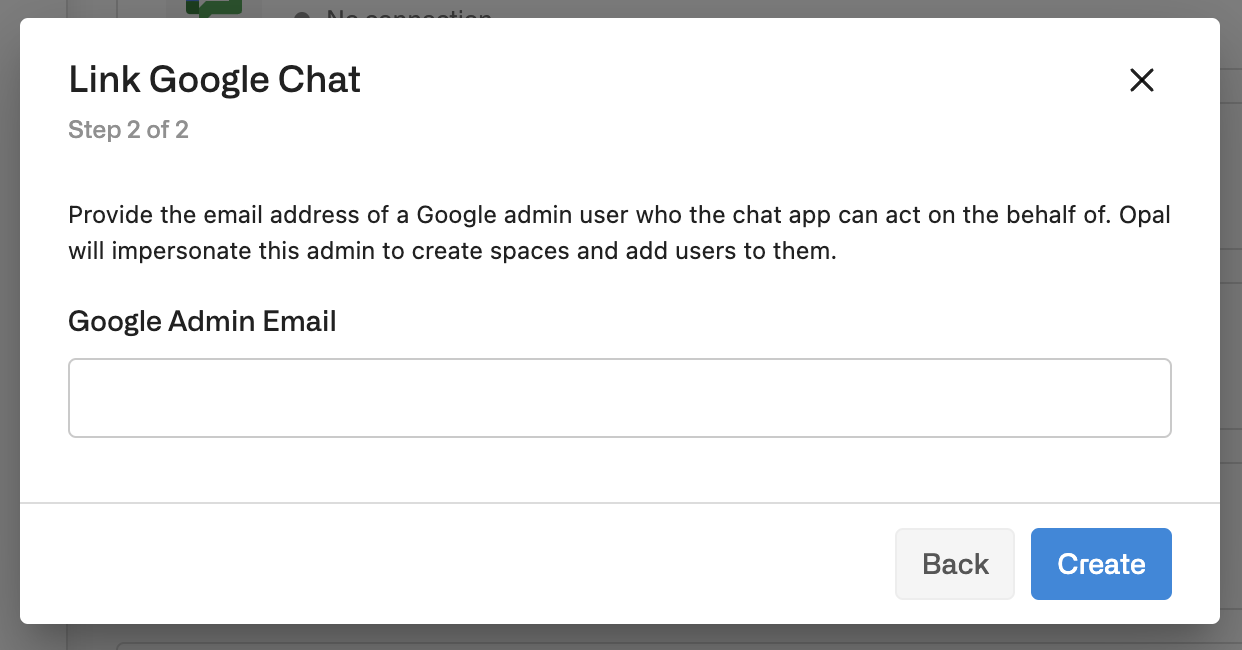
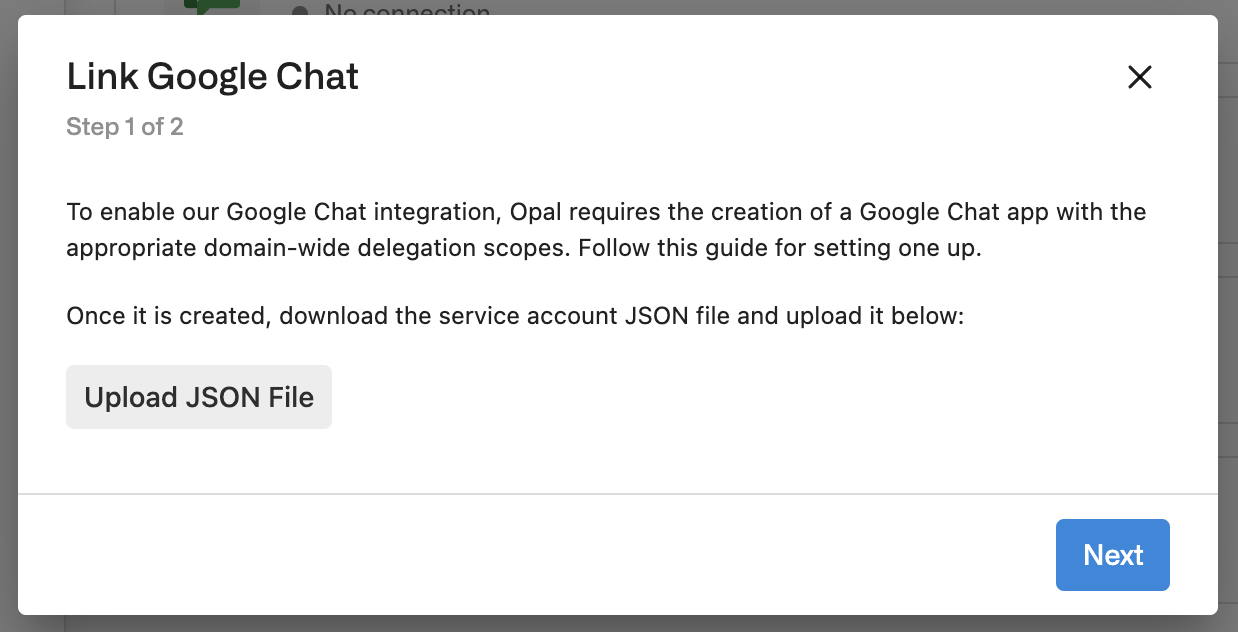
6. Connect Google Chat to Opal
In the Opal dashboard, go to Configuration > Settings > Productivity Integrations. Select the option to connect a Google Chat Integration. You’ll need two pieces of credentials:- The service account key JSON that you downloaded earlier
- The email of an admin user which the chat app can authenticate as to use the domain wide delegated scopes you granted earlier