> ## Documentation Index
> Fetch the complete documentation index at: https://docs.opal.dev/llms.txt
> Use this file to discover all available pages before exploring further.
# Jira
> Learn how to connect your Opal instance with Jira.
With Opal, you can sync your engineers' access requests with your Jira support tickets in order to grant access for the lifetime of the support ticket. When the ticket is closed (marked "Done"), access is also revoked. Opal supports Jia Software and Jira Service Management (JSM) projects. For JSM projects, [additional setup](/integrations/jira#jira-service-management) is required.
## Jira Cloud
Use the following steps to integrate Jira with Opal if you use Jira Cloud.
### 1. Create a Jira API token
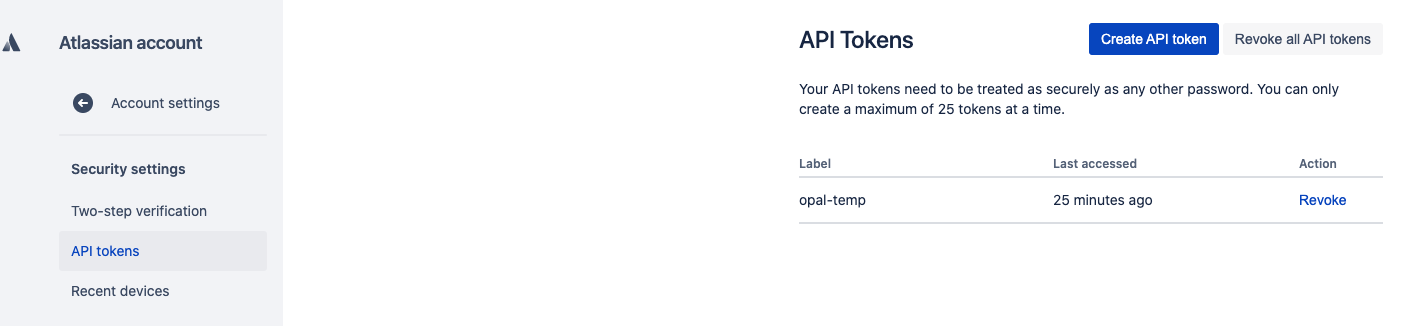
Opal requires an administrator of your Jira workspace to create a [Jira API token](https://id.atlassian.com/manage-profile/security/api-tokens). Click **Create API token** and record the generated token. You'll use this in the next step.
 ### 2. Add your Jira details to Opal
To enable the Jira integration in Opal, go to **Configuration > Settings > Productivity Integrations** in the Opal dashboard.
1. Select **Jira** and enter your Jira workspace name—e.g., if your Jira workspace is `https://jiraworkspace.atlassian.net`, enter `jiraworkspace`.
2. Enter the name of the Jira project you want to integrate.
3. Finally, enter the API token from the previous step.
Once complete, you've successfully integrated Jira with Opal. You can now load and bind Jira tickets from the project name from the Jira workspace you specified.
## Jira Data Center
Jira 8.14 or later is required.
Use the following steps to integrate Jira with Opal if you use Jira Data Center.
### 1. Create a Personal Access Token
Opal requires the administrator of your Jira workspace to create a Personal Access Token. Select your profile picture at the top right of the screen, then click **Personal Access Tokens**. Select **Create token**. Give your new token a name. Finally, click **Create** and record the generated token. This will be input in the next step.
### 2. Add your Jira details to Opal
To enable the Jira integration in Opal, go to **Configuration > Settings > Productivity Integrations** in the Opal dashboard.
1. Select **Jira** and enter your Jira workspace name—e.g., if your Jira workspace is `https://jiraworkspace.atlassian.net`, enter `jiraworkspace`.
2. Enter the name of the Jira project you want to integrate.
3. Finally, enter the API token from the previous step.
Once complete, you've successfully integrated Jira with Opal. You can now load and bind Jira tickets from the project name from the Jira workspace you specified.
## Jira Data Center
Jira 8.14 or later is required.
Use the following steps to integrate Jira with Opal if you use Jira Data Center.
### 1. Create a Personal Access Token
Opal requires the administrator of your Jira workspace to create a Personal Access Token. Select your profile picture at the top right of the screen, then click **Personal Access Tokens**. Select **Create token**. Give your new token a name. Finally, click **Create** and record the generated token. This will be input in the next step.
 ### 2. Add your Jira details to Opal
To enable the Jira integration in Opal, go to **Configuration > Settings > Productivity Integrations** in the Opal dashboard.
1. Select **Jira**, then **Self-hosted**.
2. Enter the URL of your Jira instance, e.g., `https://jira.acme-corp.com`.
3. Enter the name of the Jira project you want to integrate.
4. Finally, enter the Personal Access Token from the previous step.
Once complete, you've successfully integrated Jira with Opal. You will be able to load and bind Jira tickets from the project name from the Jira workspace you specified.
## How it works
For any access request, binding to a support ticket is optional.
After Jira is integrated, when making a request, the option to "Expire access when ticket is closed" can be enabled.
### 2. Add your Jira details to Opal
To enable the Jira integration in Opal, go to **Configuration > Settings > Productivity Integrations** in the Opal dashboard.
1. Select **Jira**, then **Self-hosted**.
2. Enter the URL of your Jira instance, e.g., `https://jira.acme-corp.com`.
3. Enter the name of the Jira project you want to integrate.
4. Finally, enter the Personal Access Token from the previous step.
Once complete, you've successfully integrated Jira with Opal. You will be able to load and bind Jira tickets from the project name from the Jira workspace you specified.
## How it works
For any access request, binding to a support ticket is optional.
After Jira is integrated, when making a request, the option to "Expire access when ticket is closed" can be enabled.
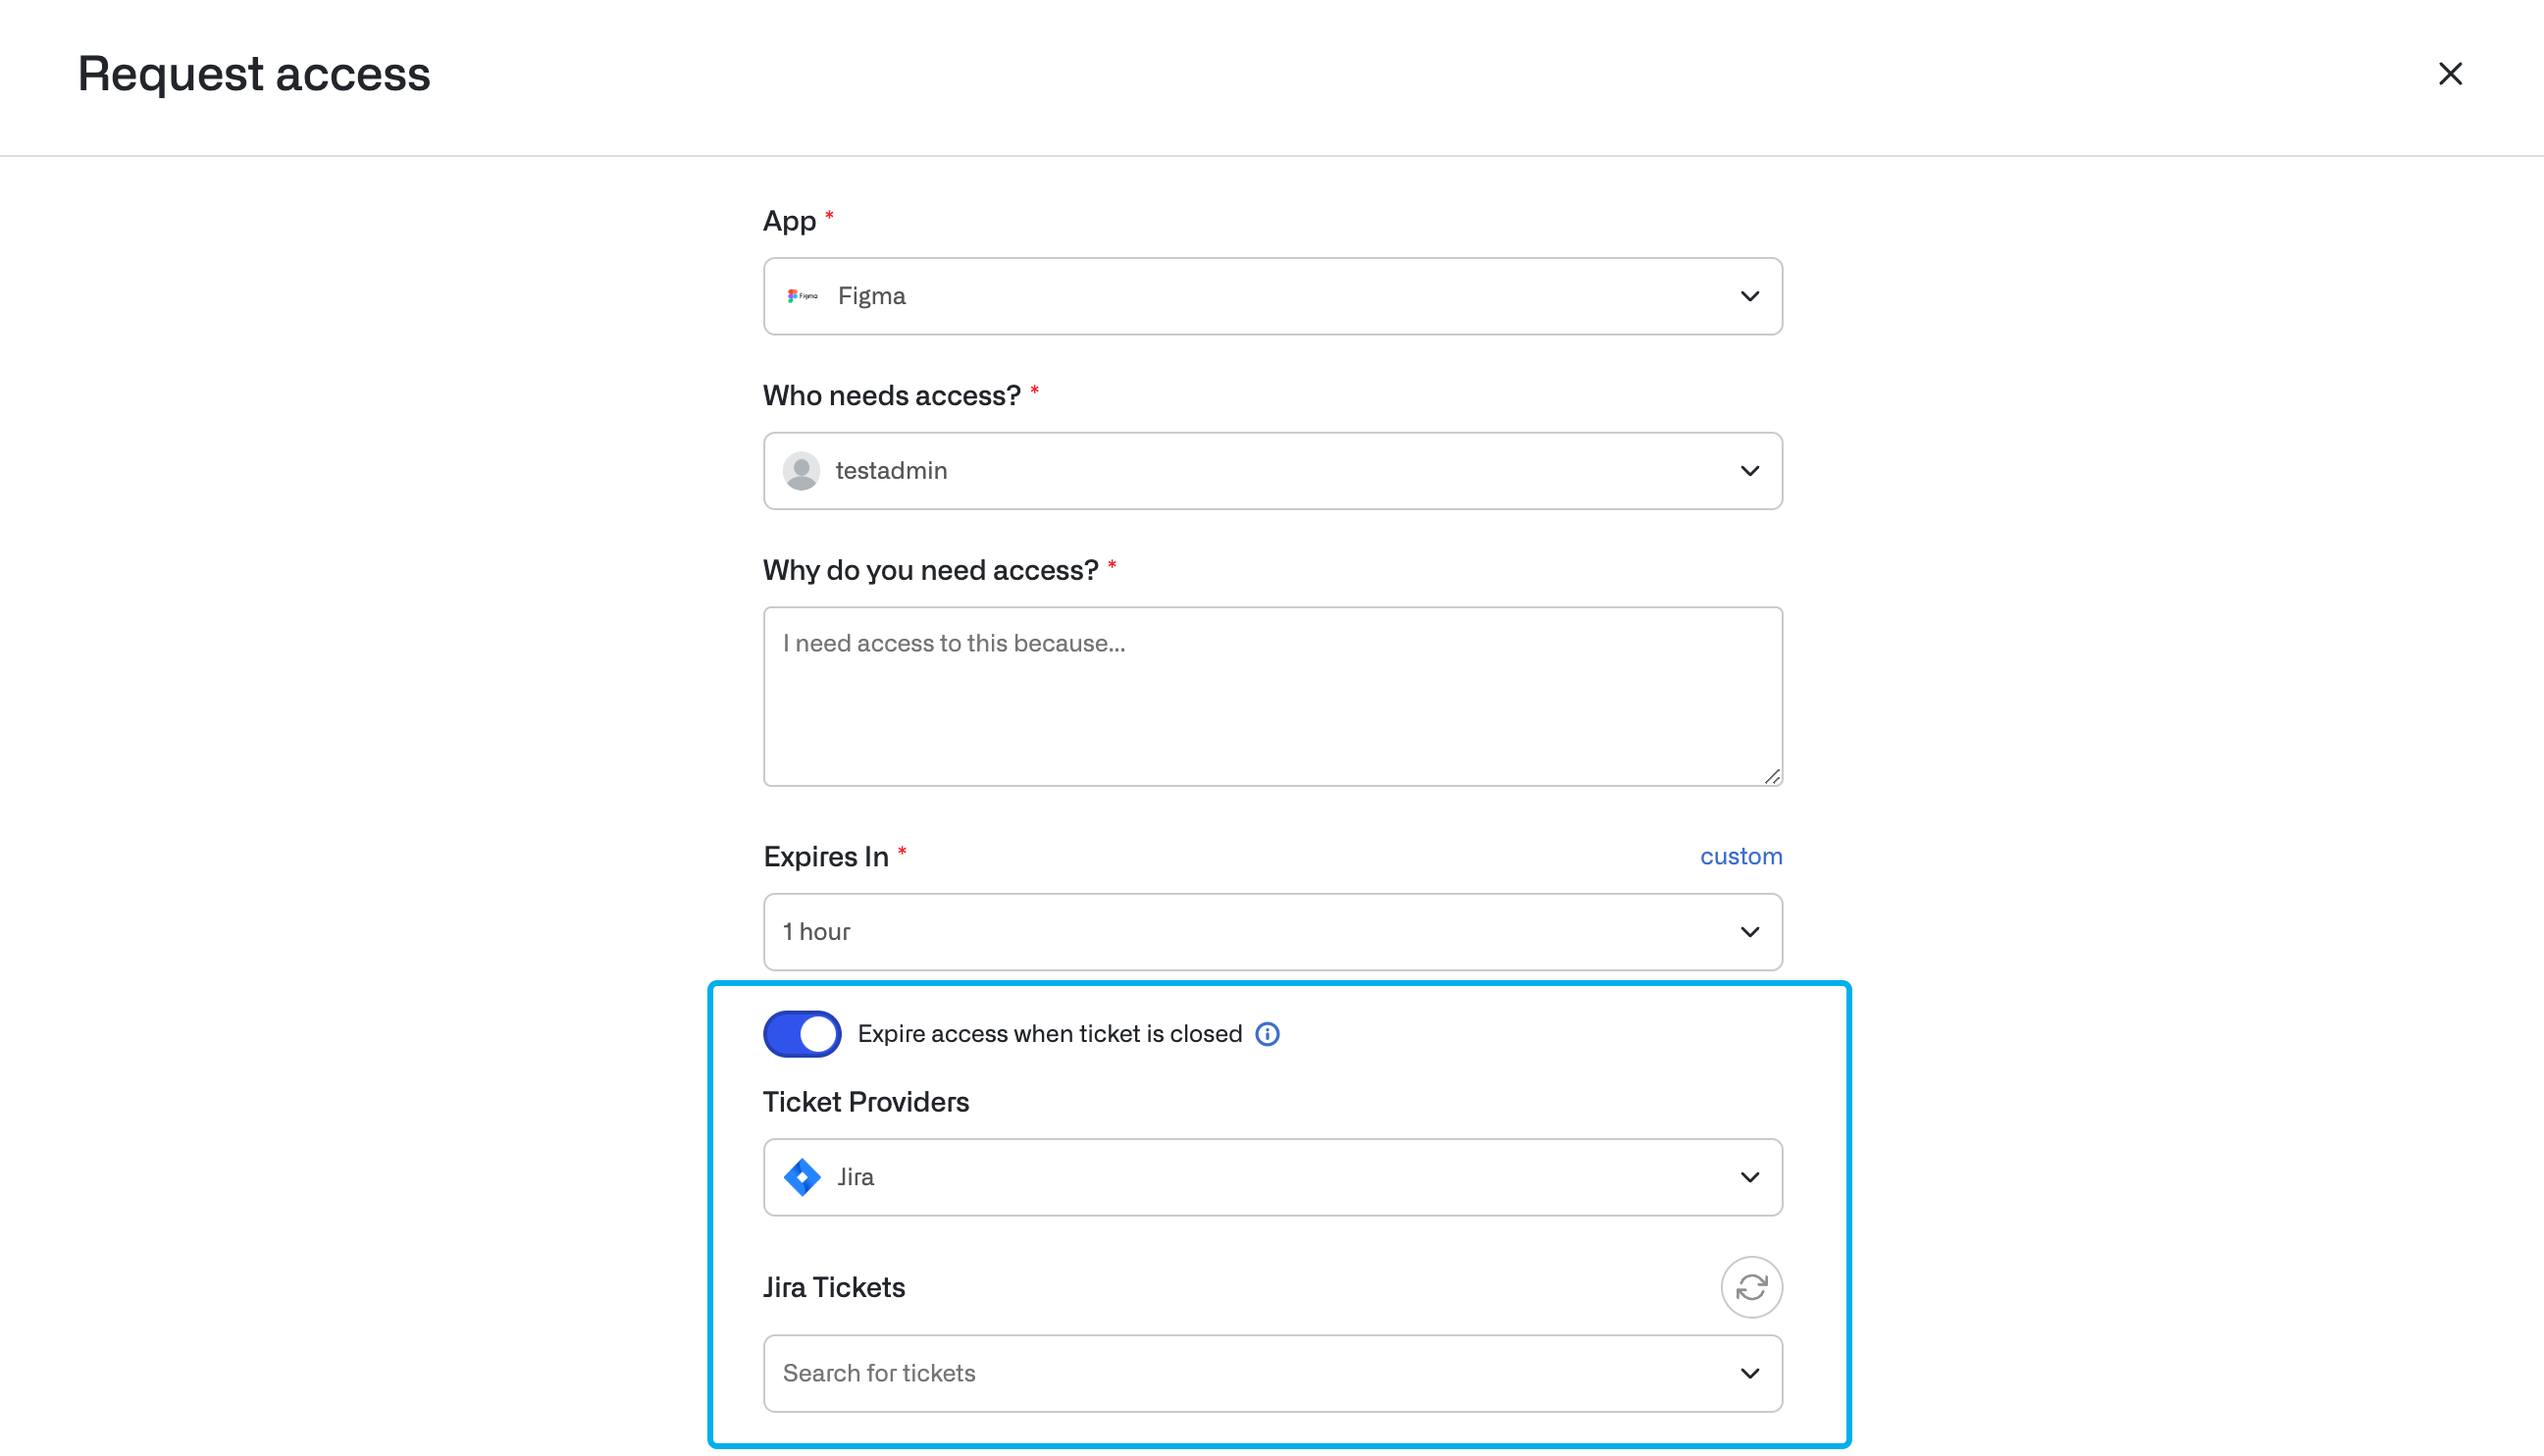 By clicking "Search for tickets", a list of Jira tickets will appear, only including tickets which are assigned to you in Jira (the Jira account which corresponds to your Opal email address).
Click on any of these support tickets to attach the ticket to the access request.
By default, an expiration time bound is required when making any access request. After the request is approved, access expiration is determined by the combination of this expiration time bound and the closure of the support ticket. Access will expire according to the minimum of these two events: if the ticket is closed before the expiration time bound is reached, access will be revoked when the ticket is closed. Similarly, if the expiration time bound is reached before the closure of the ticket, access is revoked when the expiration time bound is reached.
If you want to attach an access request to a support ticket, without an expiration time bound, you may select "Indefinite" under the expiration options and bind the request to a support ticket.
## Jira Service Management
Most functionality is the same between Jira Software and Jira Service Managent projects. The key differences are:
1. Ticket links in Opal to Jira Service Management requests will show the requestor-facing URL rather than the agent URL. This requires setting up a request type `Access Change - Opal`.
2. If the access requestor in Opal does not have a Jira account, Opal will attempt to create a Jira customer account.
### Jira Service Management Project Setup
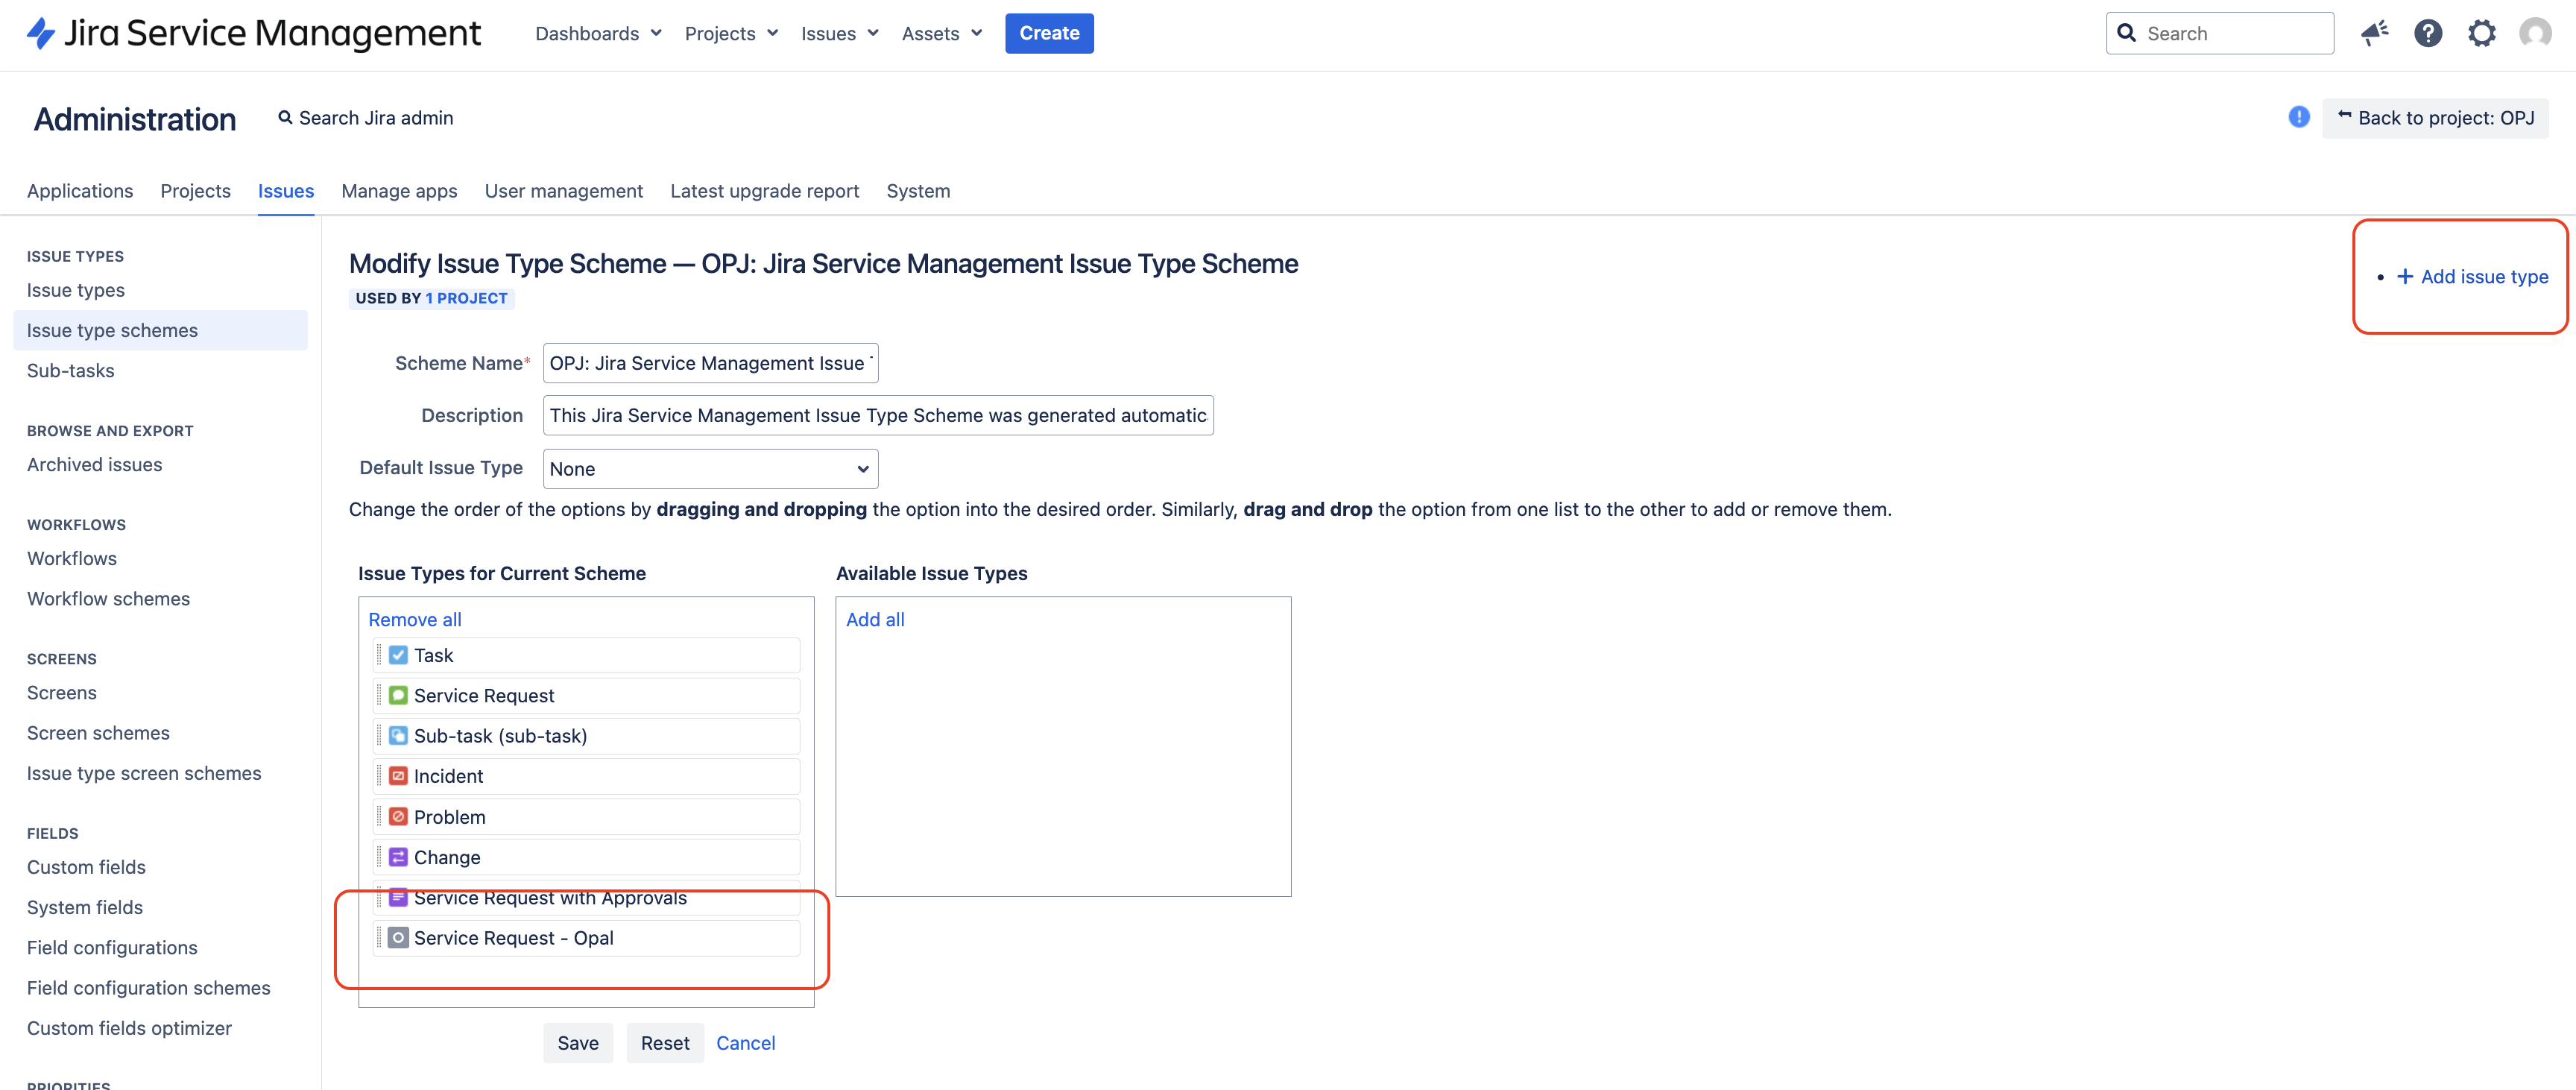
1. **Create an Issue Type: `Service Request - Opal`**
By clicking "Search for tickets", a list of Jira tickets will appear, only including tickets which are assigned to you in Jira (the Jira account which corresponds to your Opal email address).
Click on any of these support tickets to attach the ticket to the access request.
By default, an expiration time bound is required when making any access request. After the request is approved, access expiration is determined by the combination of this expiration time bound and the closure of the support ticket. Access will expire according to the minimum of these two events: if the ticket is closed before the expiration time bound is reached, access will be revoked when the ticket is closed. Similarly, if the expiration time bound is reached before the closure of the ticket, access is revoked when the expiration time bound is reached.
If you want to attach an access request to a support ticket, without an expiration time bound, you may select "Indefinite" under the expiration options and bind the request to a support ticket.
## Jira Service Management
Most functionality is the same between Jira Software and Jira Service Managent projects. The key differences are:
1. Ticket links in Opal to Jira Service Management requests will show the requestor-facing URL rather than the agent URL. This requires setting up a request type `Access Change - Opal`.
2. If the access requestor in Opal does not have a Jira account, Opal will attempt to create a Jira customer account.
### Jira Service Management Project Setup
1. **Create an Issue Type: `Service Request - Opal`**
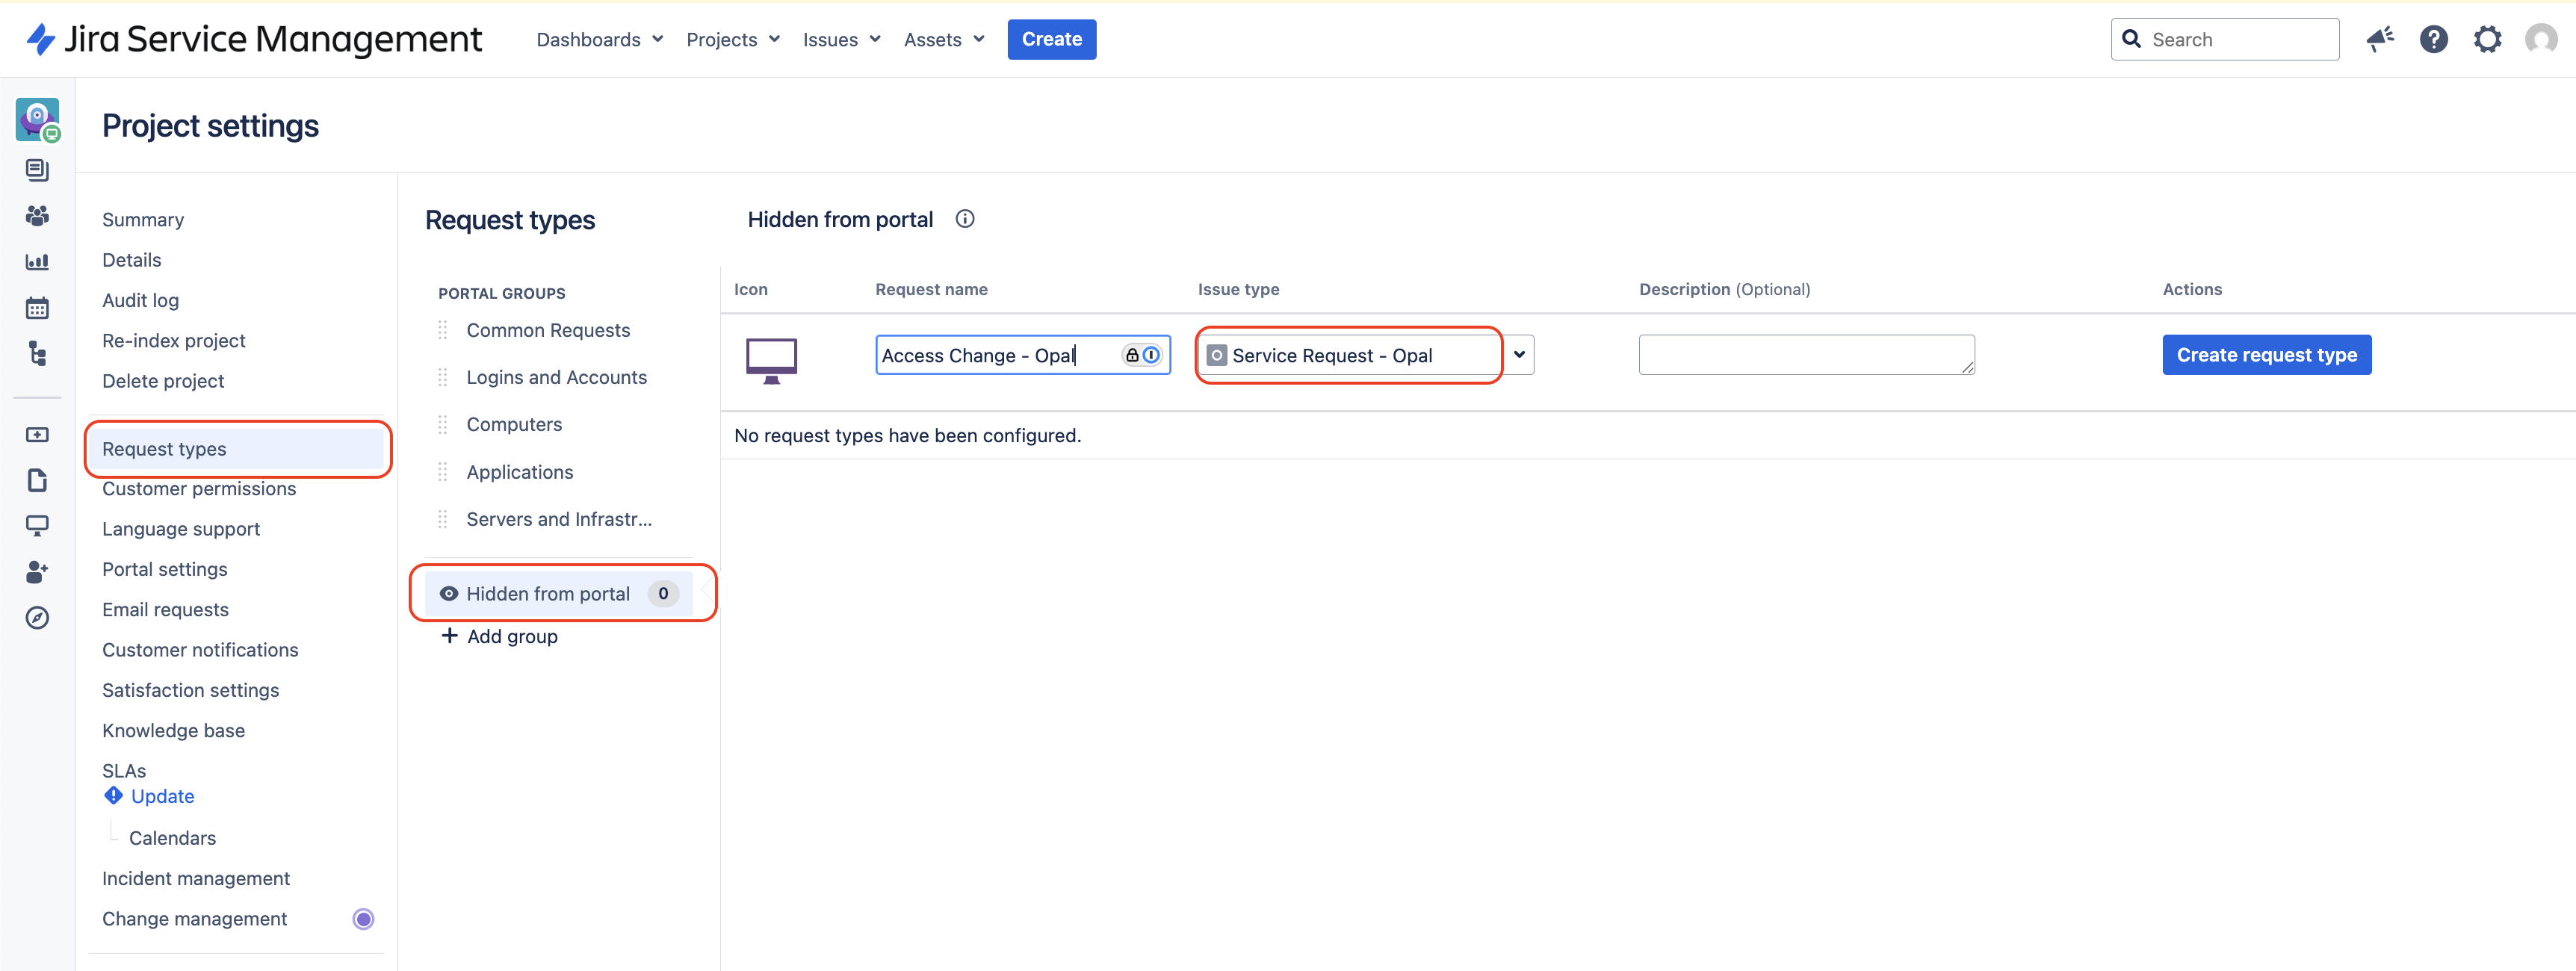
 2. **Create a Request Type `Access Change - Opal`.**
Ensure that the Issue Type is `Service Request - Opal` Opal sets tickets to this request type in order to generate the requestor-facing URL. We recommend hiding this request type from the portal in order to separate Opal requests.
2. **Create a Request Type `Access Change - Opal`.**
Ensure that the Issue Type is `Service Request - Opal` Opal sets tickets to this request type in order to generate the requestor-facing URL. We recommend hiding this request type from the portal in order to separate Opal requests.
 3. **Enable the `Request Type/Customer Request Type` and `Reporter` field on the screens associated with your Issue Type**
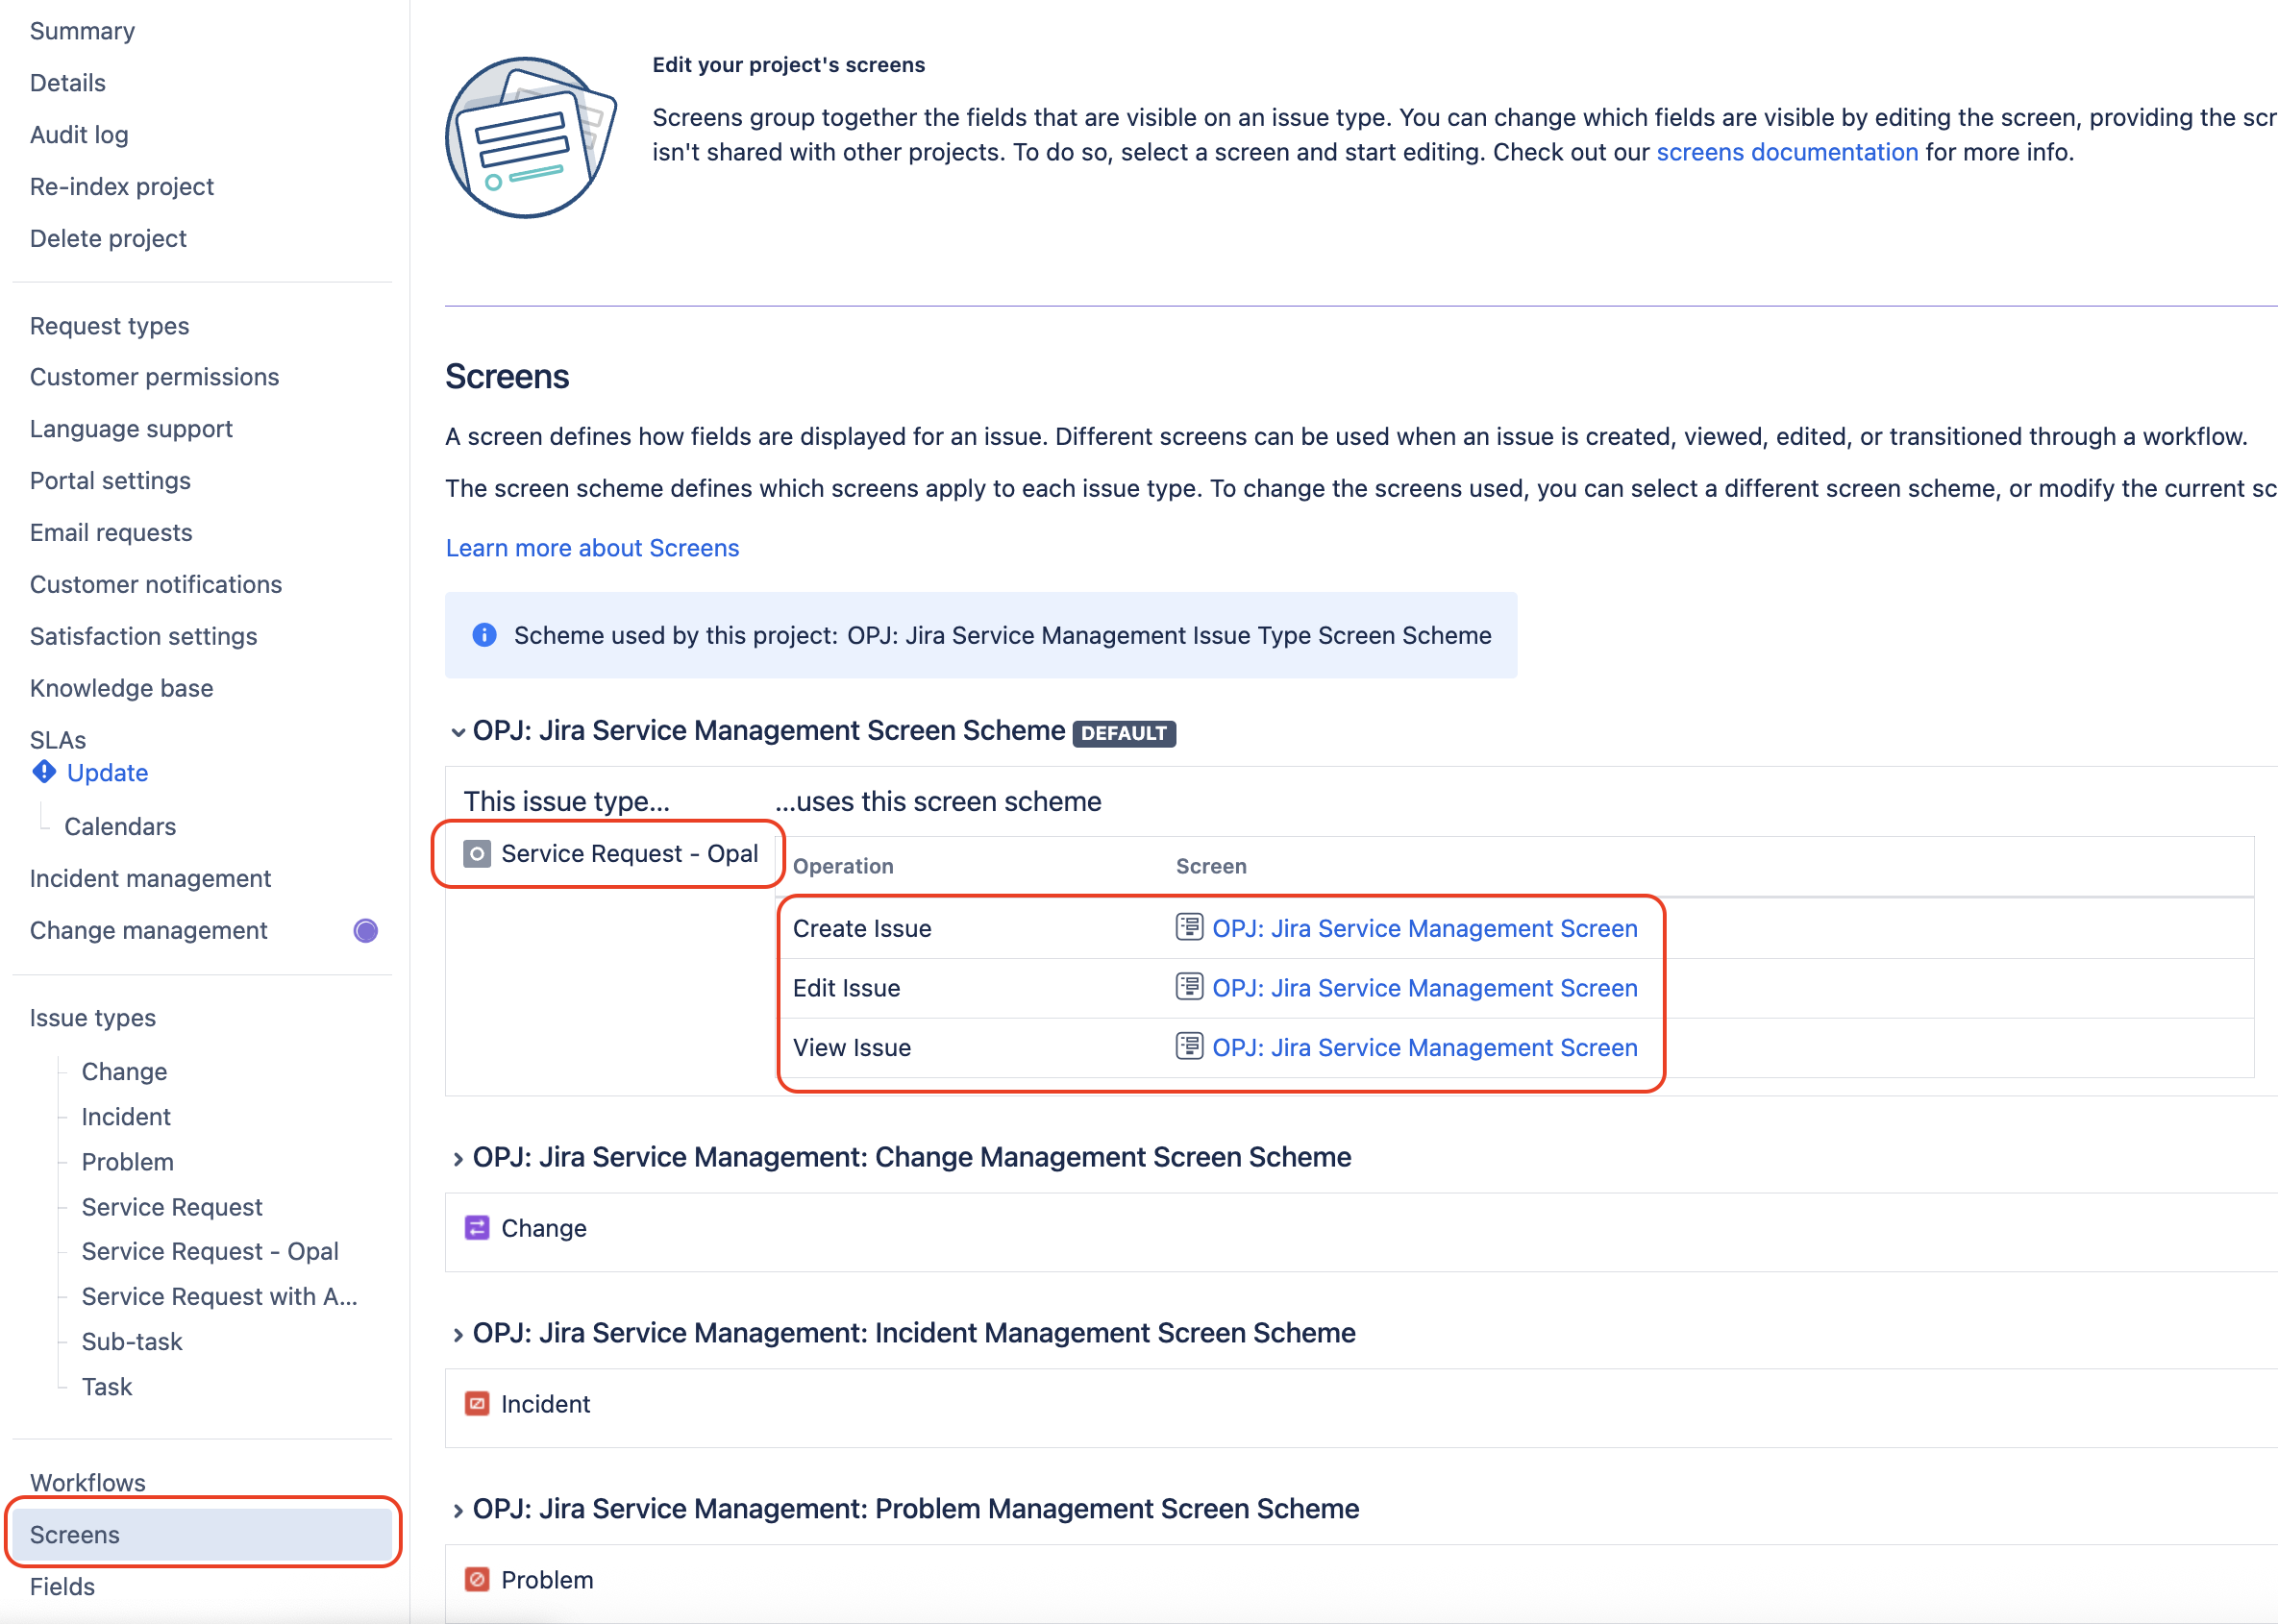
In your Project Settings, go to `Screens` and find the one associated with your Issue Type (`Service Request - Opal`). Each operation may be associated with a different screen. If they are different, you will need to update each screen to include both fields.
3. **Enable the `Request Type/Customer Request Type` and `Reporter` field on the screens associated with your Issue Type**
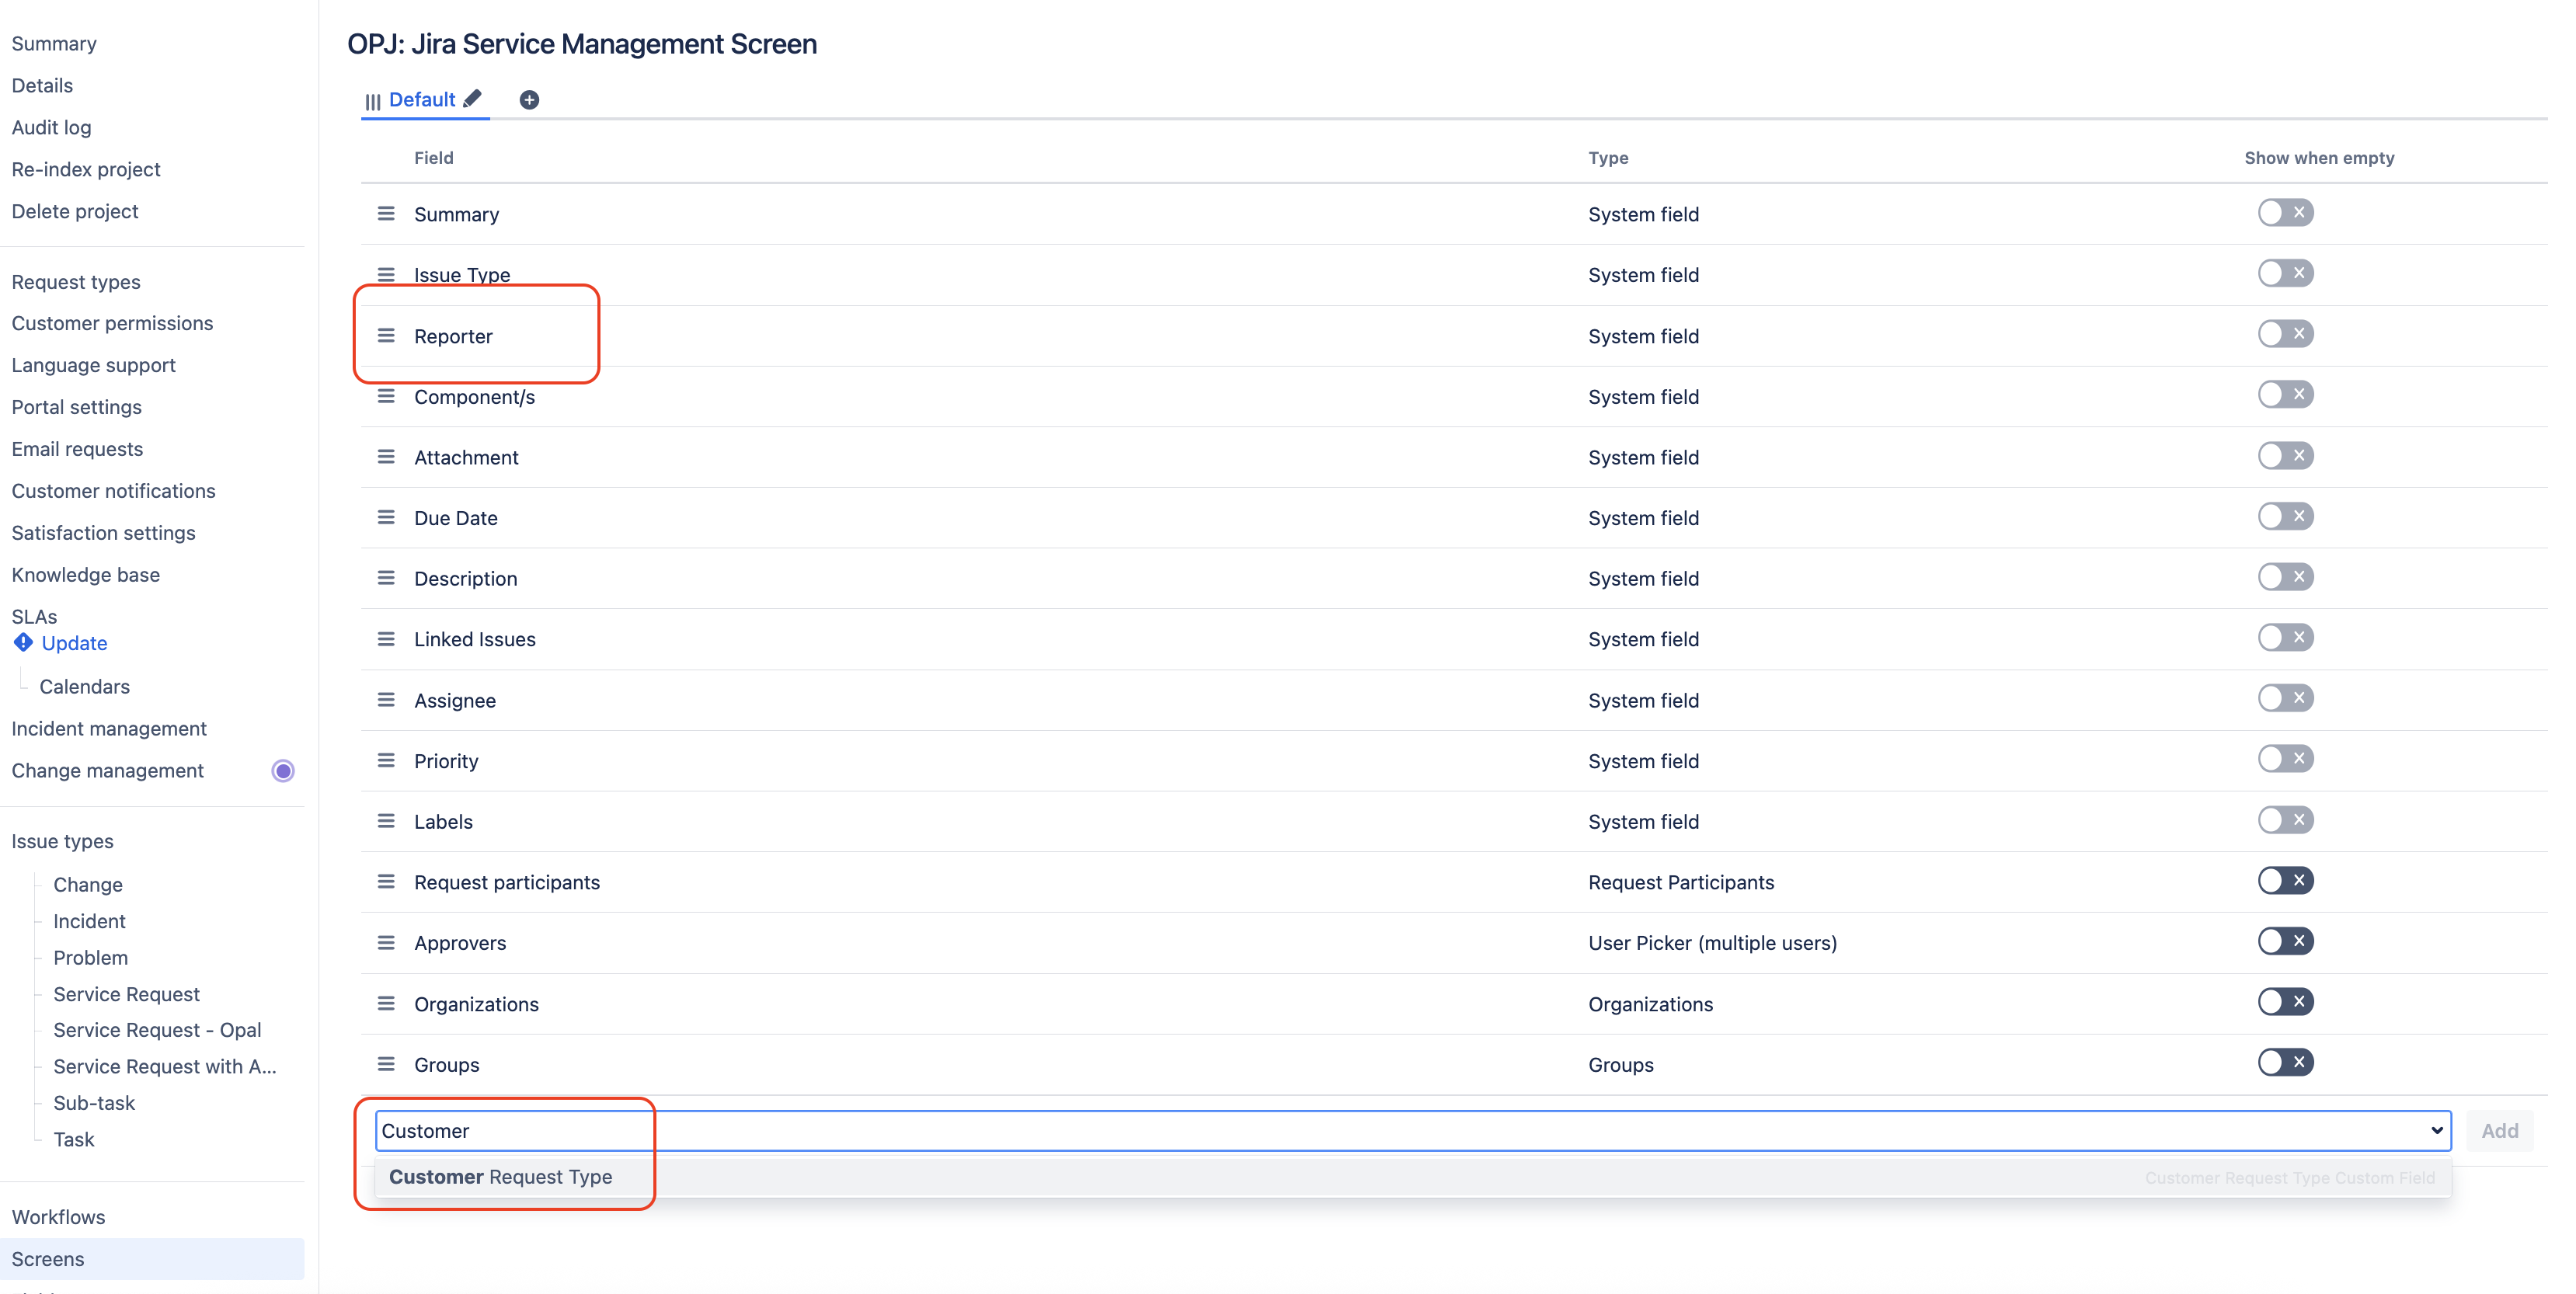
In your Project Settings, go to `Screens` and find the one associated with your Issue Type (`Service Request - Opal`). Each operation may be associated with a different screen. If they are different, you will need to update each screen to include both fields.
 For Jira Cloud customers, the field is `Request Type`.
For Jira Data-Center customers, the field is `Customer Request Type`.
For Jira Cloud customers, the field is `Request Type`.
For Jira Data-Center customers, the field is `Customer Request Type`.
 4. **Enable allowing creation of portal-only accounts.** If an Opal email does not exist in Jira, we will attempt to create a customer account.
### Jira Data-Center - Enable portal-only accounts
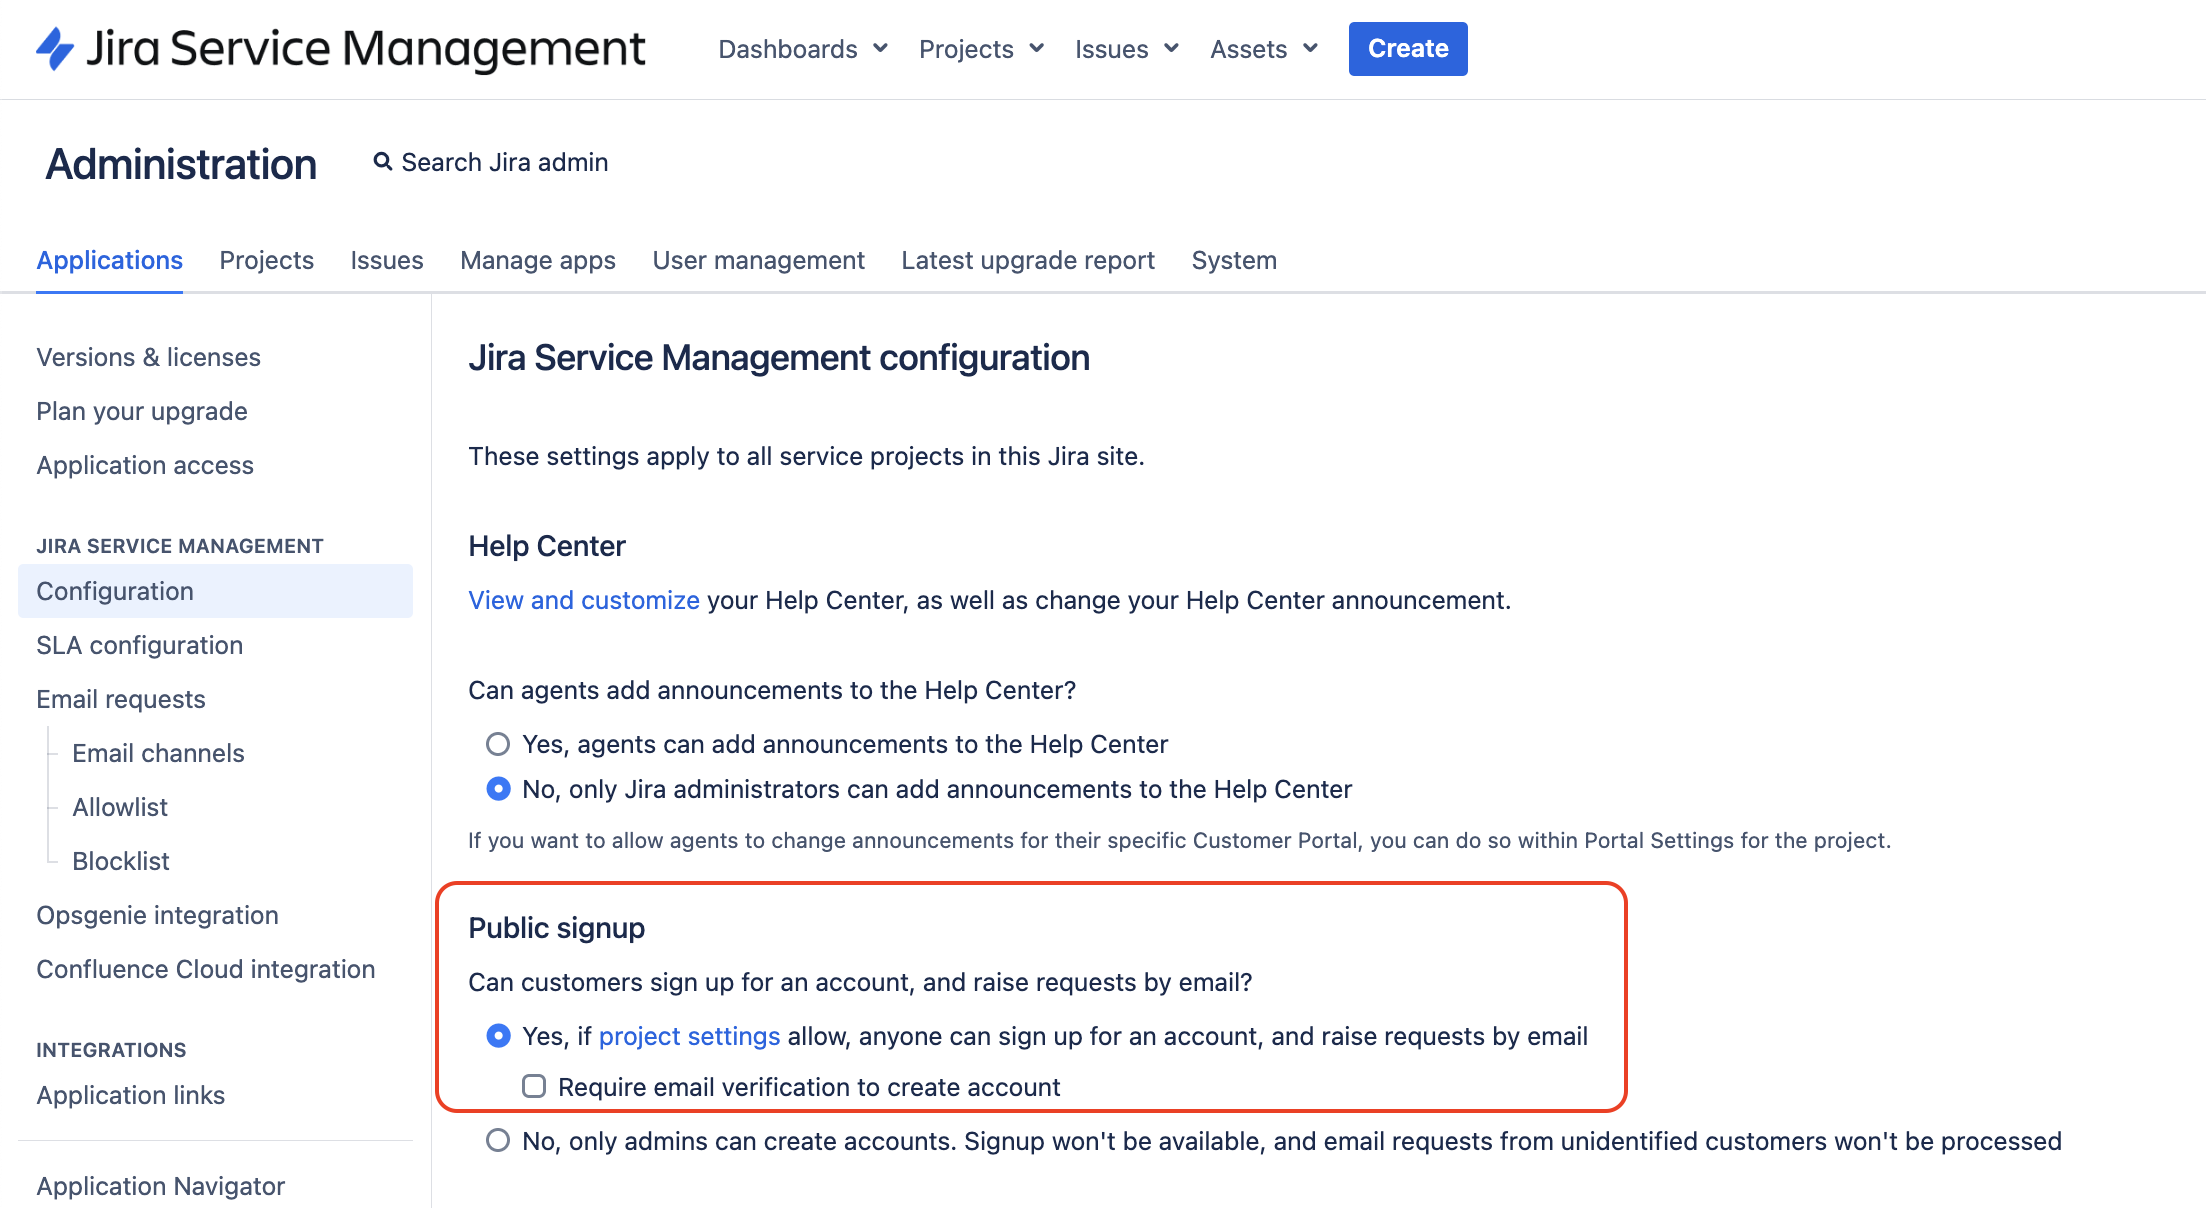
In your admin settings, go to `Configuration` to enable Public signup.
4. **Enable allowing creation of portal-only accounts.** If an Opal email does not exist in Jira, we will attempt to create a customer account.
### Jira Data-Center - Enable portal-only accounts
In your admin settings, go to `Configuration` to enable Public signup.
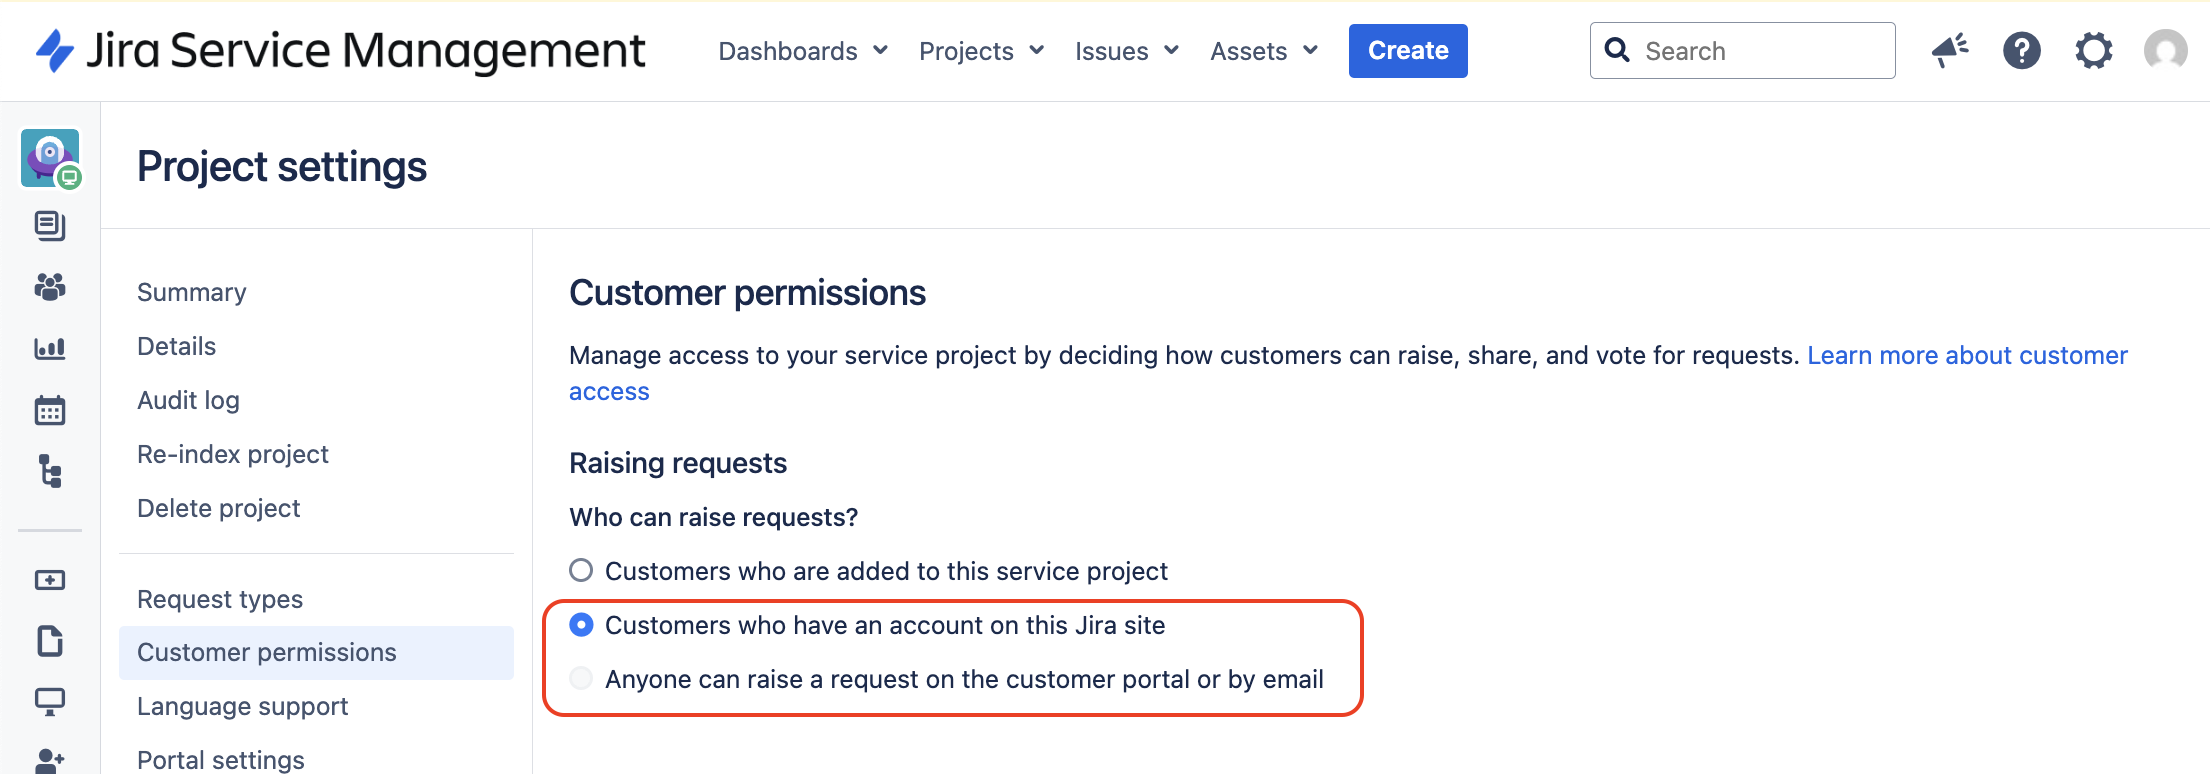
 Enable one of `Customers who have an account on this Jira Site` or `Anyone can raise a request on the customer portal`
 ### Jira Cloud - Enable portal-only accounts
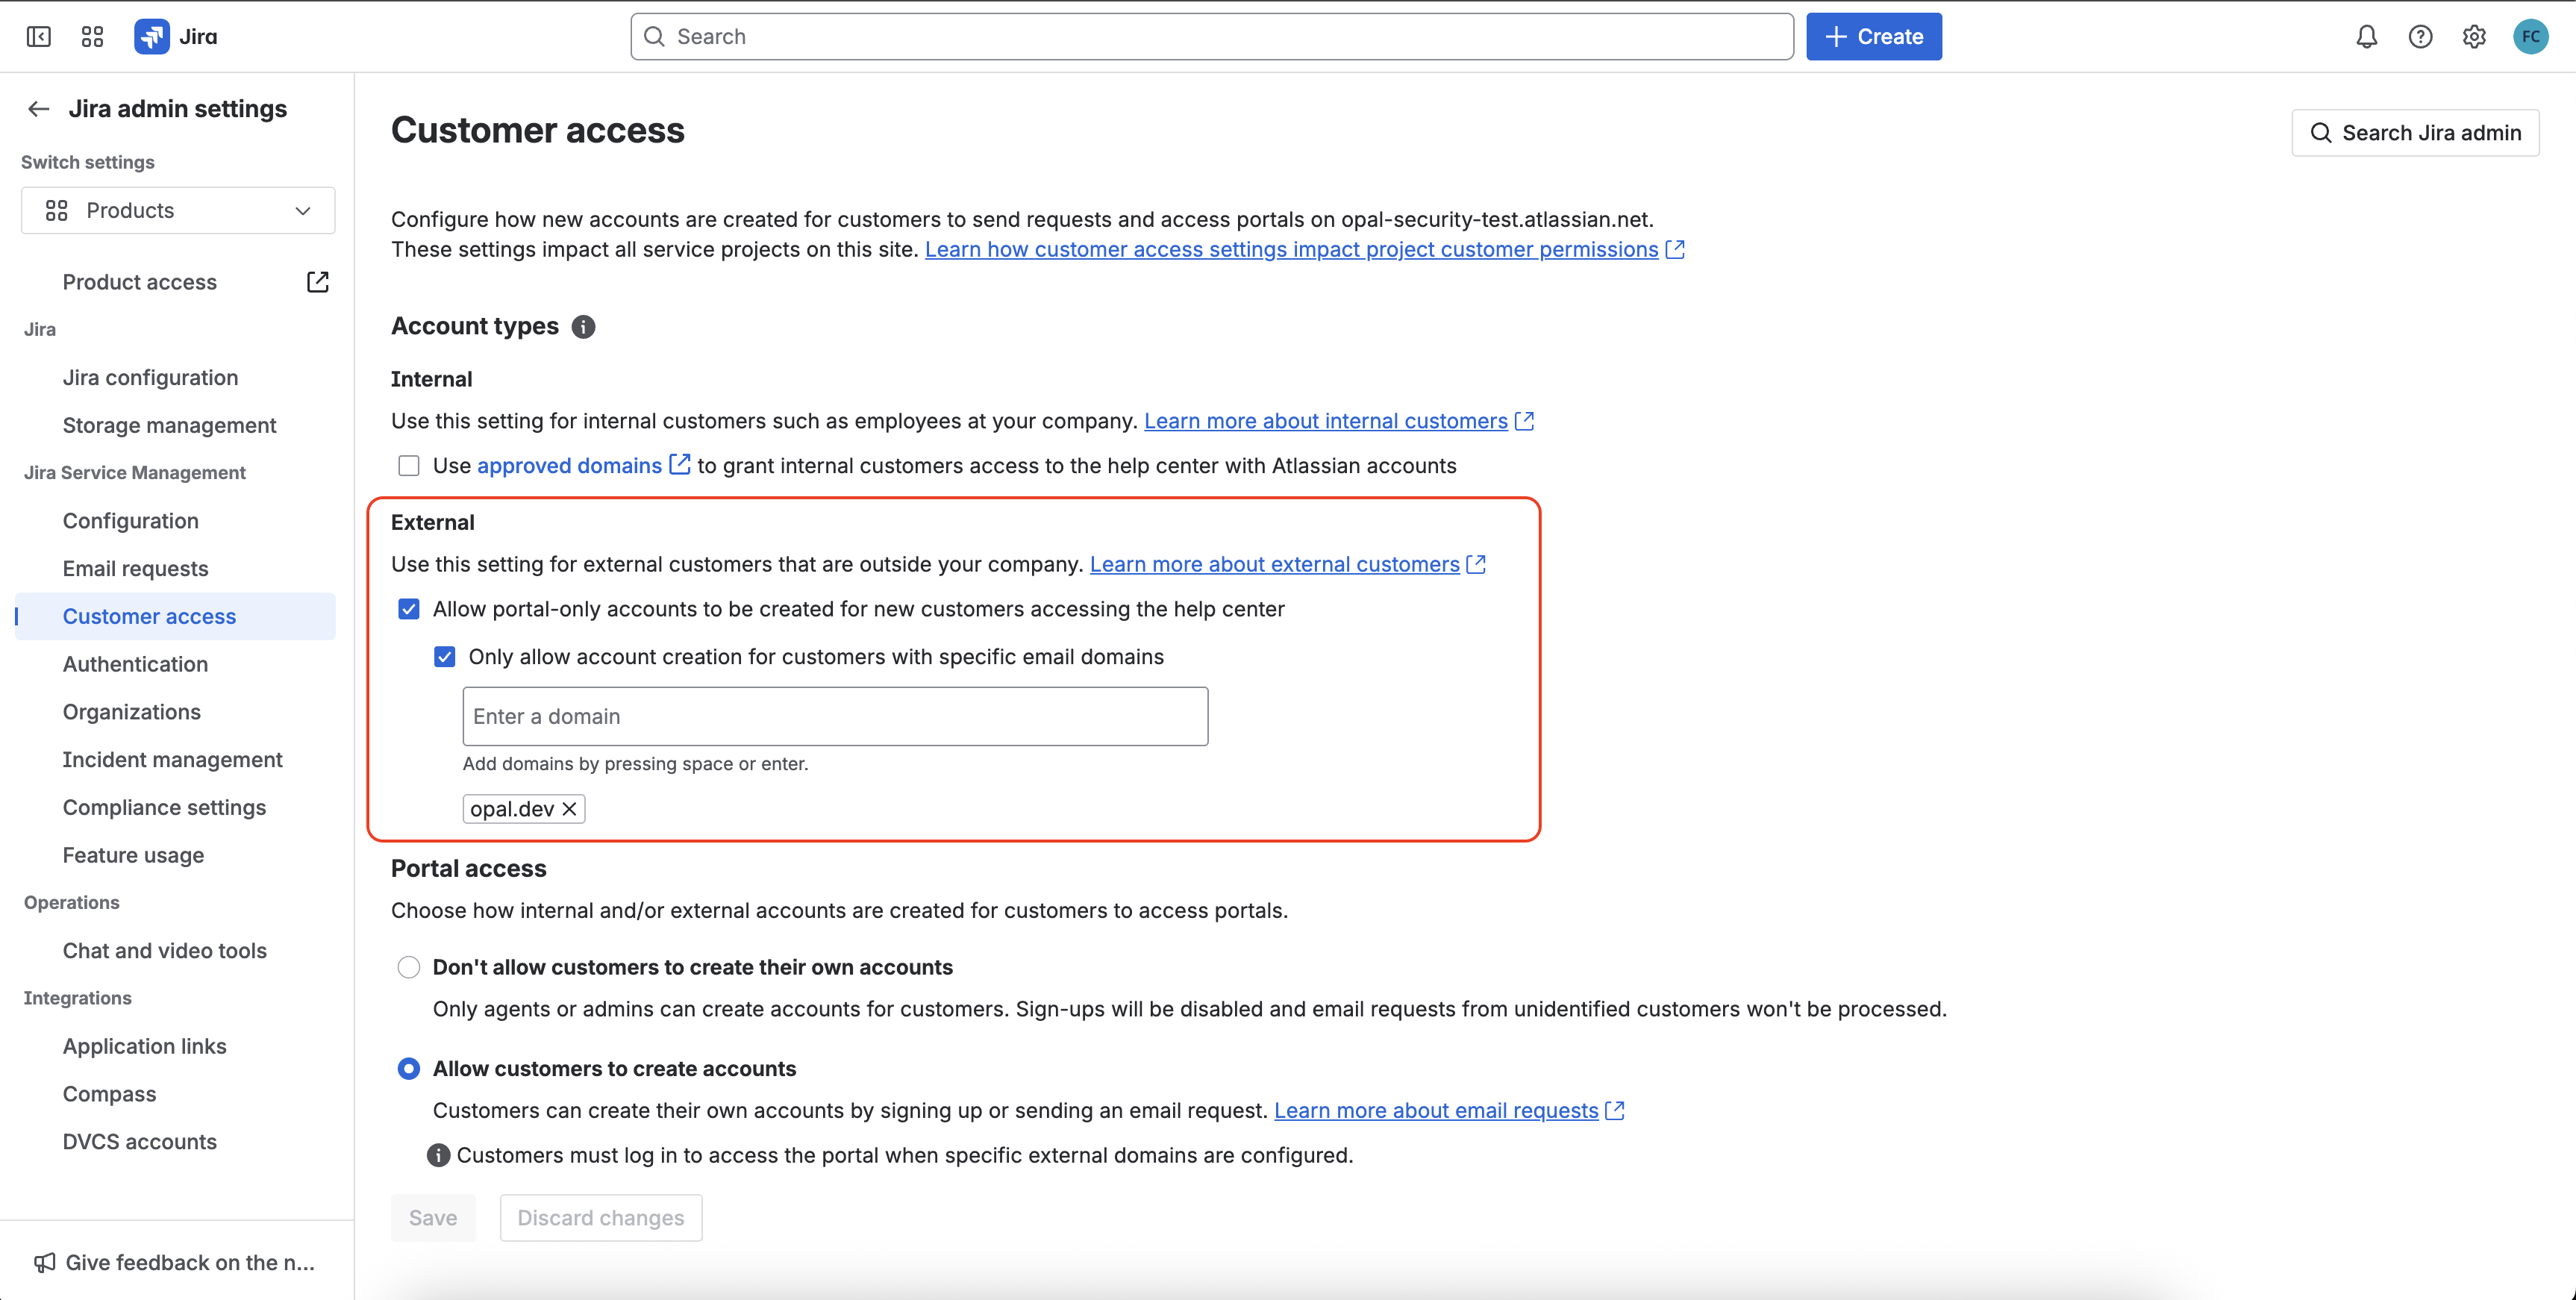
In your admin settings, under `Products` -> `Jira Service Management` -> `Customer Access`. Enable `Allow portal-only accounts to be created for new customers` . This is required in case the email address in Opal does not have a Jira account but would still like to make a request. When creating a ticket, Opal will set the requestor in Opal as the reporter in Jira. This will allow the user to see all their tickets in Jira.
### Jira Cloud - Enable portal-only accounts
In your admin settings, under `Products` -> `Jira Service Management` -> `Customer Access`. Enable `Allow portal-only accounts to be created for new customers` . This is required in case the email address in Opal does not have a Jira account but would still like to make a request. When creating a ticket, Opal will set the requestor in Opal as the reporter in Jira. This will allow the user to see all their tickets in Jira.
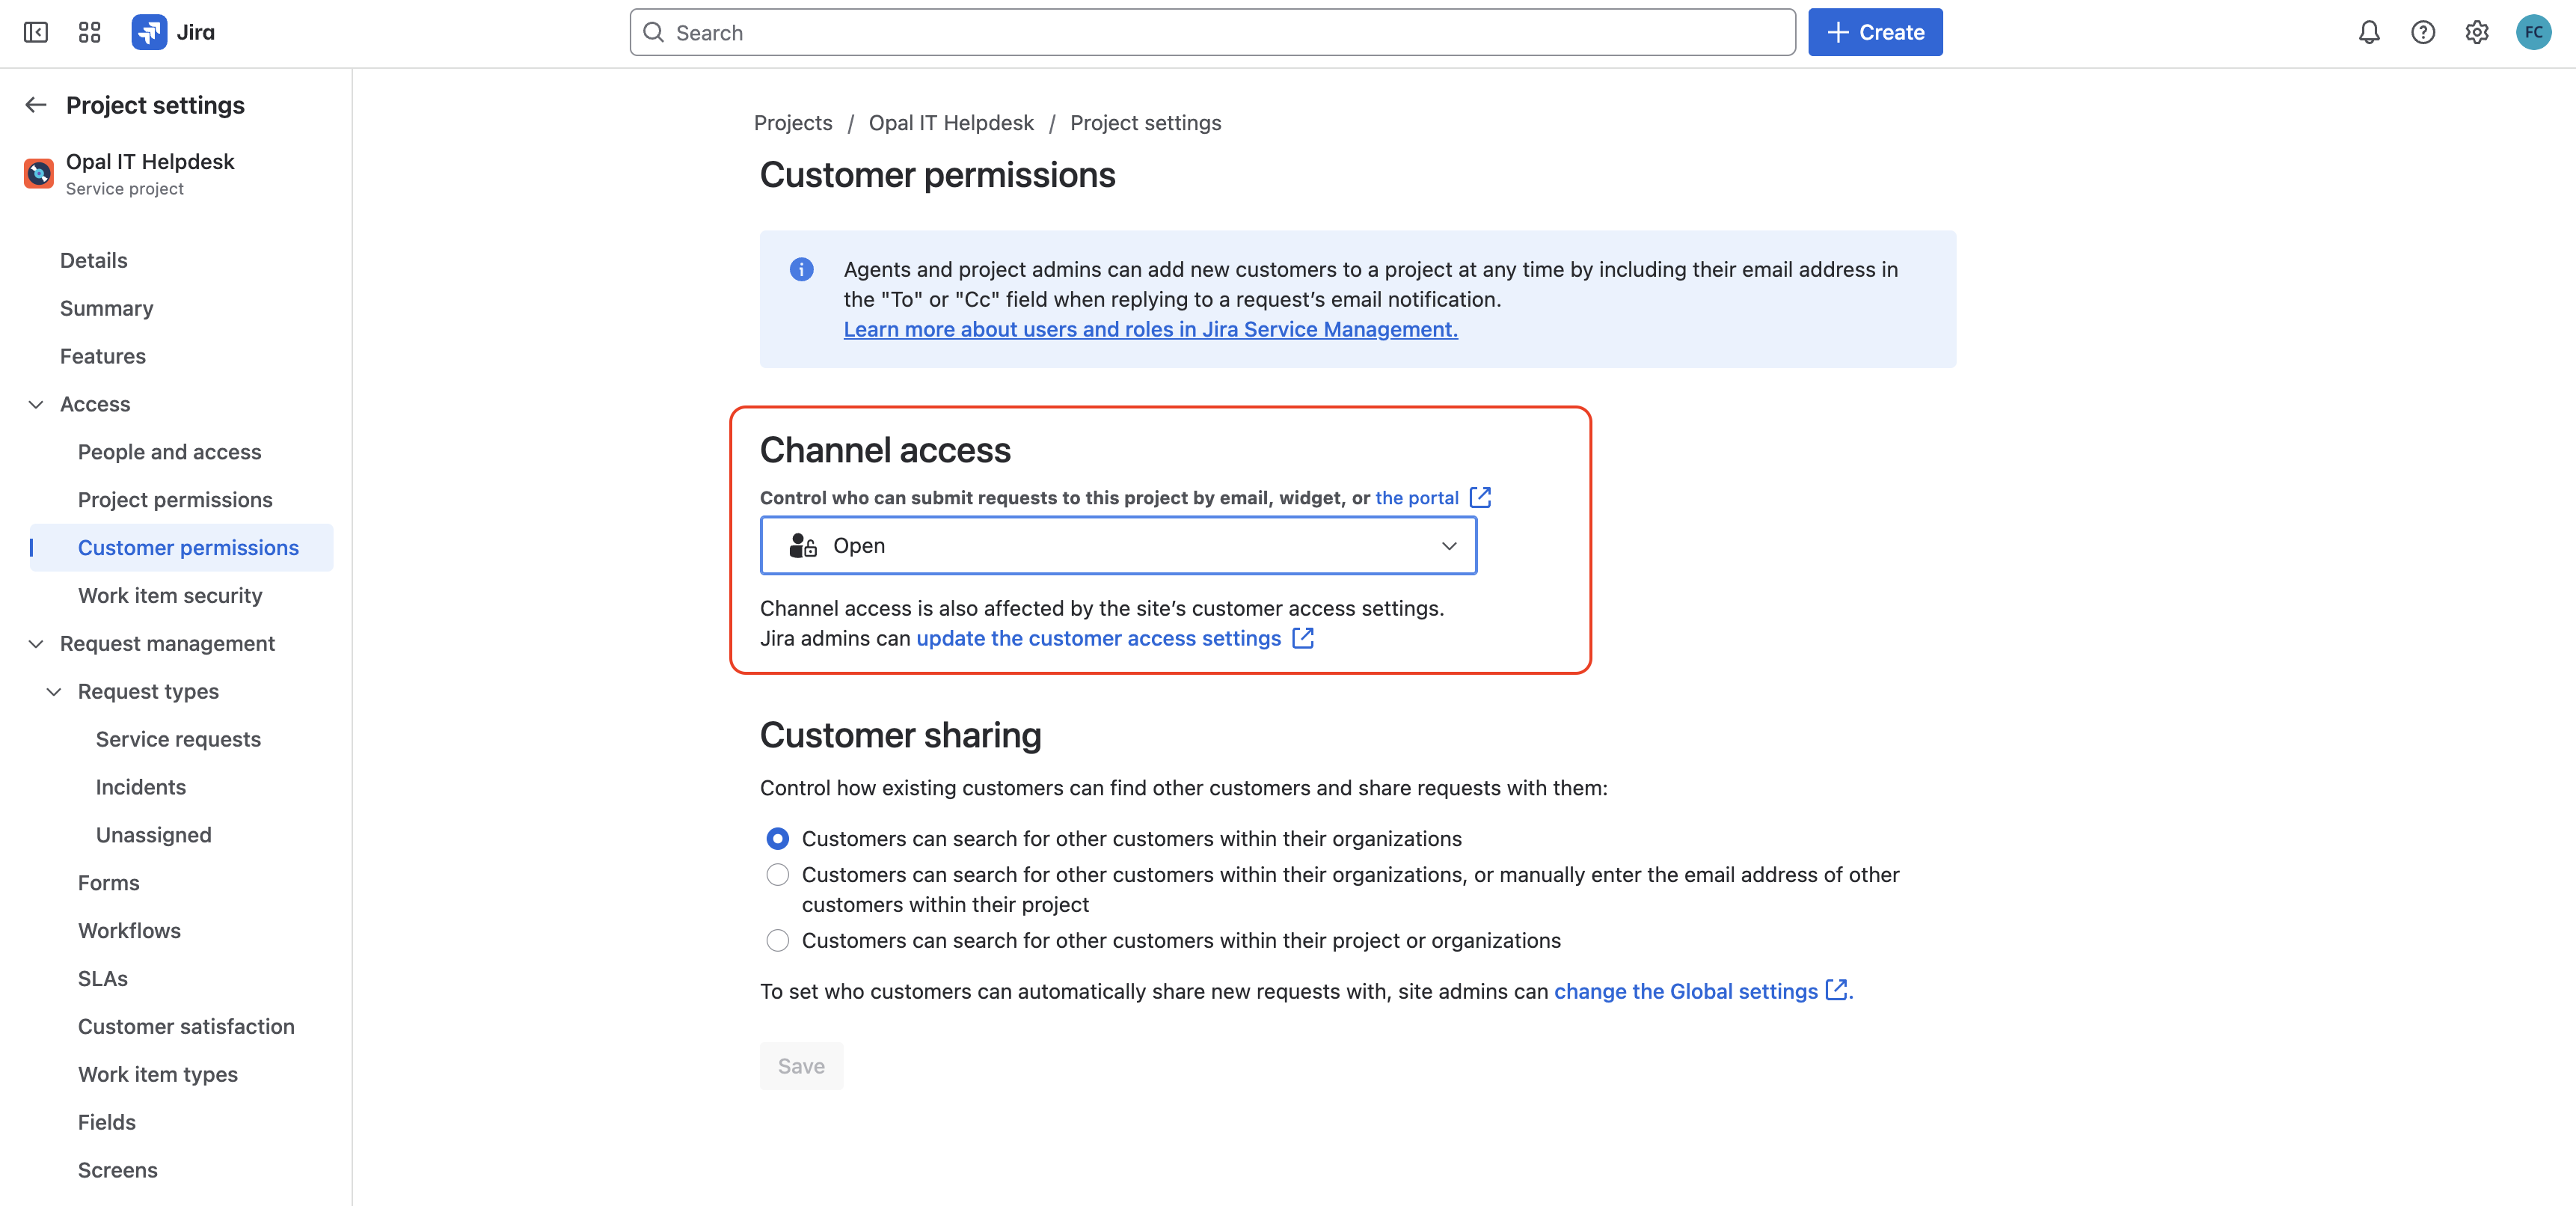
 In the JSM project settings, set `Channel Access` to `Open`
 4. **Enable service accounts to modify the `Reporter` field on a JSM ticket**
In your Jira admin settings, go to `Work Items` -> `Permission Schemes` -> Click on the `Permissions` tab of associated with your JSM project
4. **Enable service accounts to modify the `Reporter` field on a JSM ticket**
In your Jira admin settings, go to `Work Items` -> `Permission Schemes` -> Click on the `Permissions` tab of associated with your JSM project
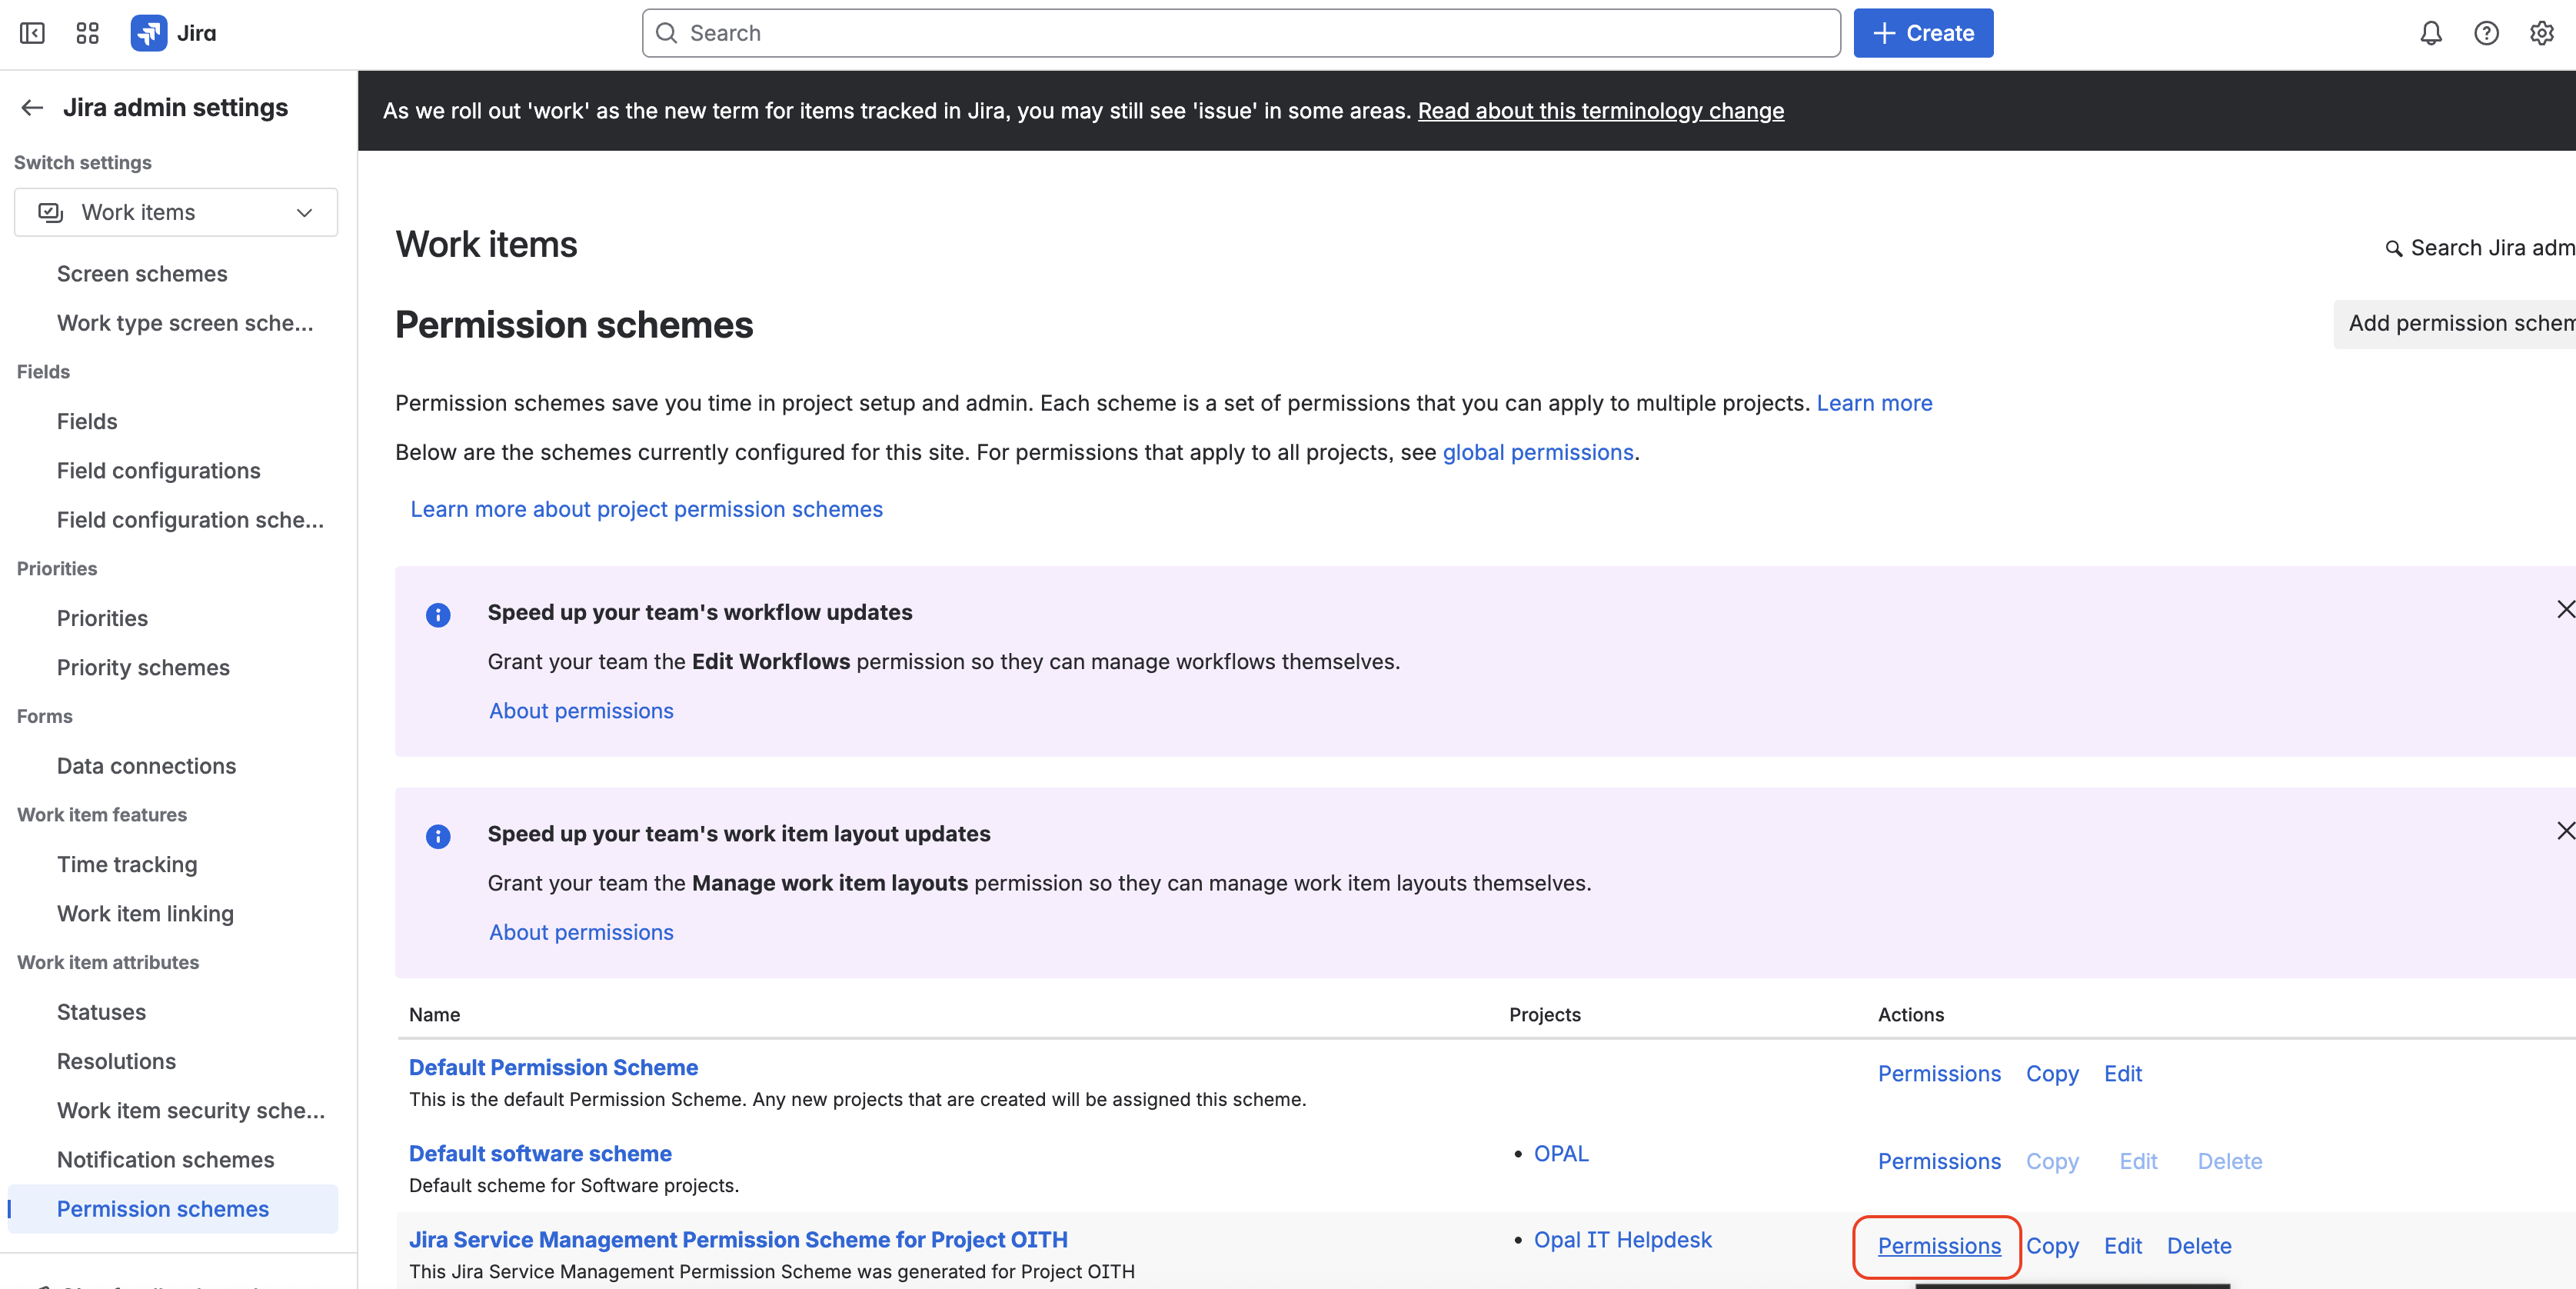 Ensure that the service account used in Opal is granted the `Modify Reporter`permission through a `Project Role` or `Group`
 ***
***