> ## Documentation Index
> Fetch the complete documentation index at: https://docs.opal.dev/llms.txt
> Use this file to discover all available pages before exploring further.
# Add an RDS database
> Add your AWS RDS databases to Opal to allow your developers to request temporary access.
This guide assumes you've already [configured your AWS organization in
Opal](/integrations/setting-up-your-aws-organization-in-opal).
The following diagram illustrates how Opal connects to AWS RDS. Use this guide to learn how you can add RDS databases to Opal.
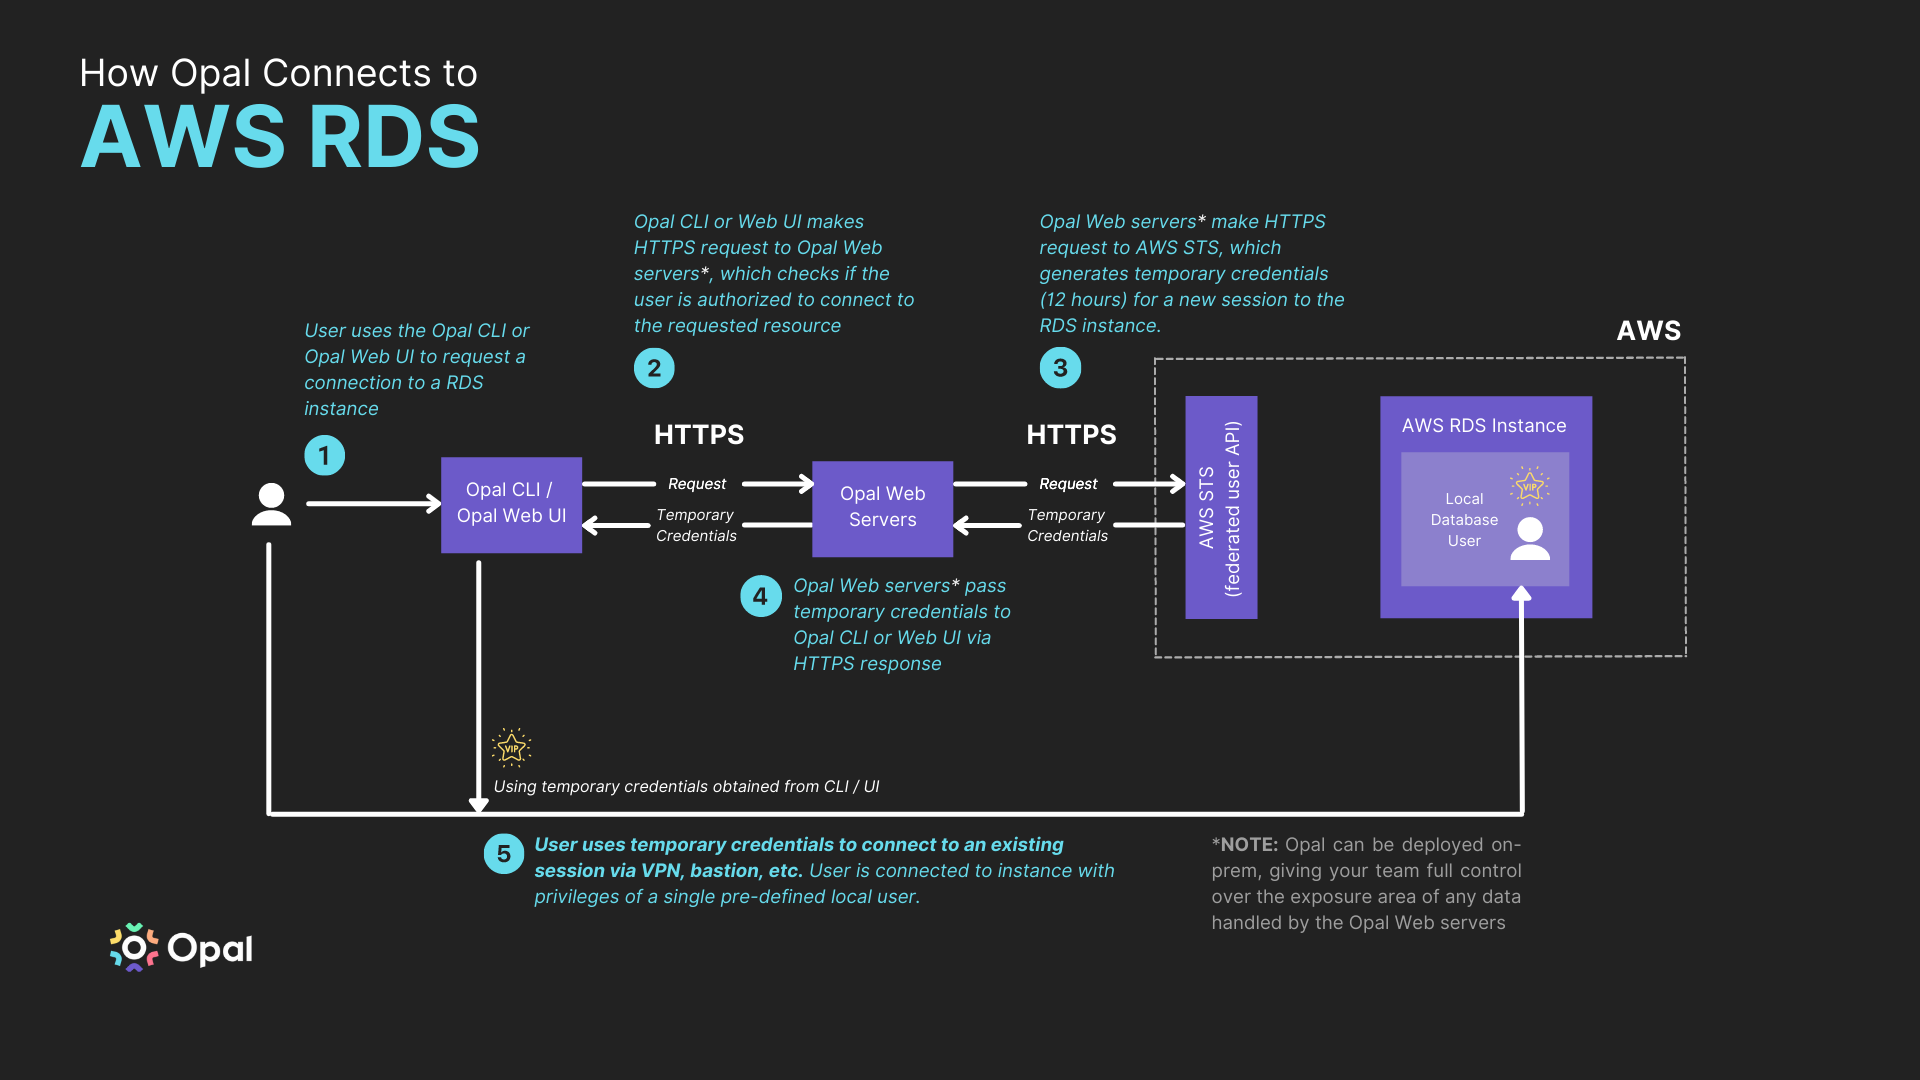 You can add RDS databases to Opal easily using [RDS IAM database authentication](https://docs.aws.amazon.com/AmazonRDS/latest/UserGuide/UsingWithRDS.IAMDBAuth.html).
## Supported RDS engines
Amazon IAM database authentication is available for the following database engines:
* MySQL 8.0, minor version 8.0.16 or higher
* MySQL 5.7, minor version 5.7.16 or higher
* MySQL 5.6, minor version 5.6.34 or higher
* PostgreSQL 14, 13, 12, and 11, all minor versions
* PostgreSQL 10, minor version 10.6 or higher
* PostgreSQL 9.6, minor version 9.6.11 or higher
* PostgreSQL 9.5, minor version 9.5.15 or higher Don't see what you want here? Let us know by suggesting an edit or [reaching out](mailto:support@opal.dev) and we'll make it happen.
## Add an RDS database
### 1. Enable IAM authentication
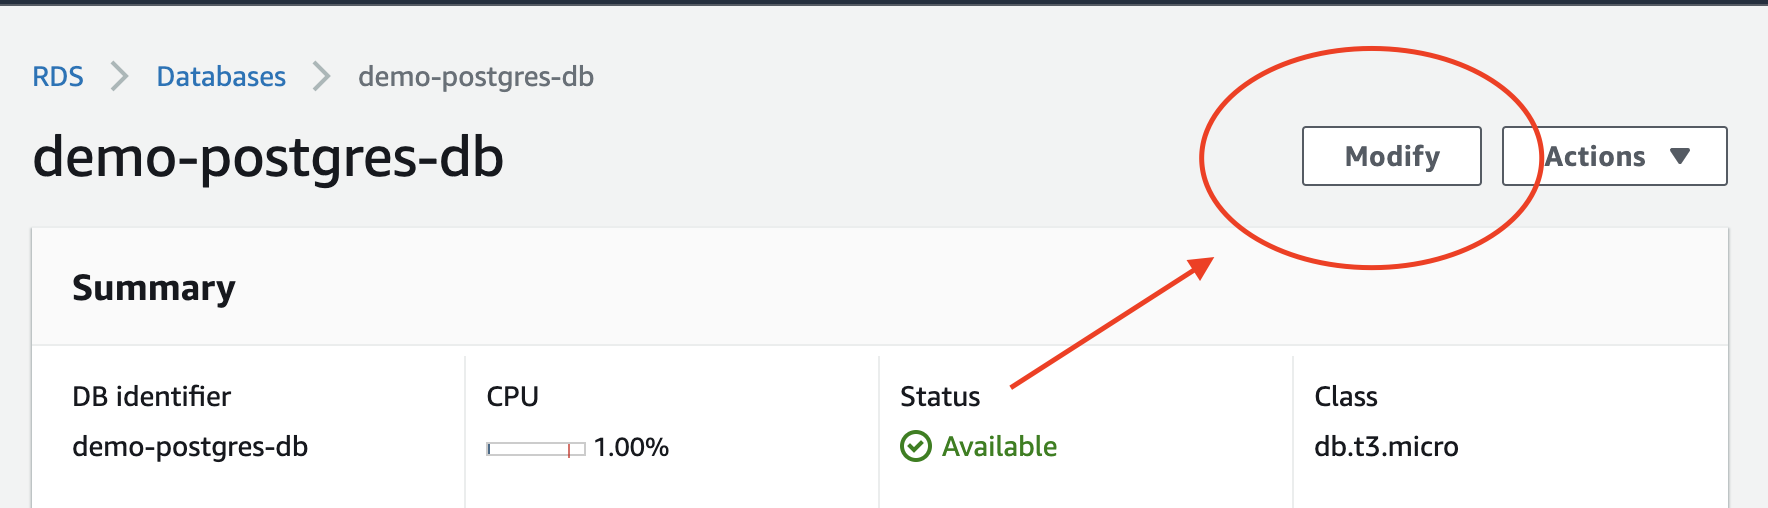
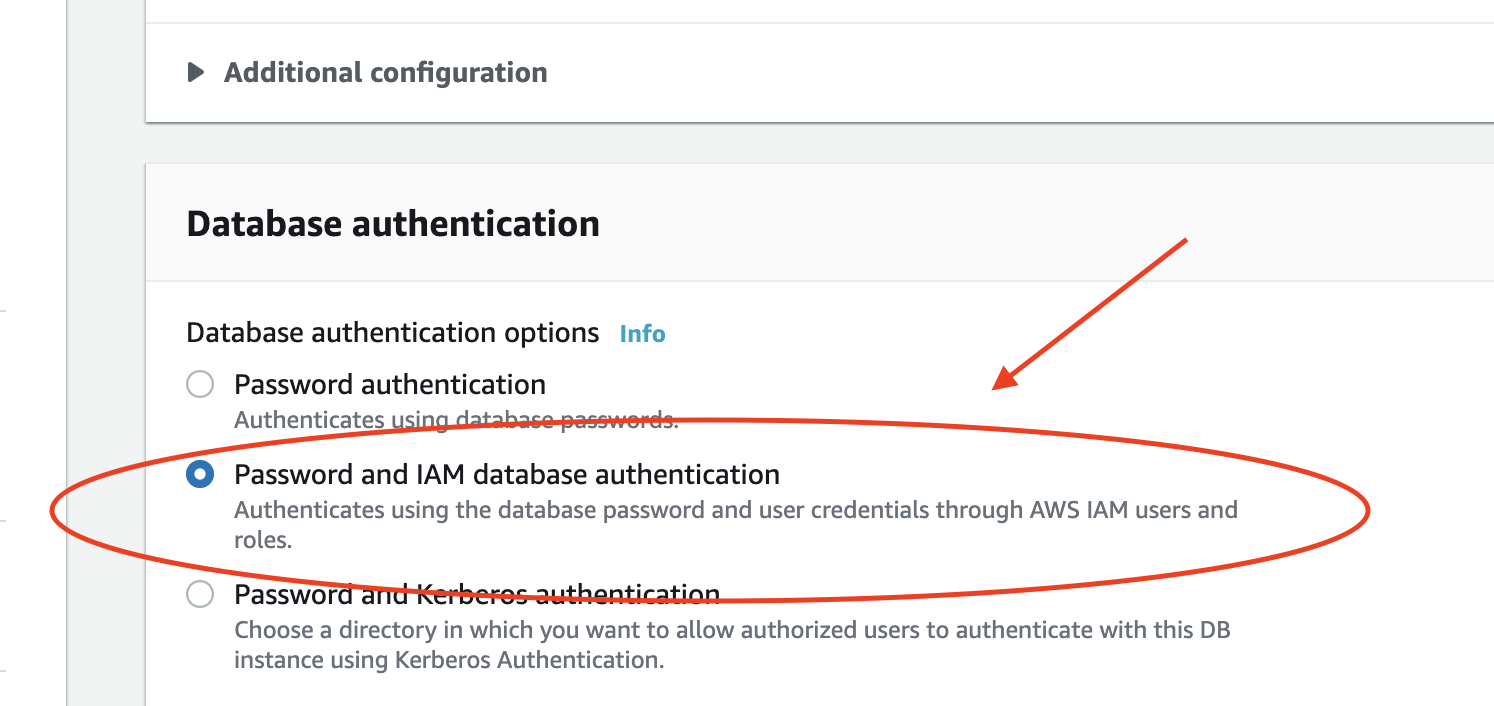
You'll need to enable IAM database authentication for your RDS instance. You can do this using the AWS Console and CLI. You can read more on how to do this [here in the AWS official documentation](https://docs.aws.amazon.com/AmazonRDS/latest/UserGuide/UsingWithRDS.IAMDBAuth.Enabling.html).
#### AWS Console
You can add RDS databases to Opal easily using [RDS IAM database authentication](https://docs.aws.amazon.com/AmazonRDS/latest/UserGuide/UsingWithRDS.IAMDBAuth.html).
## Supported RDS engines
Amazon IAM database authentication is available for the following database engines:
* MySQL 8.0, minor version 8.0.16 or higher
* MySQL 5.7, minor version 5.7.16 or higher
* MySQL 5.6, minor version 5.6.34 or higher
* PostgreSQL 14, 13, 12, and 11, all minor versions
* PostgreSQL 10, minor version 10.6 or higher
* PostgreSQL 9.6, minor version 9.6.11 or higher
* PostgreSQL 9.5, minor version 9.5.15 or higher Don't see what you want here? Let us know by suggesting an edit or [reaching out](mailto:support@opal.dev) and we'll make it happen.
## Add an RDS database
### 1. Enable IAM authentication
You'll need to enable IAM database authentication for your RDS instance. You can do this using the AWS Console and CLI. You can read more on how to do this [here in the AWS official documentation](https://docs.aws.amazon.com/AmazonRDS/latest/UserGuide/UsingWithRDS.IAMDBAuth.Enabling.html).
#### AWS Console
 #### AWS CLI
```shell shell theme={null}
aws rds modify-db-instance \
--db-instance-identifier mydbinstance \
--apply-immediately \
--enable-iam-database-authentication
```
Enabling IAM Authentication **requires a brief outage** for your RDS database.
### 2. Create database users
Connect to your database and create a database user with read-only access. Here is a snippet you can use for Postgres and MySQL.
```pgsql pgsql theme={null}
-- Create a group
CREATE ROLE readaccess;
-- Grant access to existing tables
GRANT USAGE ON SCHEMA public TO readaccess;
GRANT SELECT ON ALL TABLES IN SCHEMA public TO readaccess;
-- Grant access to future tables
ALTER DEFAULT PRIVILEGES IN SCHEMA public GRANT SELECT ON TABLES TO readaccess;
-- Create a user with IAM authentication
CREATE USER readonly; -- NOTE: THIS USERNAME IS REQUIRED
GRANT readaccess TO readonly;
GRANT rds_iam TO readonly;
CREATE USER fullaccess; -- NOTE: THIS USERNAME IS REQUIRED
GRANT rds_superuser TO fullaccess;
GRANT rds_iam TO fullaccess;
```
```mysql mysql theme={null}
-- NOTE: The usernames readonly and fullaccess are required
GRANT SELECT ON *.* TO 'readonly'@'%' IDENTIFIED WITH AWSAuthenticationPlugin AS 'RDS';
GRANT SELECT ON *.* TO 'readonly'@'%' WITH GRANT OPTION;
CREATE USER 'fullaccess'@'%' IDENTIFIED WITH AwsAuthenticationPlugin AS 'RDS';
GRANT SELECT, INSERT, UPDATE, DELETE, CREATE, DROP, RELOAD, PROCESS, REFERENCES,
INDEX, ALTER, SHOW DATABASES, CREATE TEMPORARY TABLES, LOCK TABLES,
EXECUTE, REPLICATION SLAVE, REPLICATION CLIENT, CREATE VIEW, SHOW VIEW,
CREATE ROUTINE, ALTER ROUTINE, CREATE USER, EVENT,
TRIGGER ON *.* TO 'fullaccess'@'%' WITH GRANT OPTION;
FLUSH PRIVILEGES;
```
#### Custom Database Users
If you'd like to instead define your own database users with custom amounts of access, you can do that easily in one of two ways: through Opal UI, or with tags.
#### Opal UI
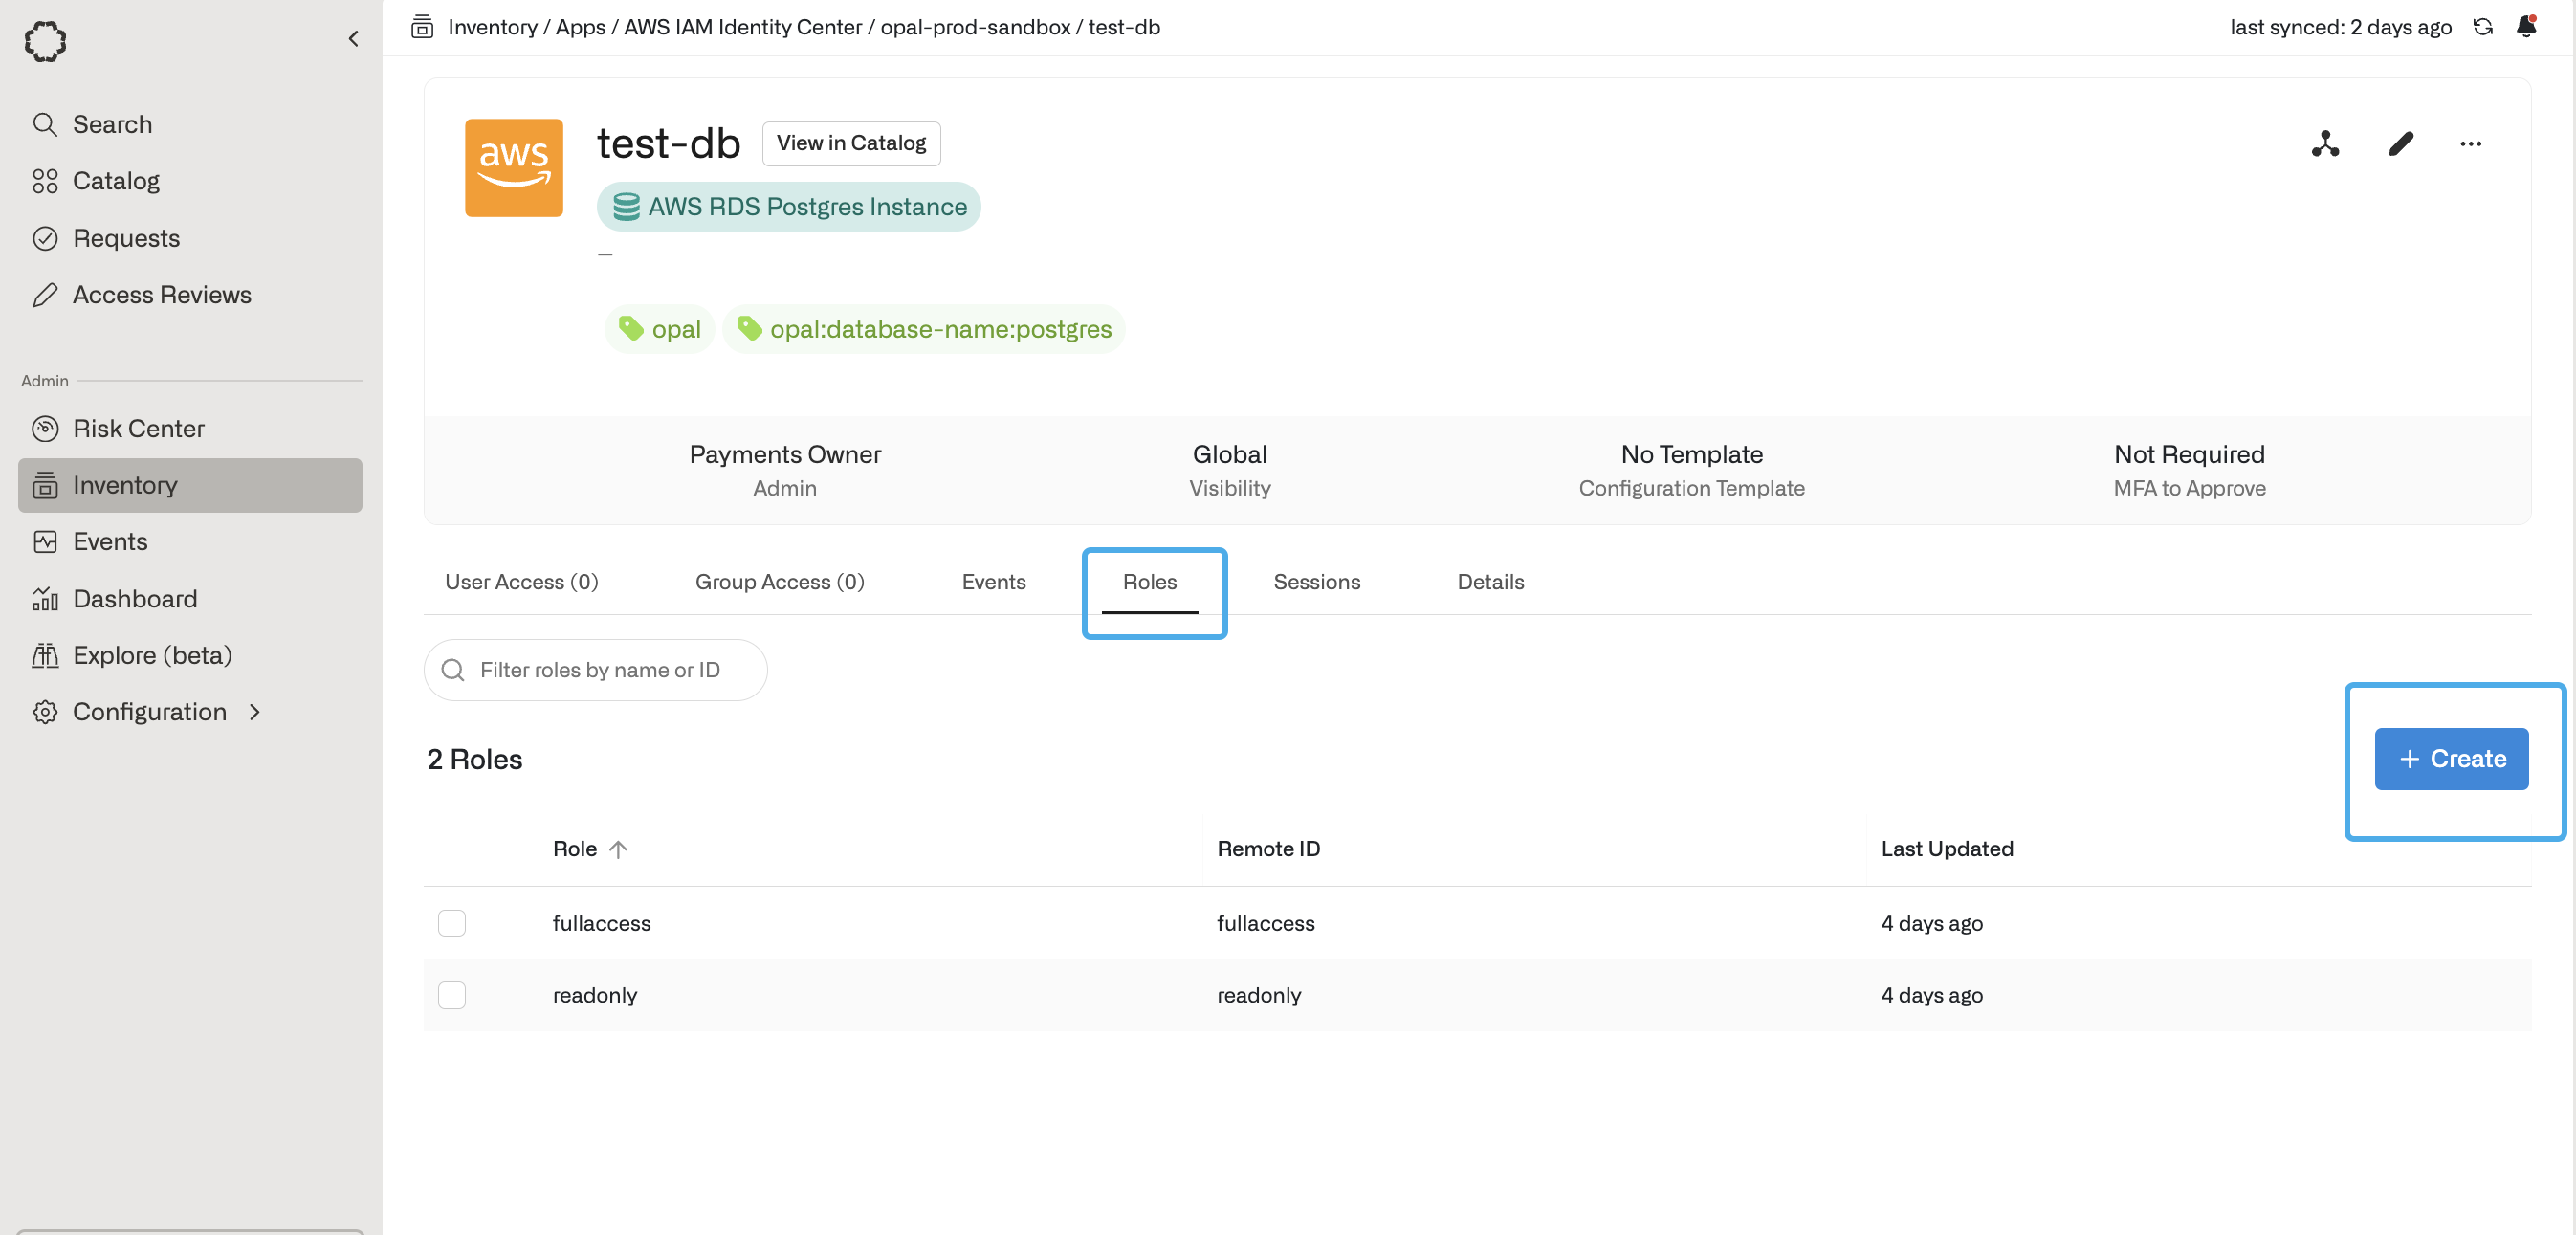
1. In the **Inventory**, go to the **Roles** tab of the RDS instance, then select **+ Create**.
#### AWS CLI
```shell shell theme={null}
aws rds modify-db-instance \
--db-instance-identifier mydbinstance \
--apply-immediately \
--enable-iam-database-authentication
```
Enabling IAM Authentication **requires a brief outage** for your RDS database.
### 2. Create database users
Connect to your database and create a database user with read-only access. Here is a snippet you can use for Postgres and MySQL.
```pgsql pgsql theme={null}
-- Create a group
CREATE ROLE readaccess;
-- Grant access to existing tables
GRANT USAGE ON SCHEMA public TO readaccess;
GRANT SELECT ON ALL TABLES IN SCHEMA public TO readaccess;
-- Grant access to future tables
ALTER DEFAULT PRIVILEGES IN SCHEMA public GRANT SELECT ON TABLES TO readaccess;
-- Create a user with IAM authentication
CREATE USER readonly; -- NOTE: THIS USERNAME IS REQUIRED
GRANT readaccess TO readonly;
GRANT rds_iam TO readonly;
CREATE USER fullaccess; -- NOTE: THIS USERNAME IS REQUIRED
GRANT rds_superuser TO fullaccess;
GRANT rds_iam TO fullaccess;
```
```mysql mysql theme={null}
-- NOTE: The usernames readonly and fullaccess are required
GRANT SELECT ON *.* TO 'readonly'@'%' IDENTIFIED WITH AWSAuthenticationPlugin AS 'RDS';
GRANT SELECT ON *.* TO 'readonly'@'%' WITH GRANT OPTION;
CREATE USER 'fullaccess'@'%' IDENTIFIED WITH AwsAuthenticationPlugin AS 'RDS';
GRANT SELECT, INSERT, UPDATE, DELETE, CREATE, DROP, RELOAD, PROCESS, REFERENCES,
INDEX, ALTER, SHOW DATABASES, CREATE TEMPORARY TABLES, LOCK TABLES,
EXECUTE, REPLICATION SLAVE, REPLICATION CLIENT, CREATE VIEW, SHOW VIEW,
CREATE ROUTINE, ALTER ROUTINE, CREATE USER, EVENT,
TRIGGER ON *.* TO 'fullaccess'@'%' WITH GRANT OPTION;
FLUSH PRIVILEGES;
```
#### Custom Database Users
If you'd like to instead define your own database users with custom amounts of access, you can do that easily in one of two ways: through Opal UI, or with tags.
#### Opal UI
1. In the **Inventory**, go to the **Roles** tab of the RDS instance, then select **+ Create**.
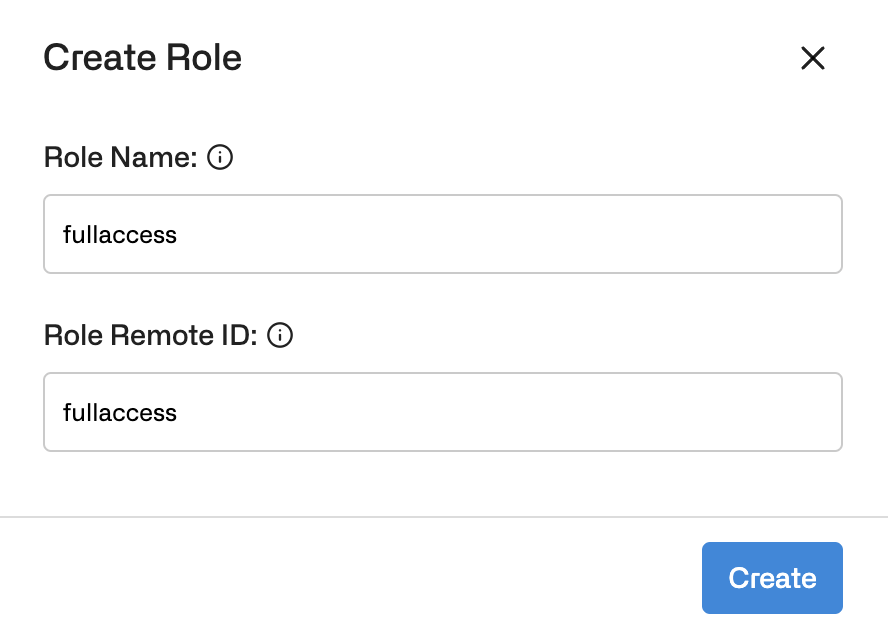
 2. Add a role name, and the database username as the **Role Remote ID**, then select **Create**.
 #### Tags
1. Create the user with any username that you like and grant them `rds_iam` with the following queries:
```pgsql pgsql theme={null}
GRANT rds_iam TO myuser;
```
```mysql mysql theme={null}
CREATE USER myuser IDENTIFIED WITH AwsAuthenticationPlugin AS 'RDS';
```
2. Tag the RDS database with key `opal:user:1` and value `myuser`. You can manage multiple levels of access using more tags! Example: `opal:user:2` => `myseconduser`. To see how to tag your database check out Step 3.
Now the custom database users will show up in Opal as access levels.
AWS supports a maximum of 50 tags on a resource.
### 3. Tag the database
Finally, tag the RDS database with `opal` so Opal knows which RDS databases you'd like Opal to automatically import:
#### AWS Console
#### Tags
1. Create the user with any username that you like and grant them `rds_iam` with the following queries:
```pgsql pgsql theme={null}
GRANT rds_iam TO myuser;
```
```mysql mysql theme={null}
CREATE USER myuser IDENTIFIED WITH AwsAuthenticationPlugin AS 'RDS';
```
2. Tag the RDS database with key `opal:user:1` and value `myuser`. You can manage multiple levels of access using more tags! Example: `opal:user:2` => `myseconduser`. To see how to tag your database check out Step 3.
Now the custom database users will show up in Opal as access levels.
AWS supports a maximum of 50 tags on a resource.
### 3. Tag the database
Finally, tag the RDS database with `opal` so Opal knows which RDS databases you'd like Opal to automatically import:
#### AWS Console
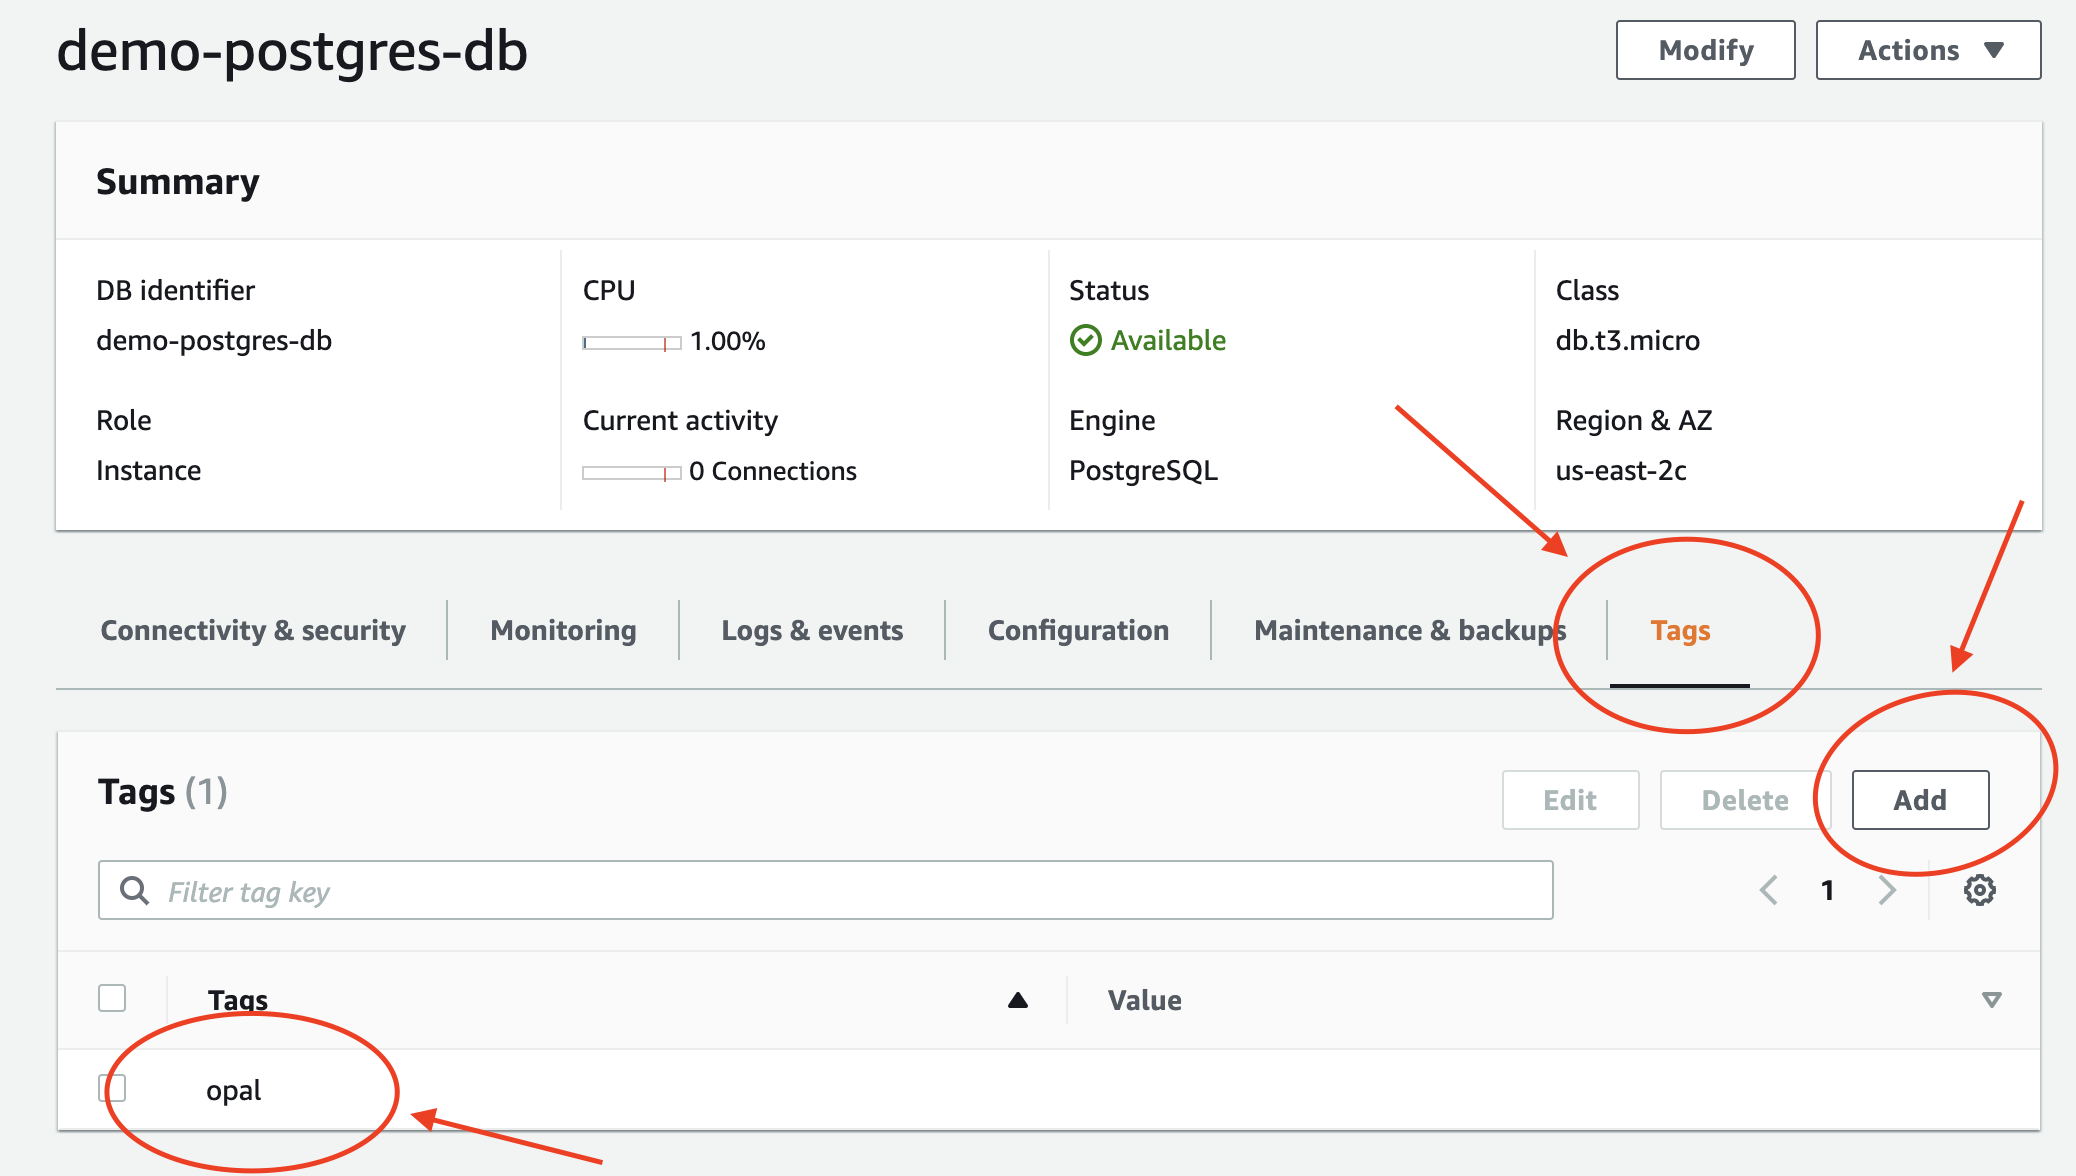 `opal`
#### AWS CLI
```shell shell theme={null}
aws rds add-tags-to-resource \
--resource-name arn:aws:rds:::db: \
--tags "Key=opal,Value="
```
#### Terraform
Add the following `tags` argument to your AWS RDS instance:
```
tags = {
opal = ""
opal:database-name="my_db" // This is optional. By default, Opal will pull the database name from RDS's configuration
}
```
## Access an RDS database in Opal
Once you've successfully tagged an RDS database, it will appear on the Resources page in the **Catalog**. If you followed the steps above, you'll be able to **Connect** with read-only and full access to your database.
Access to RDS databases in Opal is session-based, meaning your developers won't have access unless they initiate a session.
`opal`
#### AWS CLI
```shell shell theme={null}
aws rds add-tags-to-resource \
--resource-name arn:aws:rds:::db: \
--tags "Key=opal,Value="
```
#### Terraform
Add the following `tags` argument to your AWS RDS instance:
```
tags = {
opal = ""
opal:database-name="my_db" // This is optional. By default, Opal will pull the database name from RDS's configuration
}
```
## Access an RDS database in Opal
Once you've successfully tagged an RDS database, it will appear on the Resources page in the **Catalog**. If you followed the steps above, you'll be able to **Connect** with read-only and full access to your database.
Access to RDS databases in Opal is session-based, meaning your developers won't have access unless they initiate a session.
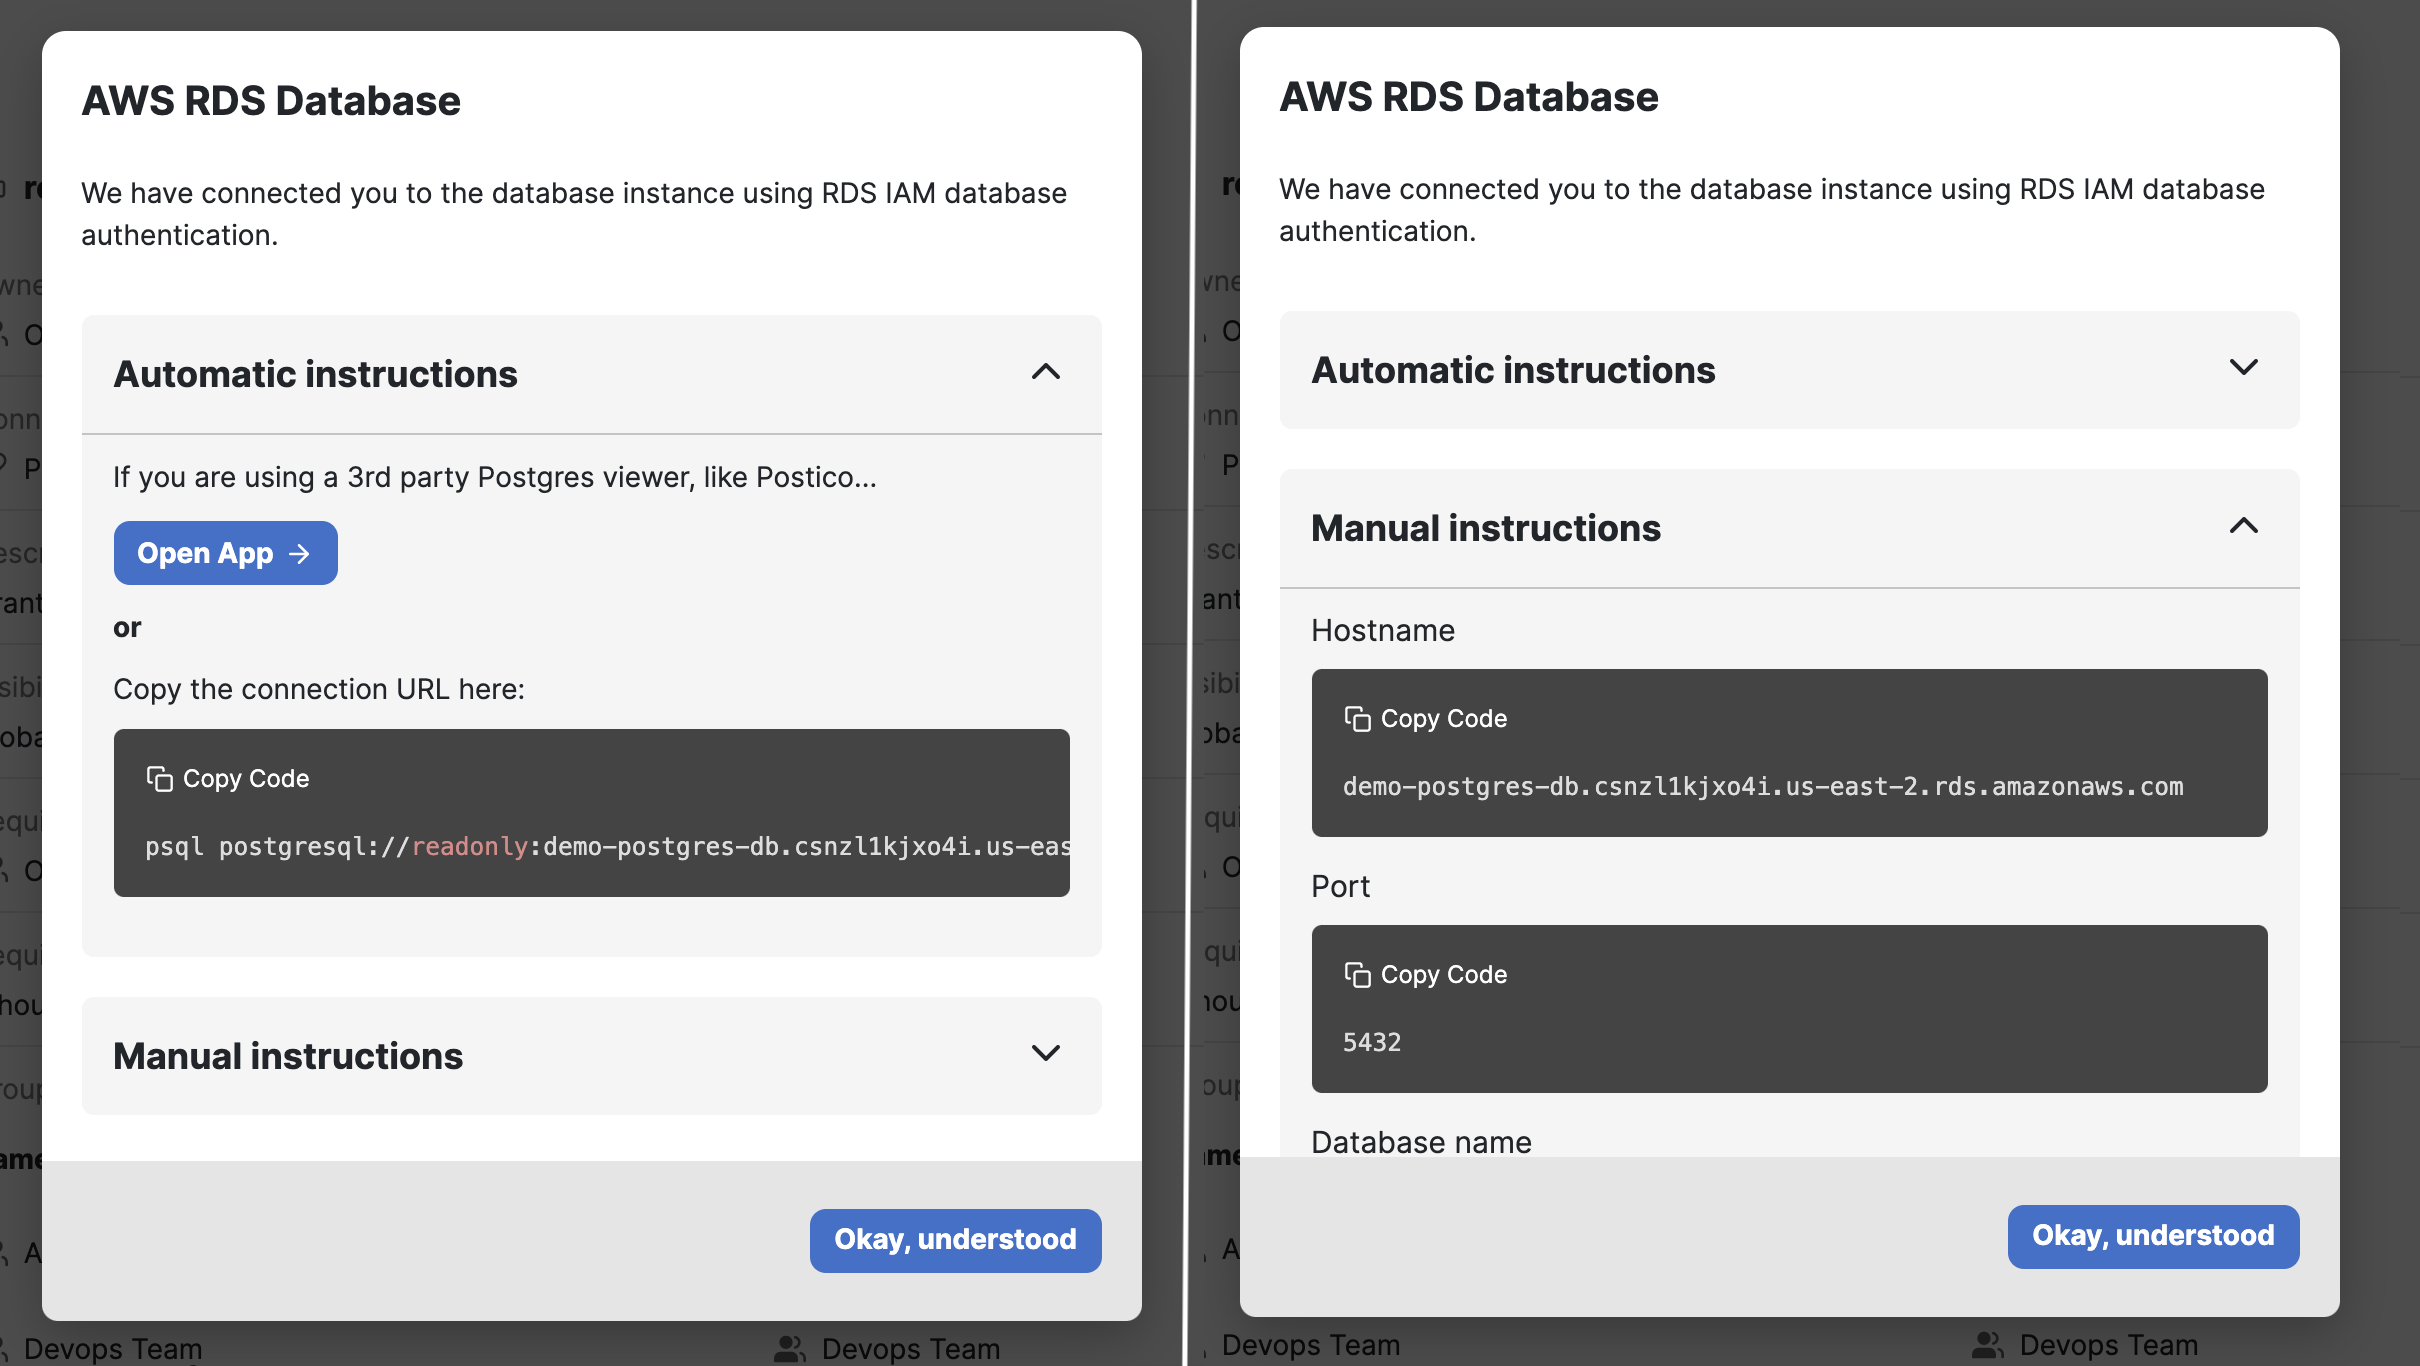
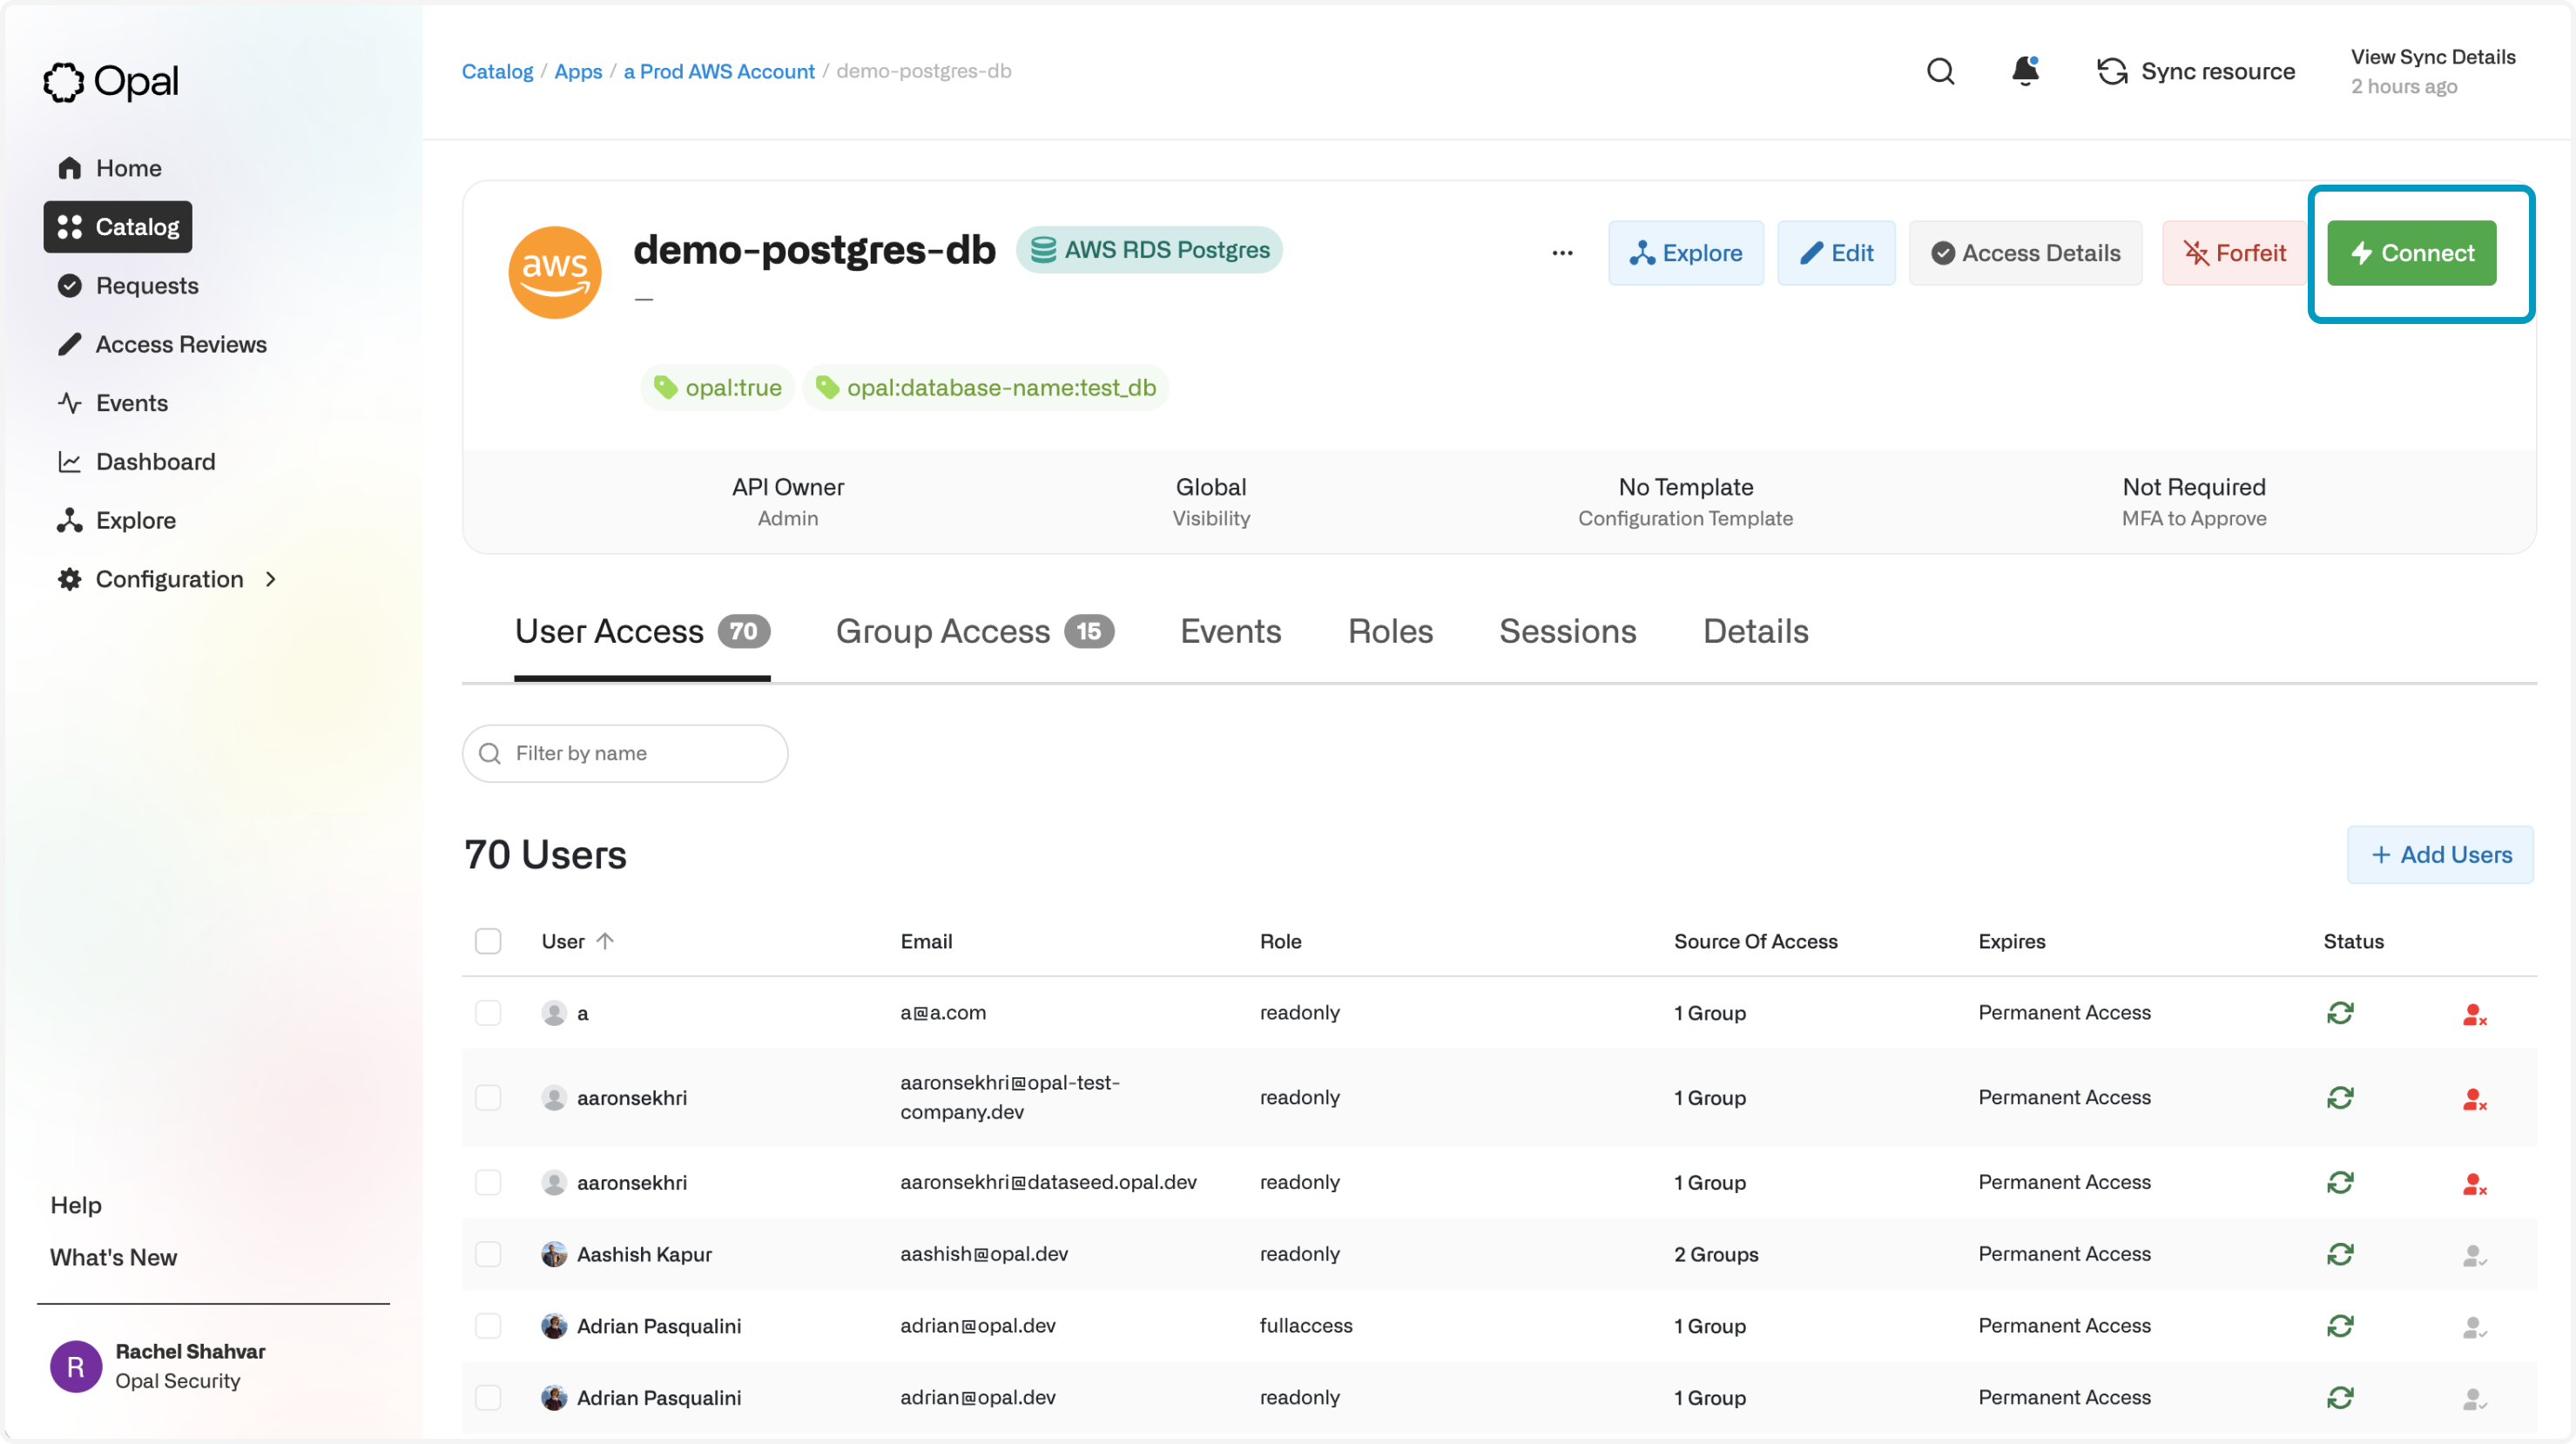 You can instantly open a connection to the database using your favorite viewer, like Postico or TablePlus, or connect manually. Your credentials can only initiate connections for 15 minutes.