> ## Documentation Index
> Fetch the complete documentation index at: https://docs.opal.dev/llms.txt
> Use this file to discover all available pages before exploring further.
# Add an EC2 instance
> Add your AWS EC2 instances to Opal to allow your developers to request temporary access.
This guide assumes you've already [configured your AWS organization in
Opal](/integrations/setting-up-your-aws-organization-in-opal).
The following diagram illustrates how Opal connects to AWS EC2. Use this guide to learn how you can add EC2 instances to Opal.
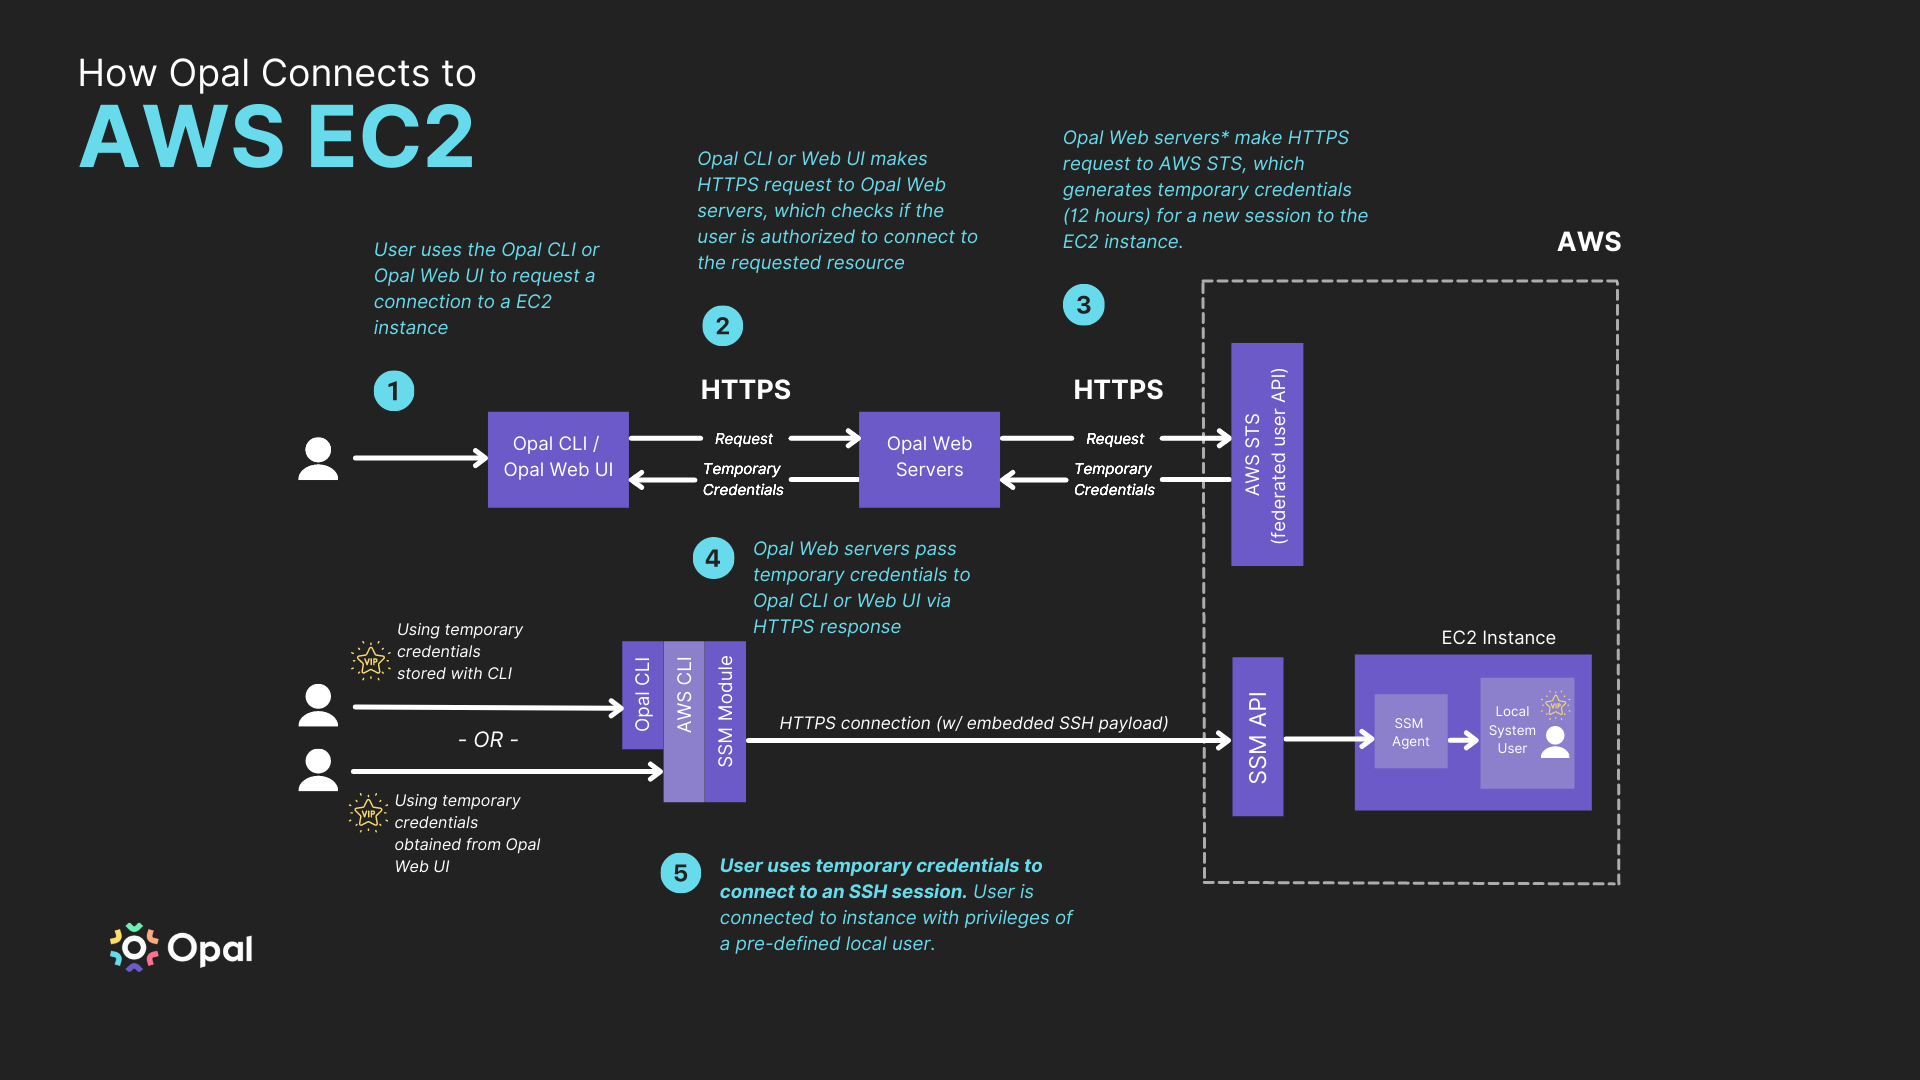 With Opal, you can grant `ssh` access to any EC2 instance running on Amazon to your developers in minutes. We make this easy by using AWS's Systems Manager API. To make this available for your organization, you'll have to enable a few things.
## Add an EC2 instance
### 1. Enable Secure Session Manager (SSM)
By default, EC2 instances don't allow `ssh` sessions using Secure Session Manager. You'll need to attach the `AmazonSSMManagedInstanceCore` AWS-managed policy to your EC2 instance profile. If an instance profile doesn't exist on that instance you'll have to create one. To determine if your EC2 instance already has a role attached to it, you can check in the AWS Console using the following instructions:
#### 1a. Check the AWS Console
First navigate to your running [EC2 instances using this link](https://console.aws.amazon.com/ec2/v2/home#Instances:instanceState=running)\*.
With Opal, you can grant `ssh` access to any EC2 instance running on Amazon to your developers in minutes. We make this easy by using AWS's Systems Manager API. To make this available for your organization, you'll have to enable a few things.
## Add an EC2 instance
### 1. Enable Secure Session Manager (SSM)
By default, EC2 instances don't allow `ssh` sessions using Secure Session Manager. You'll need to attach the `AmazonSSMManagedInstanceCore` AWS-managed policy to your EC2 instance profile. If an instance profile doesn't exist on that instance you'll have to create one. To determine if your EC2 instance already has a role attached to it, you can check in the AWS Console using the following instructions:
#### 1a. Check the AWS Console
First navigate to your running [EC2 instances using this link](https://console.aws.amazon.com/ec2/v2/home#Instances:instanceState=running)\*.
 Now click on the instance ID of the EC2 in question, and verify whether a role is attached already.
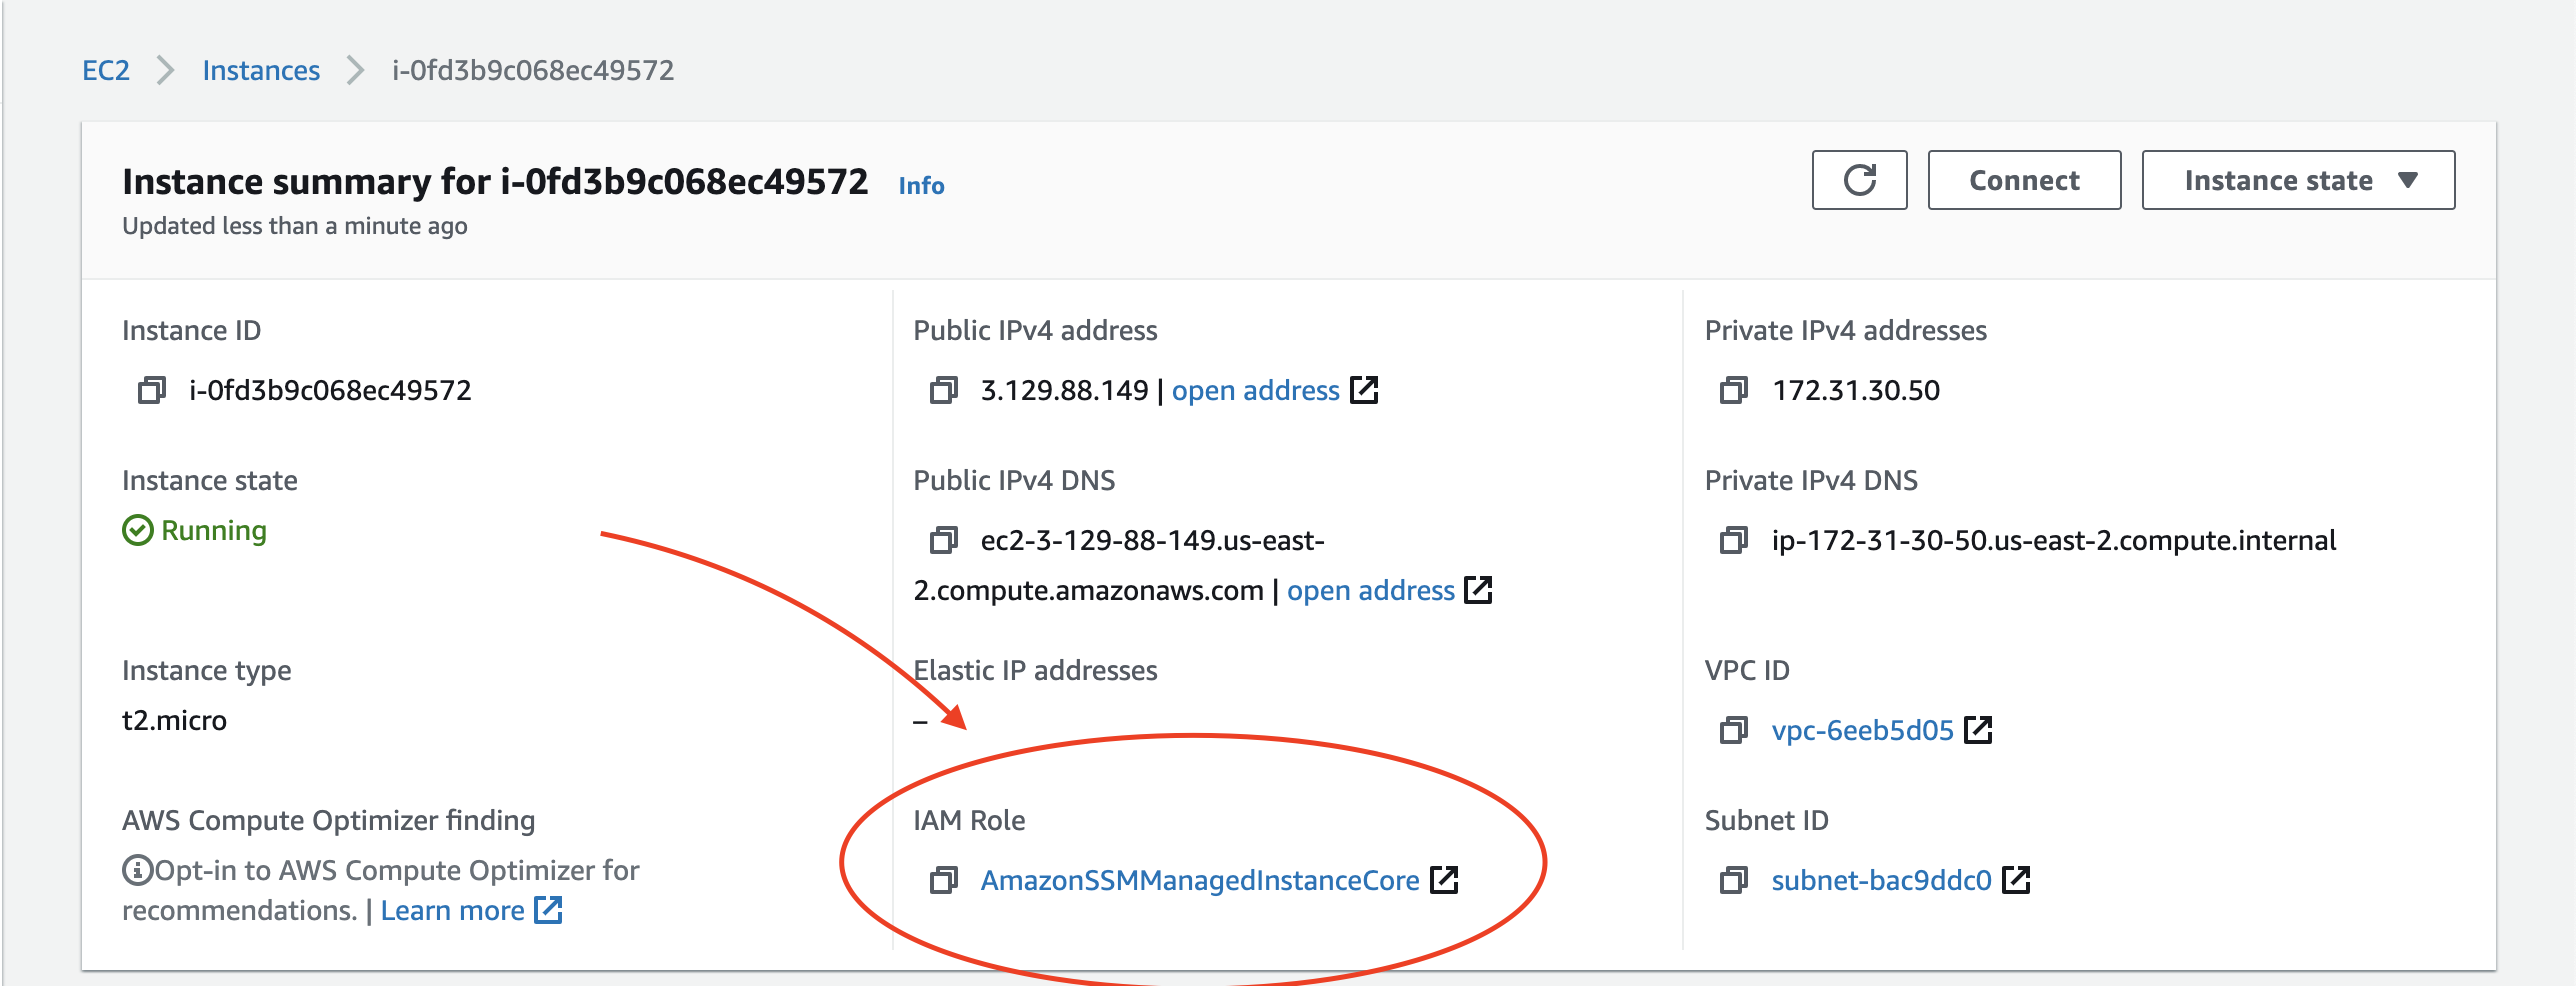 If a role already exists then skip to Step 1c. Otherwise, proceed to Step 1b.
#### 1b. Create an IAM role
If you already had a role attached skip to the next section. Otherwise, create a new IAM role using the steps below:
If a role already exists then skip to Step 1c. Otherwise, proceed to Step 1b.
#### 1b. Create an IAM role
If you already had a role attached skip to the next section. Otherwise, create a new IAM role using the steps below:
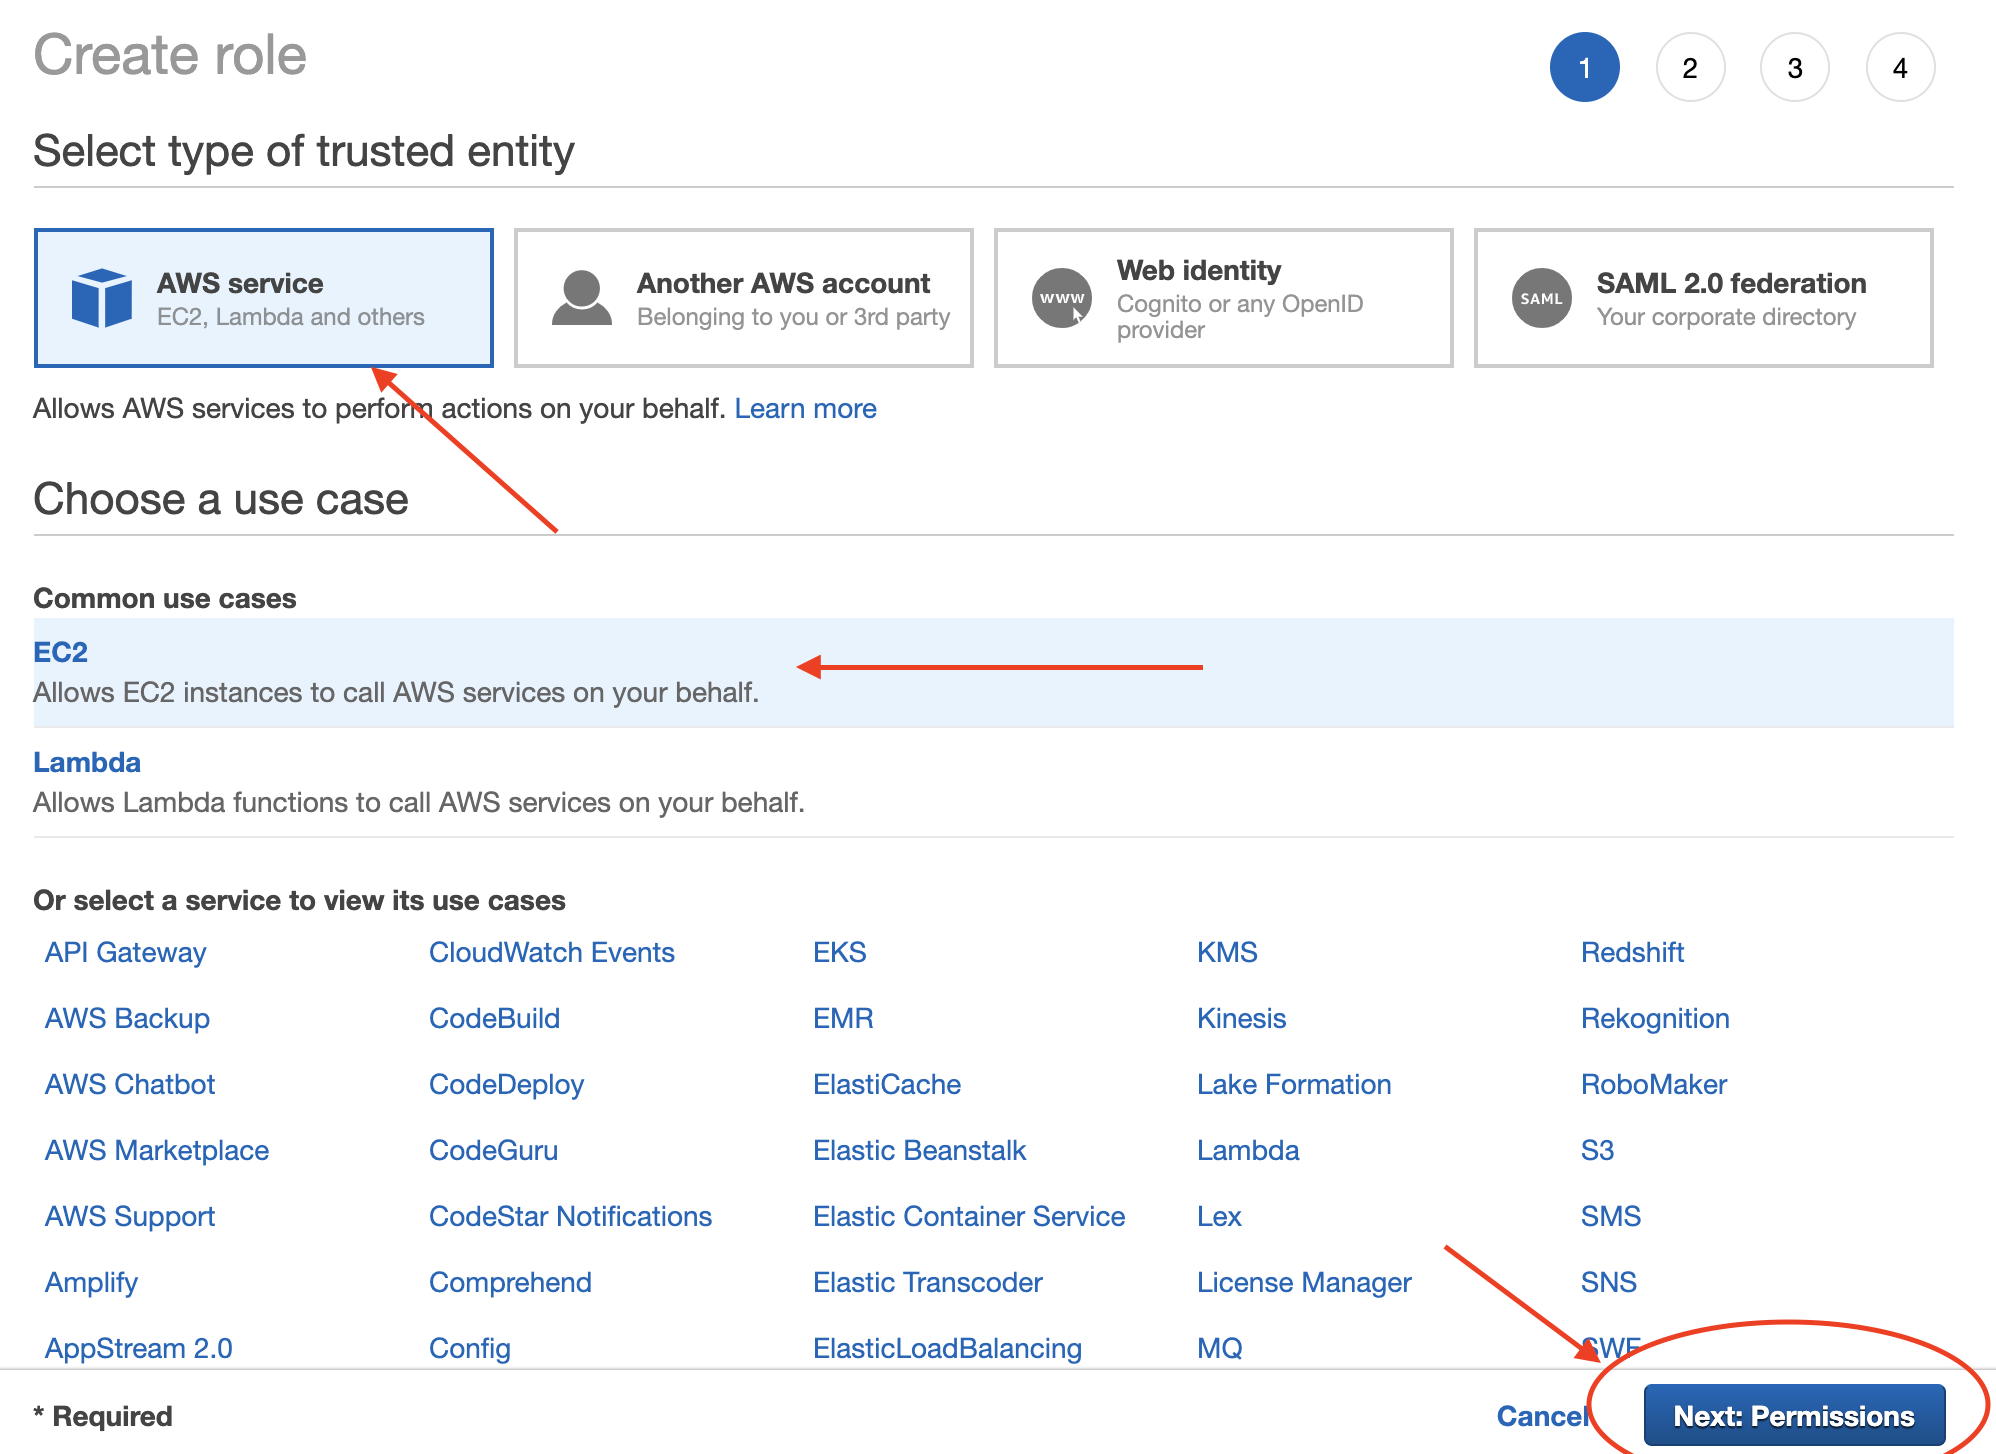 Attach the `AmazonSSMManagedInstanceCore` and `CloudWatchAgentServerPolicy` policies to your new role.
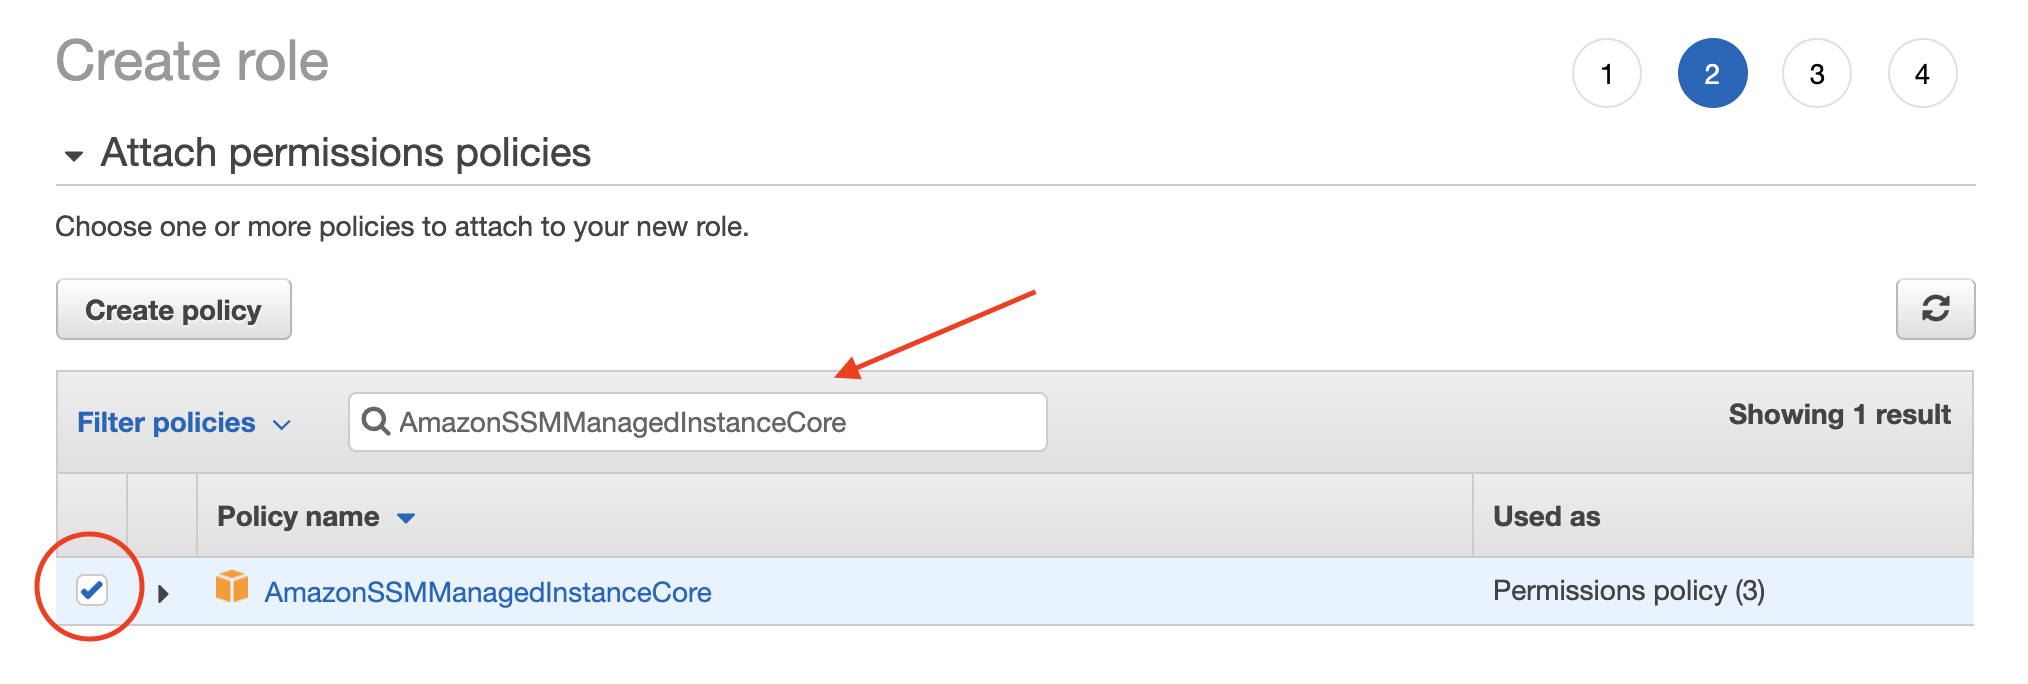 Finally, you should attach your newly created role to your EC2 instance. Since your instance didn't originally have a role attached, **you'll need to restart it**. You can now skip to step 2!
#### 1c. Add the SSM policy to your existing role
Click on the role in the EC2 dashboard to attach a role to it.
Finally, you should attach your newly created role to your EC2 instance. Since your instance didn't originally have a role attached, **you'll need to restart it**. You can now skip to step 2!
#### 1c. Add the SSM policy to your existing role
Click on the role in the EC2 dashboard to attach a role to it.
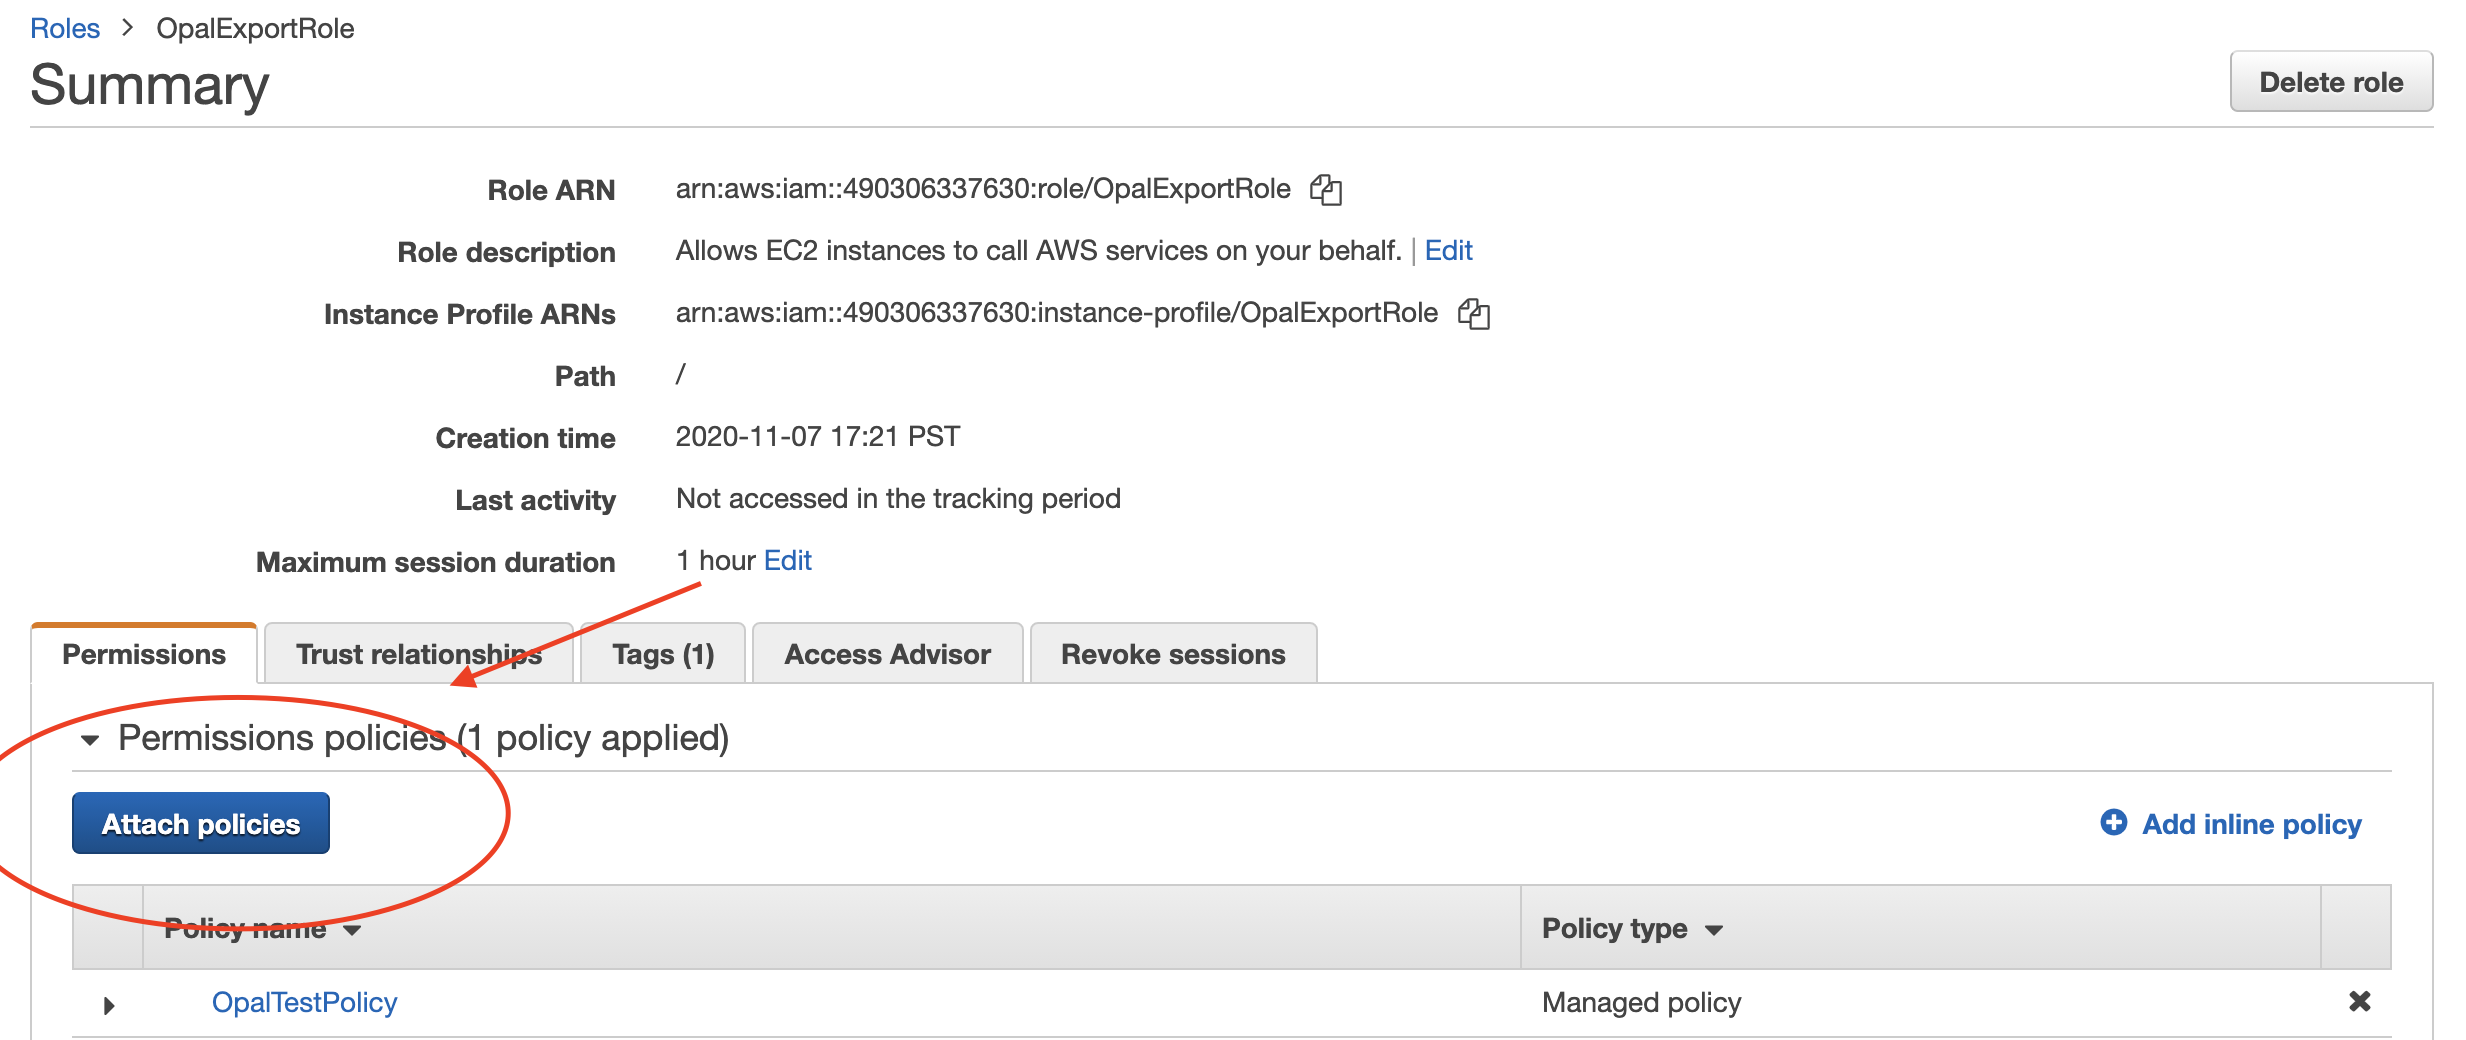 Now search and find the `AmazonSSMManagedInstanceCore` policy and attach it to your existing profile.
### 2. Tag your EC2 instance
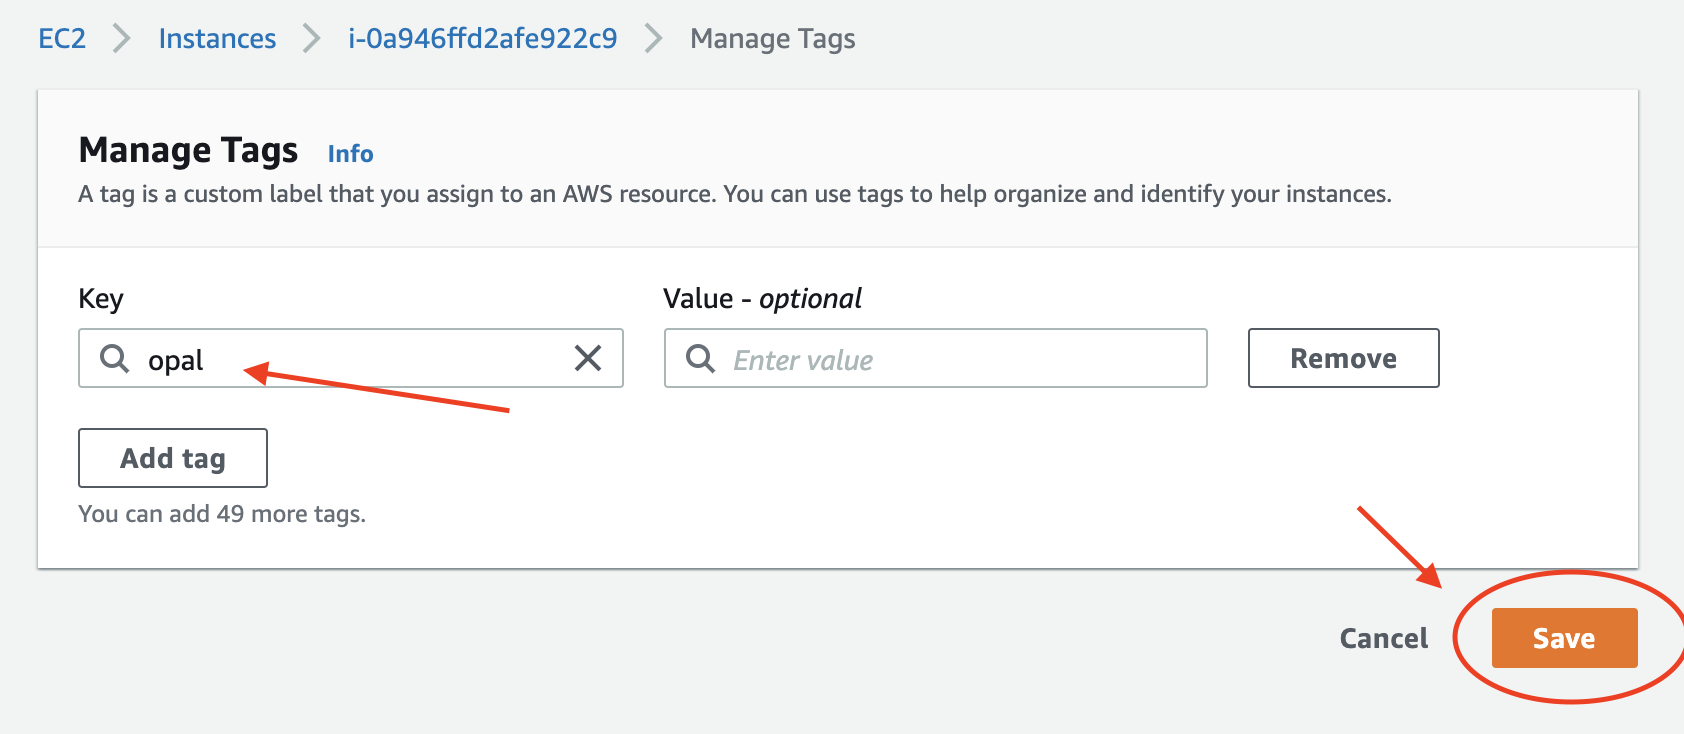
To have Opal automatically import your EC2 instance, you'll need to tag it. You can do this using the AWS Console, CLI, or Terraform below:
#### AWS Console
Navigate to your EC2 instance in the EC2 Dashboard.
Now search and find the `AmazonSSMManagedInstanceCore` policy and attach it to your existing profile.
### 2. Tag your EC2 instance
To have Opal automatically import your EC2 instance, you'll need to tag it. You can do this using the AWS Console, CLI, or Terraform below:
#### AWS Console
Navigate to your EC2 instance in the EC2 Dashboard.
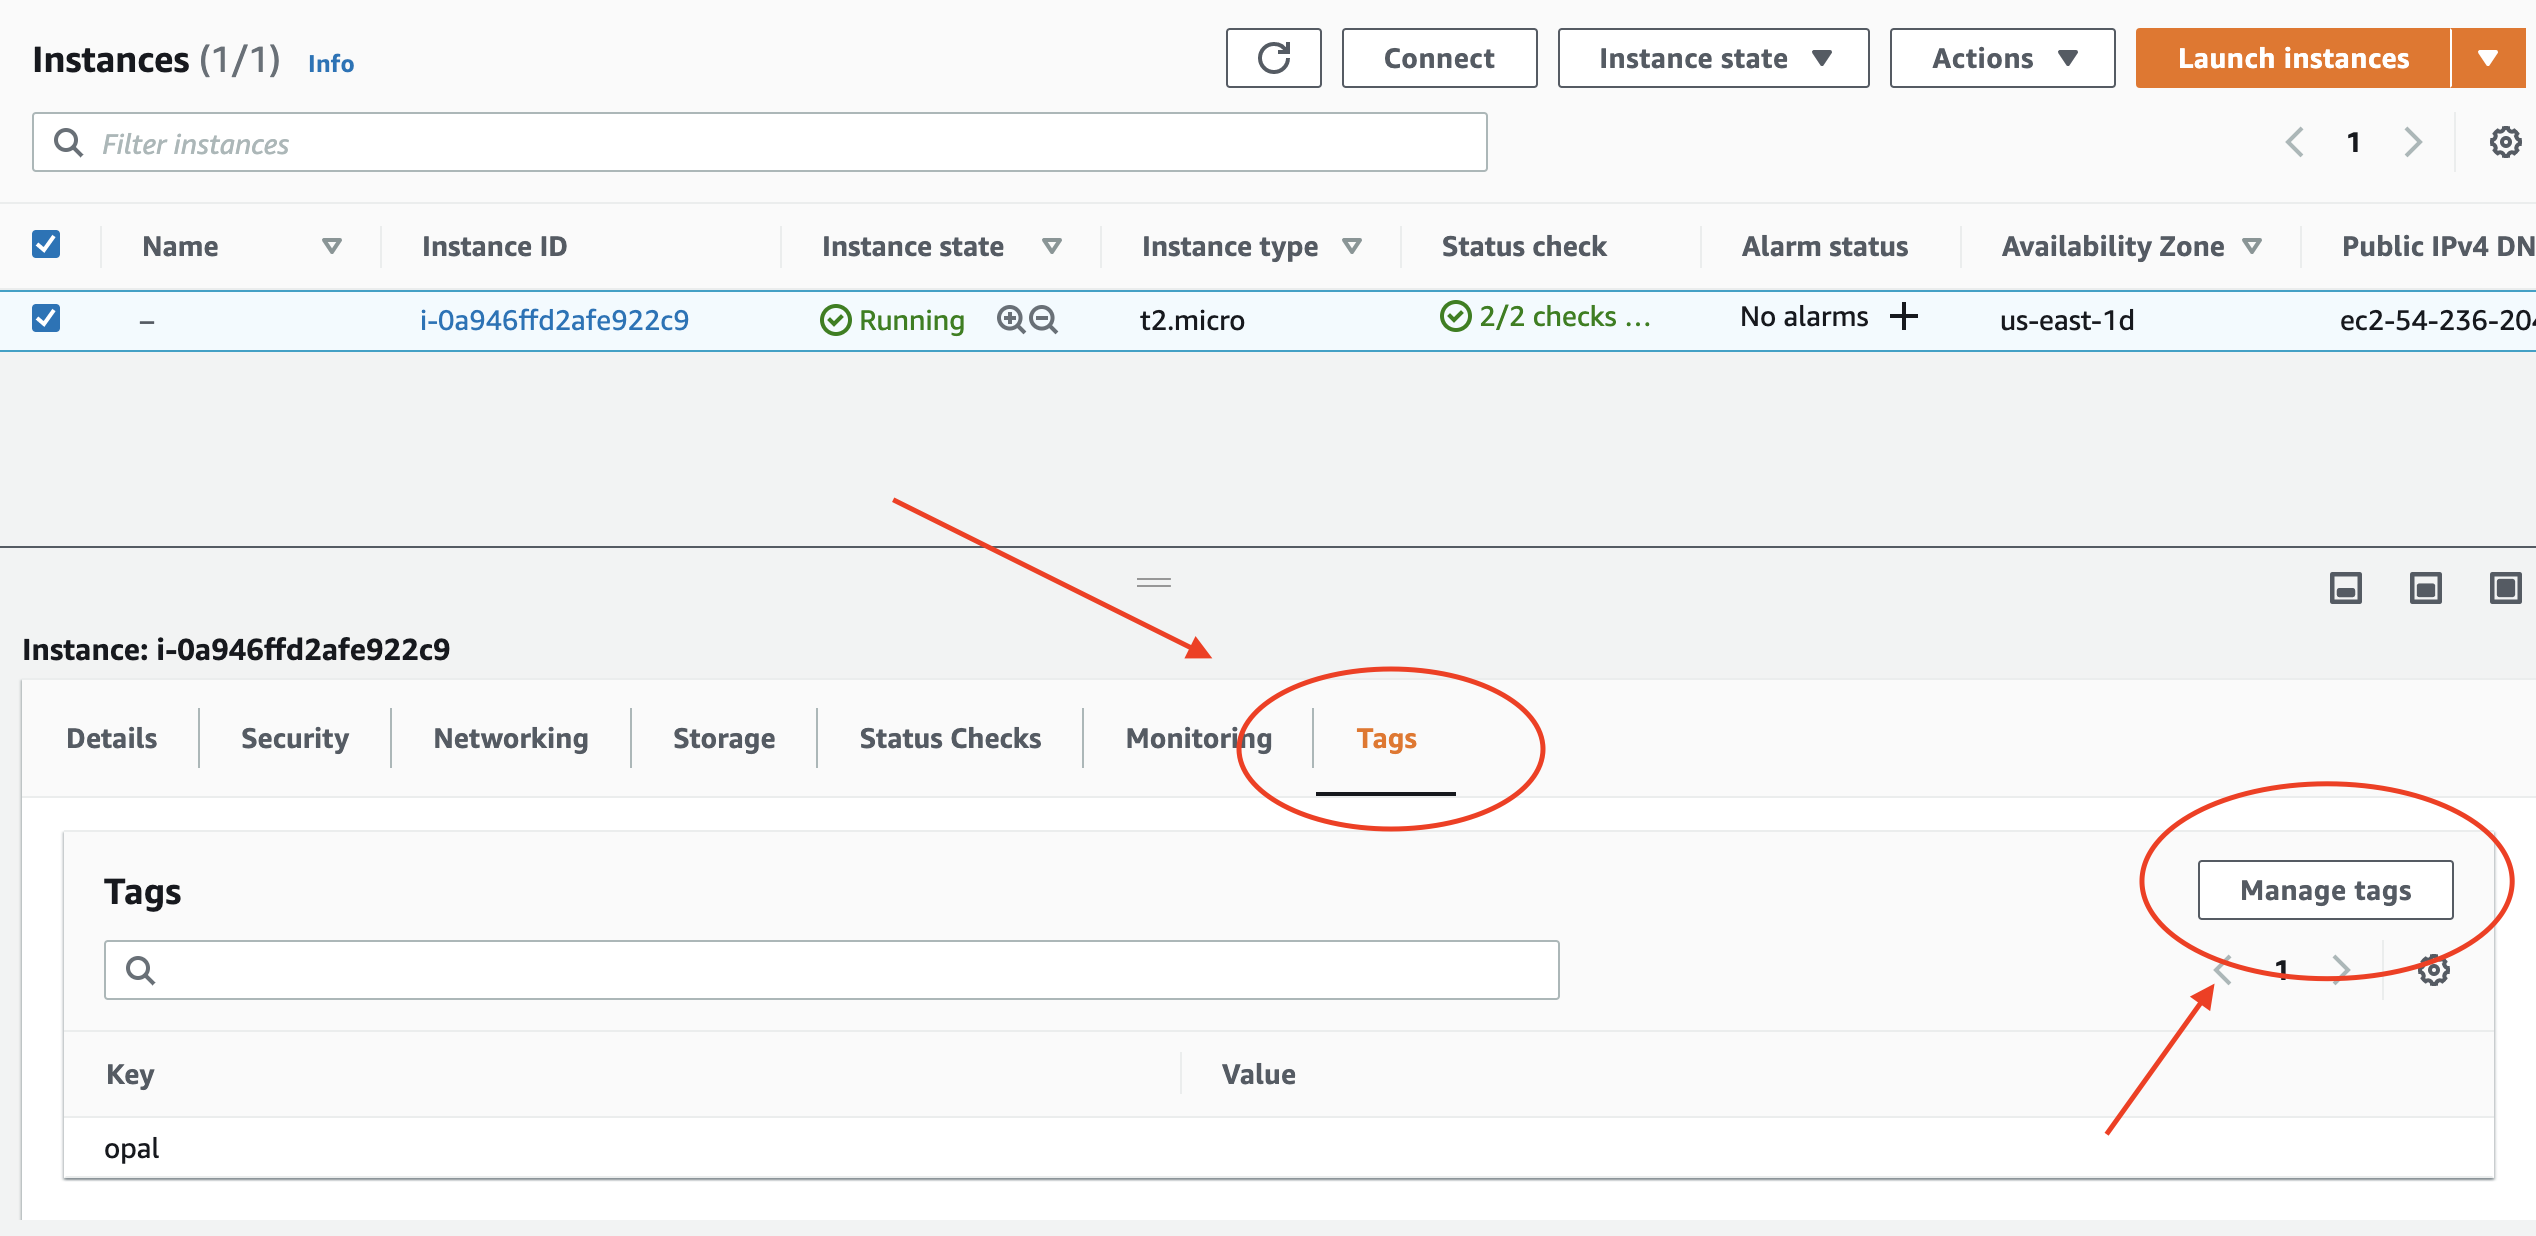 Select "Manage tags" and add the `opal` tag as seen below.
 #### AWS CLI or Terraform
```shell AWS CLI Commands theme={null}
aws ec2 create-tags \
--resources "i-0000000000" \
--tags "Key=opal,Value="
```
```text Terraform (aws_instance) theme={null}
# If you are using `aws_instance` in Terraform to provision EC2 nodes,
# add the following `tags` argument to the `aws_instance`.
tags = {
opal = ""
}
```
```text Terraform (aws_eks_node_group) theme={null}
# If you are using an `aws_eks_node_group` to launch EC2 instances,
# add the following launch template to your Terraform file.
resource "aws_launch_template" "ec2_launch" {
instance_type = YOUR_INSTANCE_TYPE
tag_specifications {
resource_type = "instance"
tags = {
opal = ""
}
}
}
# Then, reference the launch template in your EKS node group by
# adding the following argument to your EKS node group.
launch_template {
id = aws_launch_template.ec2_launch.id
version = aws_launch_template.ec2_launch.latest_version
}
```
### Optional: Enable KMS Encryption
#### 1. Create an Opal KMS key
To enable KMS encryption, first create a KMS key with the following alias: `opalssmkms`. Under advanced settings, make sure to make this key multi-regional.
#### 2. Enable encryption
You can enable encryption in the Session Manager console in AWS by going to **Systems Manager > Session Manager > Preferences > KMS Encryption** and selecting the key created in the previous step.
## Access your instance in Opal
If you followed the above steps to configure your EC2 instance, it should now show up in Opal.
#### AWS CLI or Terraform
```shell AWS CLI Commands theme={null}
aws ec2 create-tags \
--resources "i-0000000000" \
--tags "Key=opal,Value="
```
```text Terraform (aws_instance) theme={null}
# If you are using `aws_instance` in Terraform to provision EC2 nodes,
# add the following `tags` argument to the `aws_instance`.
tags = {
opal = ""
}
```
```text Terraform (aws_eks_node_group) theme={null}
# If you are using an `aws_eks_node_group` to launch EC2 instances,
# add the following launch template to your Terraform file.
resource "aws_launch_template" "ec2_launch" {
instance_type = YOUR_INSTANCE_TYPE
tag_specifications {
resource_type = "instance"
tags = {
opal = ""
}
}
}
# Then, reference the launch template in your EKS node group by
# adding the following argument to your EKS node group.
launch_template {
id = aws_launch_template.ec2_launch.id
version = aws_launch_template.ec2_launch.latest_version
}
```
### Optional: Enable KMS Encryption
#### 1. Create an Opal KMS key
To enable KMS encryption, first create a KMS key with the following alias: `opalssmkms`. Under advanced settings, make sure to make this key multi-regional.
#### 2. Enable encryption
You can enable encryption in the Session Manager console in AWS by going to **Systems Manager > Session Manager > Preferences > KMS Encryption** and selecting the key created in the previous step.
## Access your instance in Opal
If you followed the above steps to configure your EC2 instance, it should now show up in Opal.
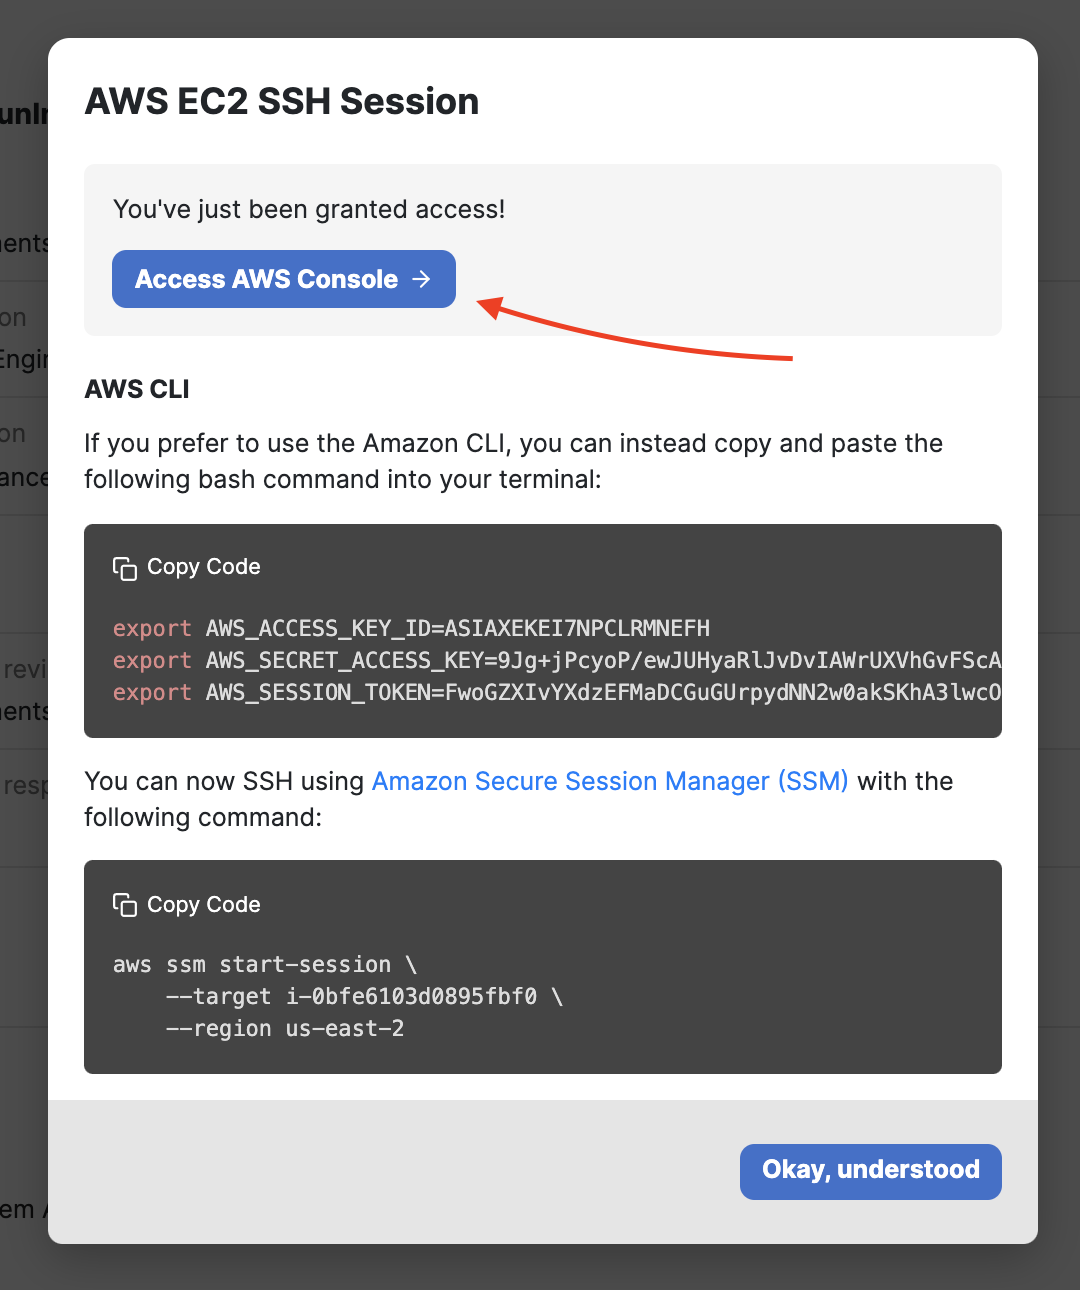
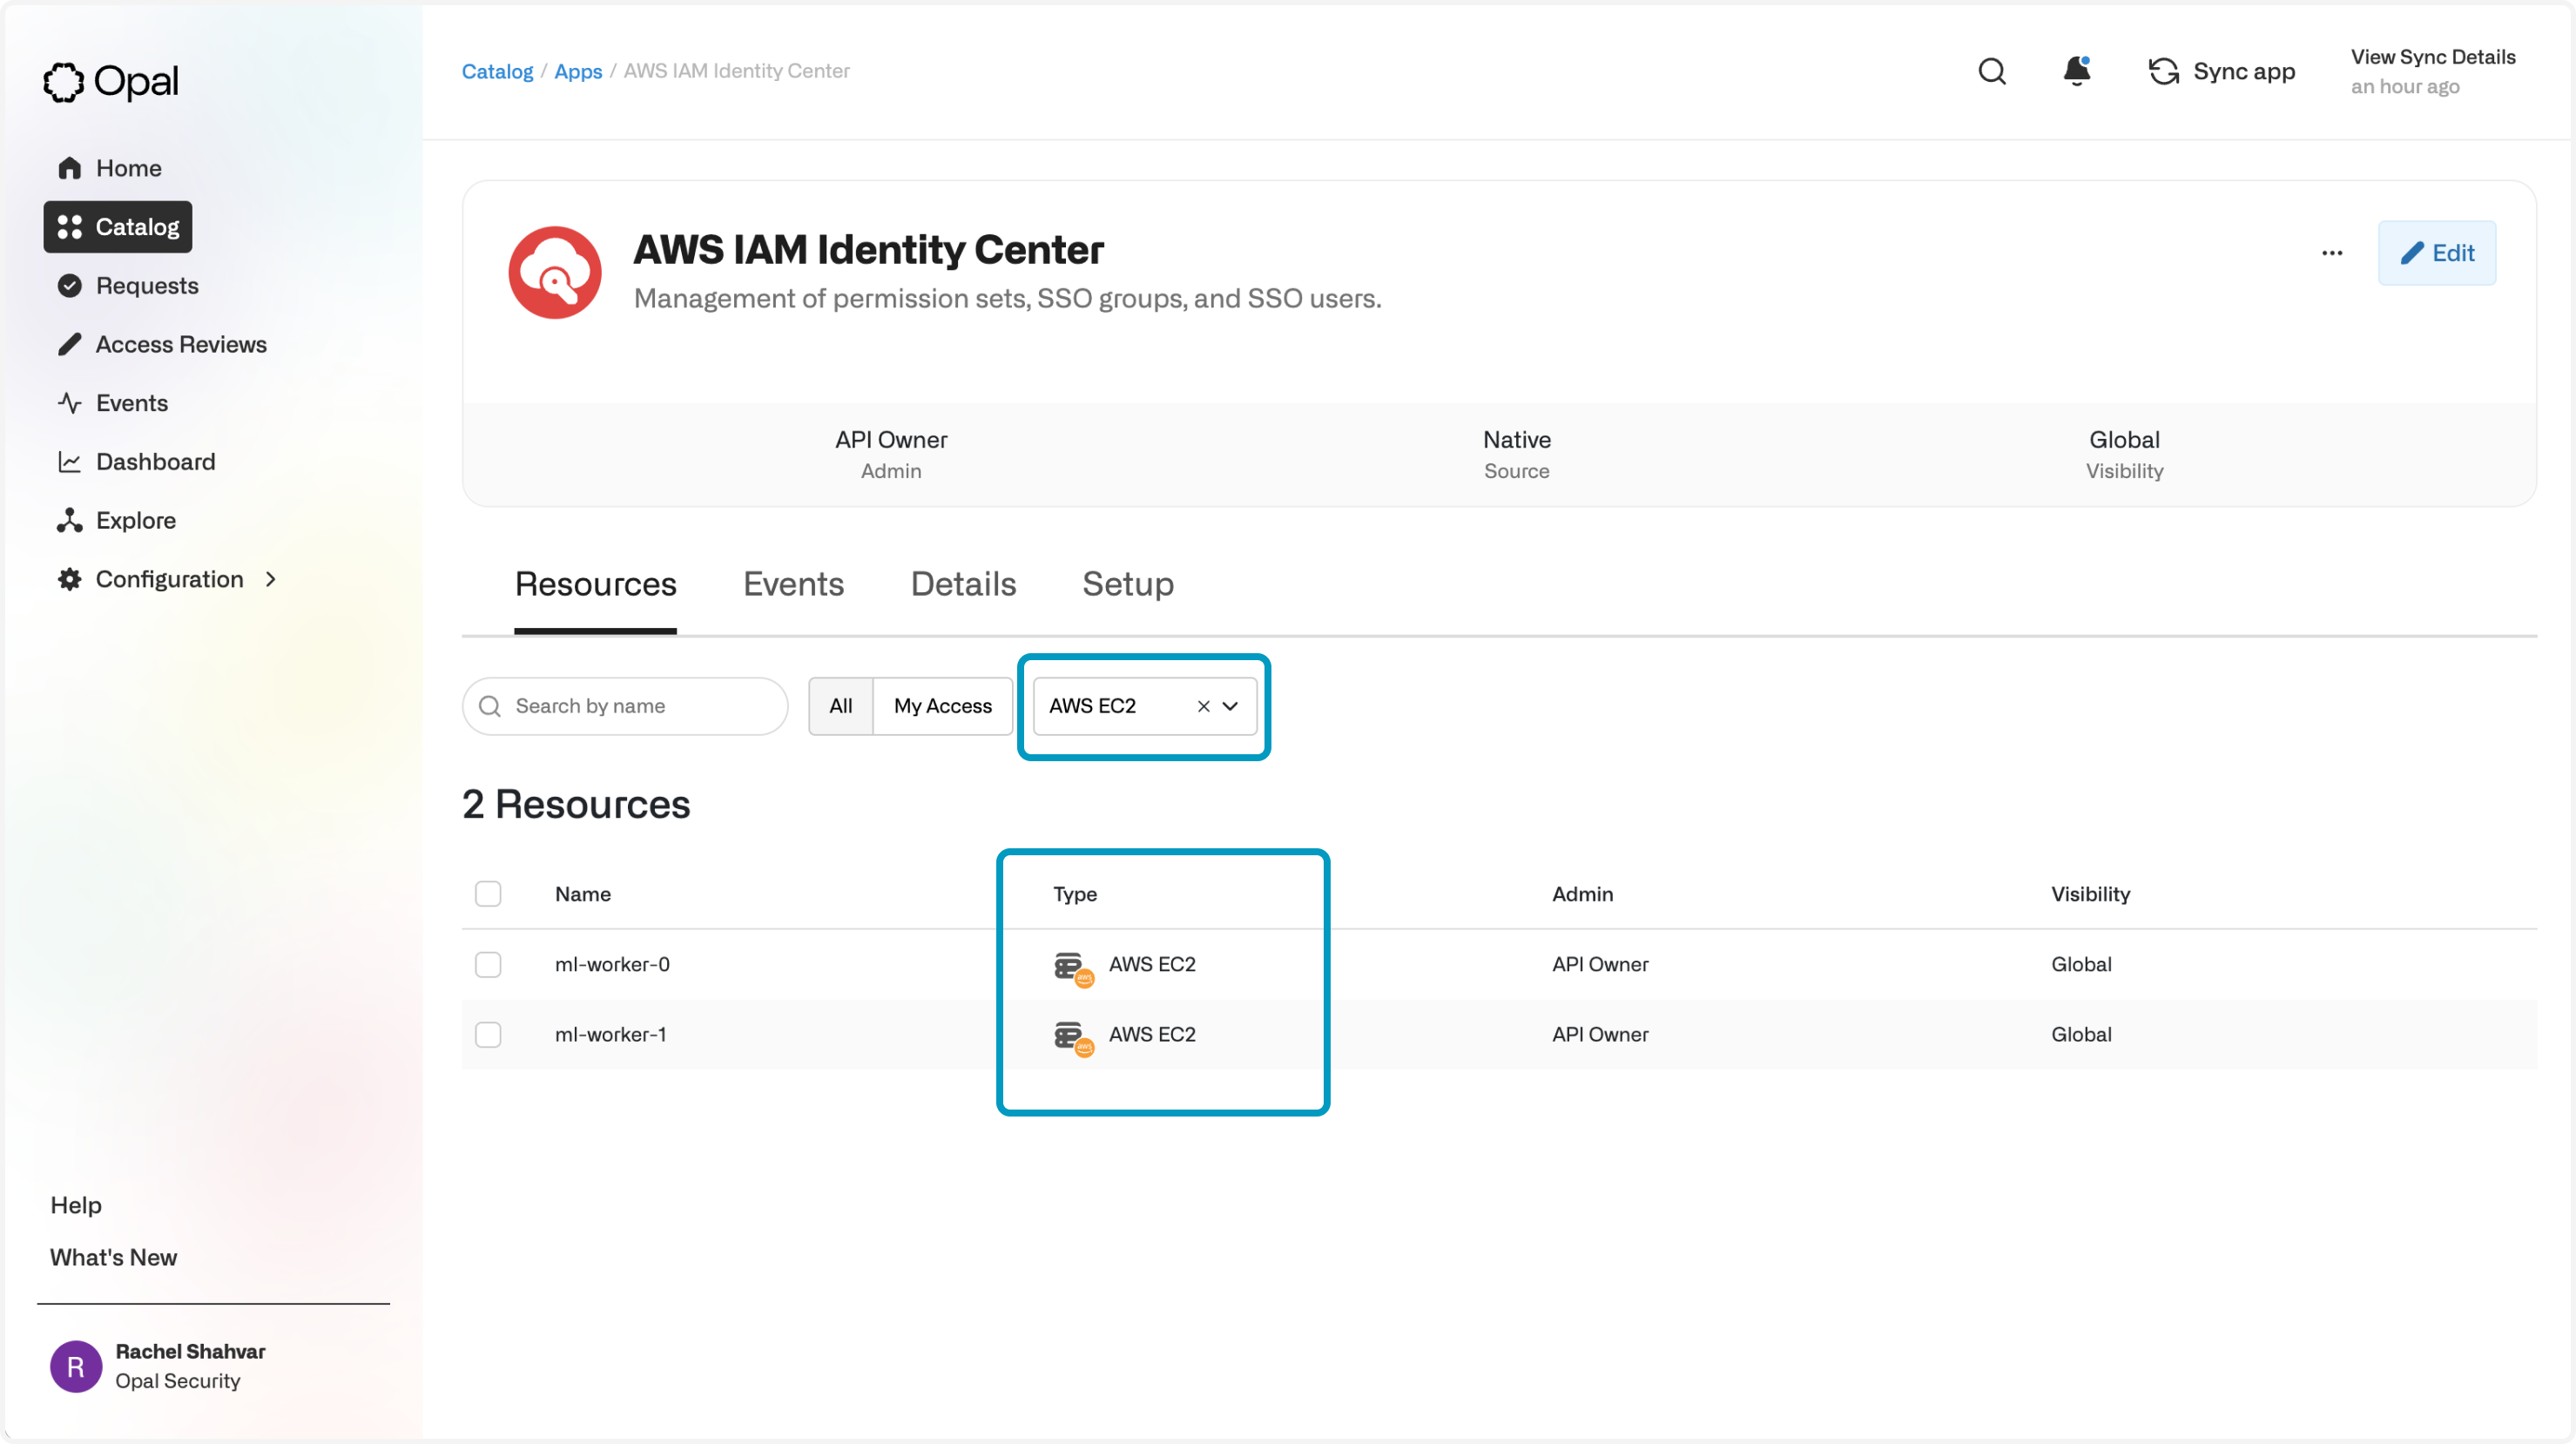 Permissions to EC2 instances are session-based, meaning they require your developers to initiate a session when they want to access that instance. They can do so by clicking the "**Connect**" button.
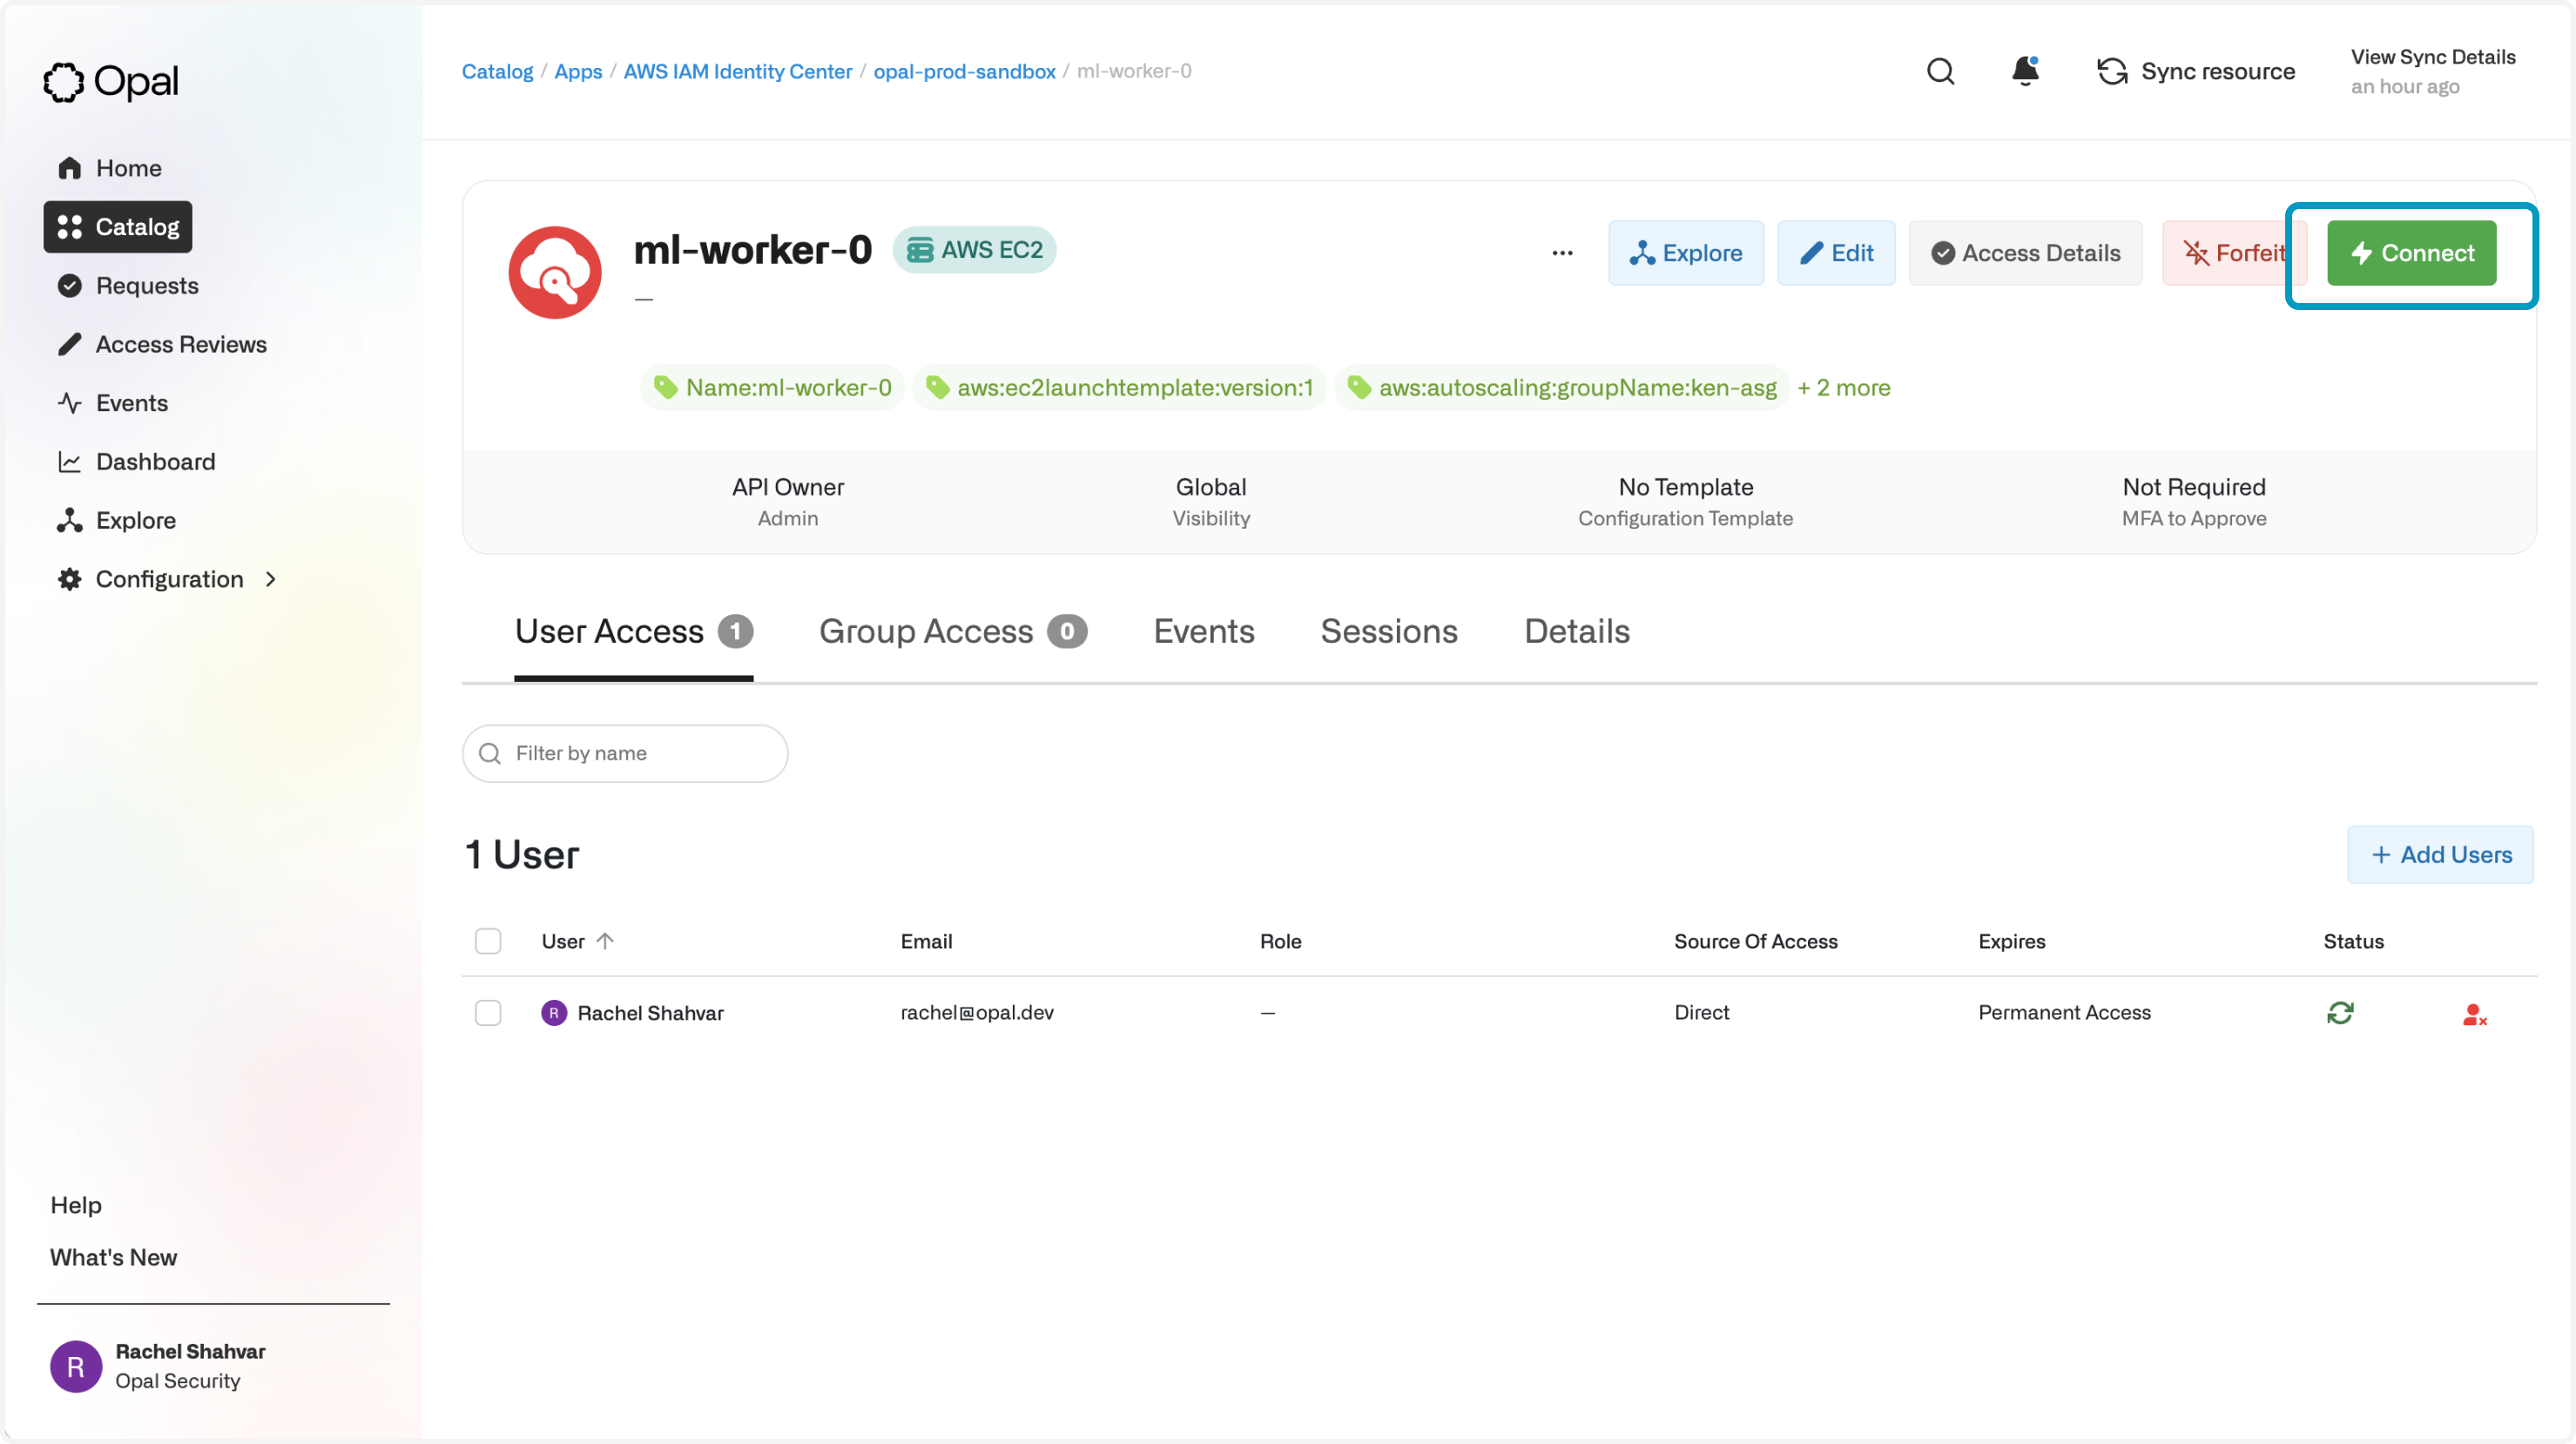 Once they're connected, they can SSH instance using an in-browser command line or in their own terminal!