> ## Documentation Index
> Fetch the complete documentation index at: https://docs.opal.dev/llms.txt
> Use this file to discover all available pages before exploring further.
# Self-Hosted on AWS EKS
> Learn how to deploy Opal on AWS EKS.
Use this guide to learn how to deploy Self-Hosted Opal on AWS EKS.
There are three steps to deploying Opal:
1. **Infrastructure setup**: EKS cluster, RDS Postgres instance, and TLS certificate
2. **Deploy Opal admin console**: Deployed on the EKS cluster and used to configure your Opal deployment and manage updates
3. **Configure and deploy Opal**: Deployed on the EKS cluster
Useful links:
* [Video walkthrough](https://www.loom.com/share/42d59816445a4954b333c2c02084c2e6)
* [Terraform files for infrastructure setup](https://github.com/opalsecurity/opal-onprem)
# 1. Infrastructure setup
## Recommended: Use Terraform
Terraform is the easiest way to setup the required infrastructure for Opal Self-Host.
1. Clone the GitHub repo of Terraform files linked above.
2. If desired, adjust `aws/variables.tf`. **For test instances only**, you can safely downsize the following:
* `cluster_node_instance_type = t3.large`
* `db_instance_class = db.t3.micro`
3. Apply the Terraform config as follows. This will initialize an EKS cluster and RDS instance, along with the necessary IAM roles and VPC. Please note that this step may take 20+ minutes.
```
terraform init
terraform validate # optional
terraform plan # optional
terraform apply
```
After infrastructure deployment is complete, you should have a cluster that you can examine as follows:
```shell shell theme={null}
aws eks update-kubeconfig --region [REGION] \
--name opal-cluster \
--alias opal-cluster
kubectl config use-context opal-cluster
kubectl get pods -A
```
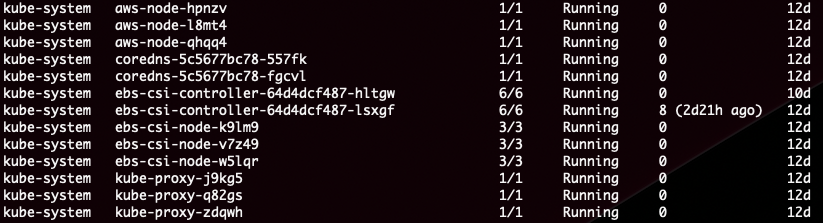
You should see the following results if your infrastructure setup is successful:
 ## Alternative: Manual setup
### Create a Kubernetes cluster
Opal installs into an existing Kubernetes cluster. This cluster must meet the following requirements:
* x86-64 architecture. ARM is not supported.
* Min nodes: 2
* Min total CPU: 4 cores
* Min total RAM: 30 GB
* Kubernetes version: 1.29+
* Your cluster must have outbound access to pull Docker containers and verify your license. If you don't want to provide open outbound access, see our [list of ports](https://docs.replicated.com/enterprise/installing-general-requirements#firewall-openings-for-online-installations) that need access.
*Note: EKS Fargate is not supported.*
We recommend using `eksctl` to create your cluster, which creates a VPC and selects the proper security groups for you.
1. [Install](https://docs.aws.amazon.com/cli/latest/userguide/getting-started-install.html) and configure the AWS CLI for your AWS account.
2. Install `eksctl`
3. Create your cluster by running the following (CloudFormation with eksctl and EKS can take more than 20 minutes to complete):
```shell shell theme={null}
eksctl create cluster --name=opal --nodes 2 --node-type m6i.xlarge
```
### Provision RDS database
For production deployments, we strongly recommend that you use an external PostgreSQL database provisioned in either RDS or Aurora, in order to have automatic backups.
Your RDS instance should meet the following requirements:
* Minimum PostgreSQL version: 15
* Minimum storage: 50 GB
* Minimum instance size: db.m6i.large (if more than 1,000 users: db.m6i.xlarge)
* Recommended:
* Enabled: multi-AZ for high availability
* Enabled: encrypted-at-rest storage
For production use cases, we recommend running a managed PostgreSQL database. This is easy to configure with Opal's setup process.
Alternatively, you can store all of Opal's data on the virtual machine it's deployed on. This is great for testing out the product, but accidents are more likely to cause data loss.
## Additional setup
### Required: TLS certificate
We recommend using AWS Certificate Manager (ACM) to setup a TLS certificate. This makes it easy to map the certificate to the load balancer deployed with Opal.
You can setup an ACM certificate [using these official instructions](https://docs.aws.amazon.com/acm/latest/userguide/gs-acm-request-public.html). The domain name for your certificate should be the user-facing hostname for your on-prem instance (e.g. `opal.mycorp.com`).
### Optional: Async exports storage
If you want to use the async export feature in Opal Query, you'll need to provision an S3 bucket and IAM user. Without this, exports still work but are tied to the browser session (they cancel if the user navigates away).
See [Configure Async Exports Storage](/docs/configure-async-exports-storage) for setup instructions.
## 2. Deploy Opal admin console
We use [KOTS](https://kots.io/) to package and monitor private cluster deployments of Opal. Specifically, it provides an admin console for configuring your Opal deployment and managing updates.
If you would prefer to manage deployments yourself, you can alternatively [install opal using helm](/docs/install-opal-using-helm).
Otherwise, proceed with the instructions below for setting up with KOTS.
To install KOTS, run the following command:
```shell shell theme={null}
curl https://kots.io/install | bash
```
Next, install the Opal admin console. The installation should take 5-10 minutes, and you'll be prompted to set a password for accessing your admin console (which you can reset [using these instructions](https://docs.replicated.com/reference/kots-cli-reset-password)).
```shell shell theme={null}
kubectl kots install opal-onprem --strict-security-context
```
The Opal admin console is deployed as a set of `kotsadm-*` pods. Once installed, you should see the following pods deployed as well as a URL for accessing the Opal admin console via port-forwarding.
## Alternative: Manual setup
### Create a Kubernetes cluster
Opal installs into an existing Kubernetes cluster. This cluster must meet the following requirements:
* x86-64 architecture. ARM is not supported.
* Min nodes: 2
* Min total CPU: 4 cores
* Min total RAM: 30 GB
* Kubernetes version: 1.29+
* Your cluster must have outbound access to pull Docker containers and verify your license. If you don't want to provide open outbound access, see our [list of ports](https://docs.replicated.com/enterprise/installing-general-requirements#firewall-openings-for-online-installations) that need access.
*Note: EKS Fargate is not supported.*
We recommend using `eksctl` to create your cluster, which creates a VPC and selects the proper security groups for you.
1. [Install](https://docs.aws.amazon.com/cli/latest/userguide/getting-started-install.html) and configure the AWS CLI for your AWS account.
2. Install `eksctl`
3. Create your cluster by running the following (CloudFormation with eksctl and EKS can take more than 20 minutes to complete):
```shell shell theme={null}
eksctl create cluster --name=opal --nodes 2 --node-type m6i.xlarge
```
### Provision RDS database
For production deployments, we strongly recommend that you use an external PostgreSQL database provisioned in either RDS or Aurora, in order to have automatic backups.
Your RDS instance should meet the following requirements:
* Minimum PostgreSQL version: 15
* Minimum storage: 50 GB
* Minimum instance size: db.m6i.large (if more than 1,000 users: db.m6i.xlarge)
* Recommended:
* Enabled: multi-AZ for high availability
* Enabled: encrypted-at-rest storage
For production use cases, we recommend running a managed PostgreSQL database. This is easy to configure with Opal's setup process.
Alternatively, you can store all of Opal's data on the virtual machine it's deployed on. This is great for testing out the product, but accidents are more likely to cause data loss.
## Additional setup
### Required: TLS certificate
We recommend using AWS Certificate Manager (ACM) to setup a TLS certificate. This makes it easy to map the certificate to the load balancer deployed with Opal.
You can setup an ACM certificate [using these official instructions](https://docs.aws.amazon.com/acm/latest/userguide/gs-acm-request-public.html). The domain name for your certificate should be the user-facing hostname for your on-prem instance (e.g. `opal.mycorp.com`).
### Optional: Async exports storage
If you want to use the async export feature in Opal Query, you'll need to provision an S3 bucket and IAM user. Without this, exports still work but are tied to the browser session (they cancel if the user navigates away).
See [Configure Async Exports Storage](/docs/configure-async-exports-storage) for setup instructions.
## 2. Deploy Opal admin console
We use [KOTS](https://kots.io/) to package and monitor private cluster deployments of Opal. Specifically, it provides an admin console for configuring your Opal deployment and managing updates.
If you would prefer to manage deployments yourself, you can alternatively [install opal using helm](/docs/install-opal-using-helm).
Otherwise, proceed with the instructions below for setting up with KOTS.
To install KOTS, run the following command:
```shell shell theme={null}
curl https://kots.io/install | bash
```
Next, install the Opal admin console. The installation should take 5-10 minutes, and you'll be prompted to set a password for accessing your admin console (which you can reset [using these instructions](https://docs.replicated.com/reference/kots-cli-reset-password)).
```shell shell theme={null}
kubectl kots install opal-onprem --strict-security-context
```
The Opal admin console is deployed as a set of `kotsadm-*` pods. Once installed, you should see the following pods deployed as well as a URL for accessing the Opal admin console via port-forwarding.
 If you kill your port-forwarding to the admin console, you can set it up again using this command:
```
kubectl kots admin-console --namespace opal-onprem
```
The admin console password may be reset with this command:
```
kubectl kots reset-password opal-onprem
```
## 3. Configure and deploy Opal
When you access your admin console, you'll be prompted to upload a license. This should have been provided by your Opal representative.
Next, you'll be asked to configure your Opal deployment:
If you kill your port-forwarding to the admin console, you can set it up again using this command:
```
kubectl kots admin-console --namespace opal-onprem
```
The admin console password may be reset with this command:
```
kubectl kots reset-password opal-onprem
```
## 3. Configure and deploy Opal
When you access your admin console, you'll be prompted to upload a license. This should have been provided by your Opal representative.
Next, you'll be asked to configure your Opal deployment:
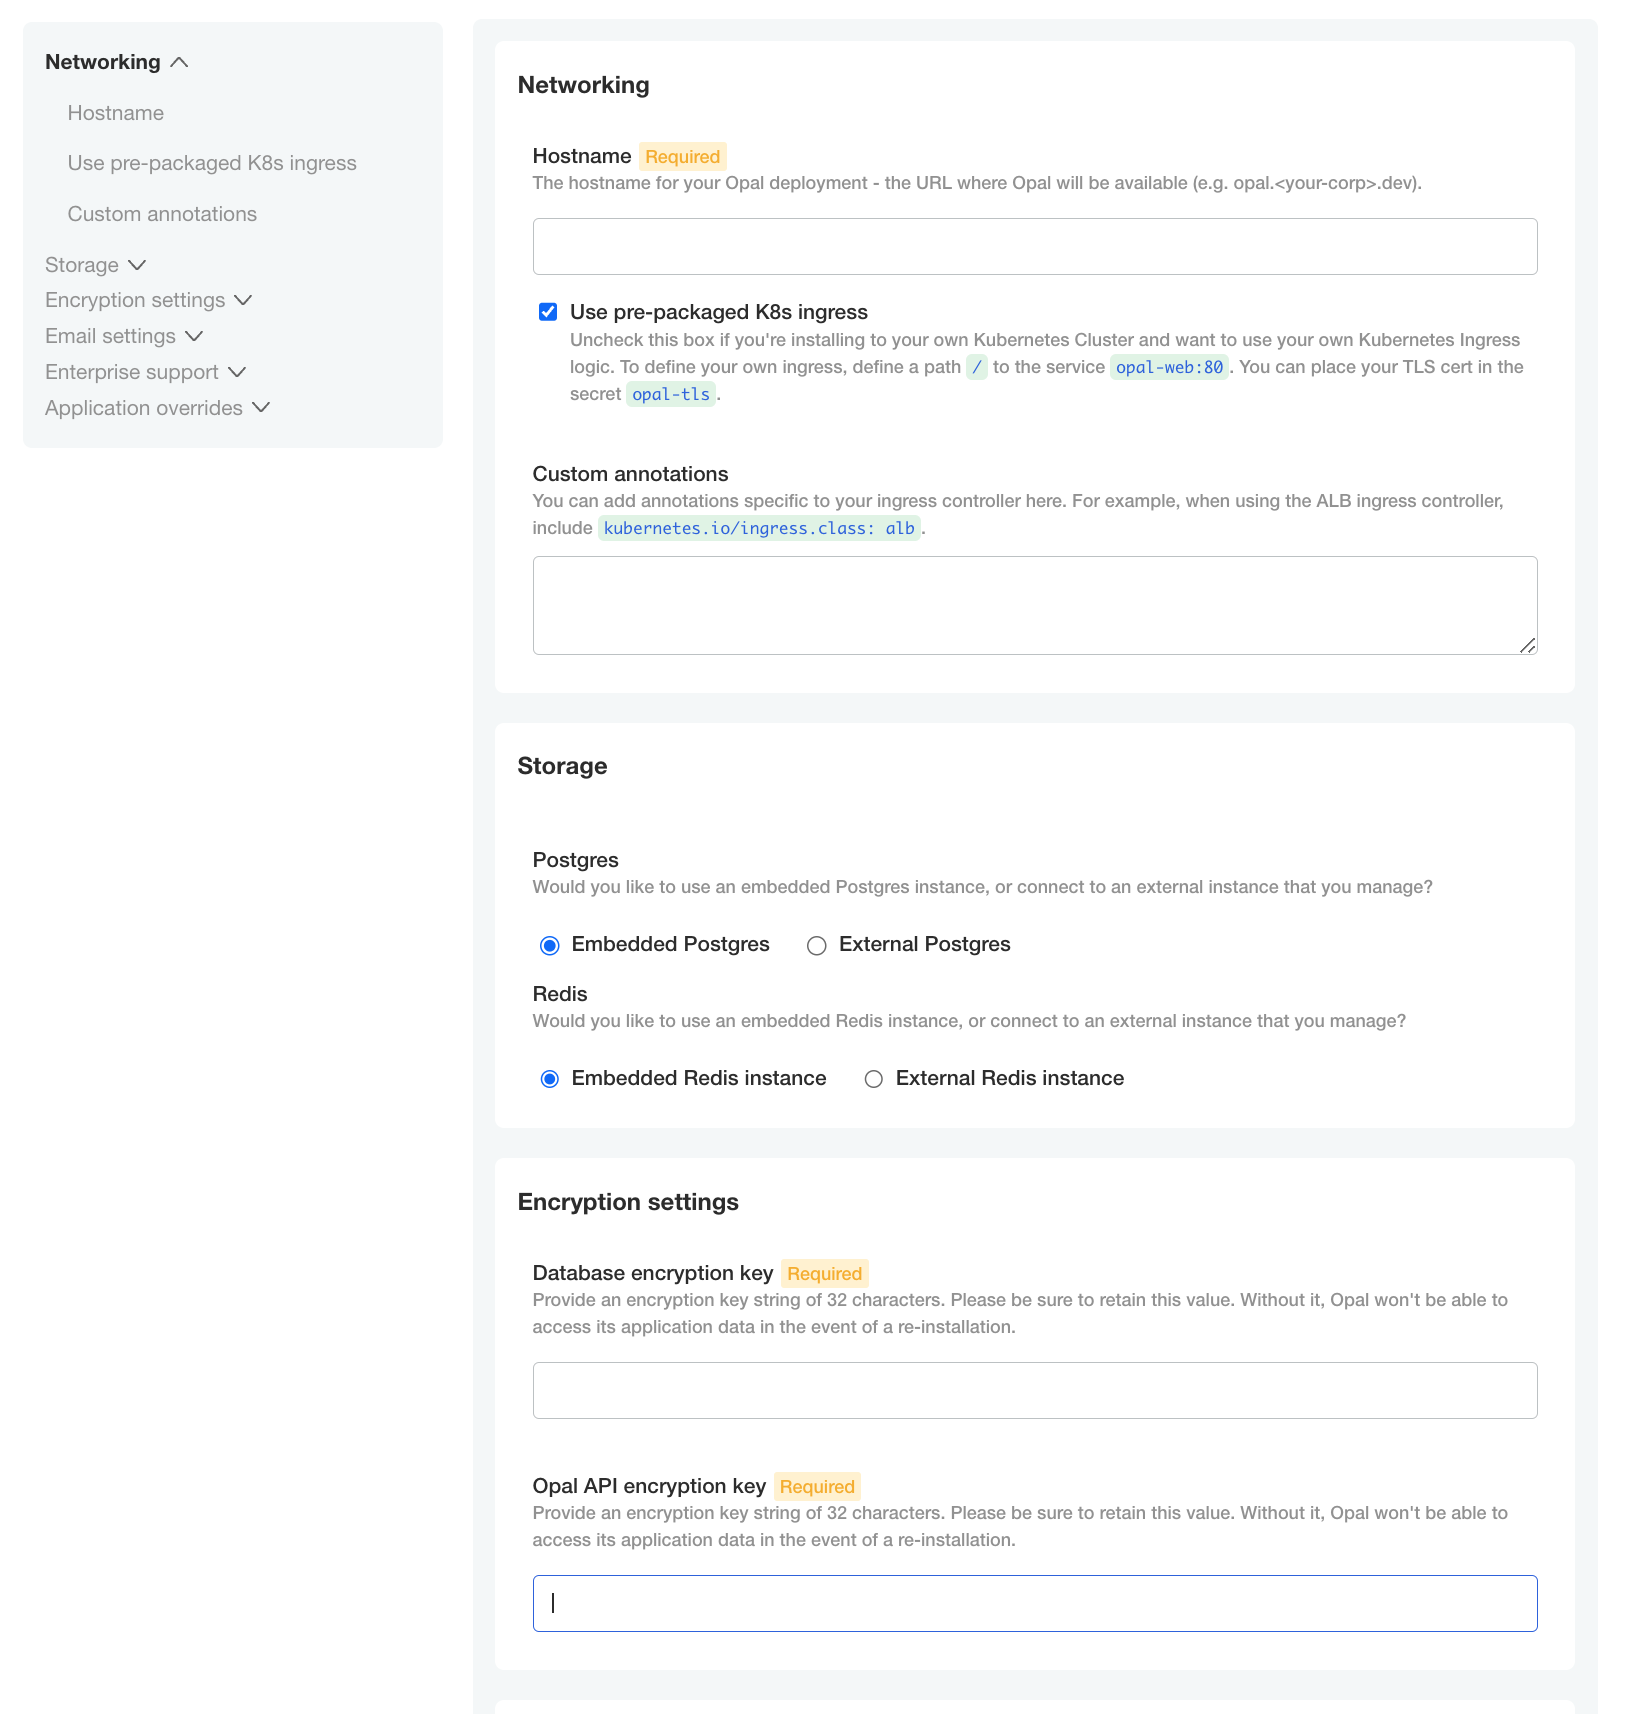 The below recommendations assume you've followed the steps above to setup your infrastructure:
* **Hostname**: Enter the hostname used to access the Opal application. *This cannot be updated later.*
* **Use pre-packaged K8s ingress**: Check this unless you plan to customize the ingress.
* **Custom annotations**:
* `kubernetes.io/ingress.class: alb`
* `alb.ingress.kubernetes.io/scheme: internet-facing` (only if you plan to expose your Opal Self-hosted instance to the internet; otherwise the default is `internal`)
* `alb.ingress.kubernetes.io/certificate-arn: [ACM certificate ARN]`
* **Postgres**: Select *External Postgres* and point it to your RDS instance. You can find the relevant information by querying Terraform: `terraform output; terraform output rds_password`
* \[Optional] **Use SSL for Database Connection**: Enable this setting if you'd like to require the connection to the Opal database to use SSL.
* **Redis**: Select *Embedded Redis*.
* **Database encryption key**: Generate a 32-character string for encrypting sensitive data, like 3rd party API tokens, in your database.
* **Opal API encryption key**: Generate a 32-character string for encrypting generated Opal API tokens.
Encryption keys used by the application should be stored securely in a password manager to enable restoring Opal in a disaster recovery event.
* **Email settings**: You may enable SMTP for sending email notifications and use the SMTP provider of your choice. If you use [Google Workspace's SMTP](https://support.google.com/a/answer/2956491), you'll be required to add the public IP addresses of the Kubernetes nodes to the allowlist.
Click **Continue**. You can run or skip the pre-flight checks. After you deploy, you expect to see the following additional Opal pods running on the cluster:
The below recommendations assume you've followed the steps above to setup your infrastructure:
* **Hostname**: Enter the hostname used to access the Opal application. *This cannot be updated later.*
* **Use pre-packaged K8s ingress**: Check this unless you plan to customize the ingress.
* **Custom annotations**:
* `kubernetes.io/ingress.class: alb`
* `alb.ingress.kubernetes.io/scheme: internet-facing` (only if you plan to expose your Opal Self-hosted instance to the internet; otherwise the default is `internal`)
* `alb.ingress.kubernetes.io/certificate-arn: [ACM certificate ARN]`
* **Postgres**: Select *External Postgres* and point it to your RDS instance. You can find the relevant information by querying Terraform: `terraform output; terraform output rds_password`
* \[Optional] **Use SSL for Database Connection**: Enable this setting if you'd like to require the connection to the Opal database to use SSL.
* **Redis**: Select *Embedded Redis*.
* **Database encryption key**: Generate a 32-character string for encrypting sensitive data, like 3rd party API tokens, in your database.
* **Opal API encryption key**: Generate a 32-character string for encrypting generated Opal API tokens.
Encryption keys used by the application should be stored securely in a password manager to enable restoring Opal in a disaster recovery event.
* **Email settings**: You may enable SMTP for sending email notifications and use the SMTP provider of your choice. If you use [Google Workspace's SMTP](https://support.google.com/a/answer/2956491), you'll be required to add the public IP addresses of the Kubernetes nodes to the allowlist.
Click **Continue**. You can run or skip the pre-flight checks. After you deploy, you expect to see the following additional Opal pods running on the cluster:
 ### Create DNS record
Opal creates an ALB as part of its deployment (assuming you used the pre-packaged K8s ingress). As a final step, create a CNAME DNS record mapping your desired hostname to the ALB's hostname.
Generally, you can get the hostname of the ALB created as part of the Opal deployment by running `kubectl get ingress -A`.
**Once your DNS record is created, you should now be able to access Opal at your desired hostname. Log in and invite your team!**
### Optional: Access via VPN (e.g. Cloudflare Access, Twingate)
If your users will be accessing your Opal instance via a VPN, please ensure that you've configured it to point to the ALB.
### Create DNS record
Opal creates an ALB as part of its deployment (assuming you used the pre-packaged K8s ingress). As a final step, create a CNAME DNS record mapping your desired hostname to the ALB's hostname.
Generally, you can get the hostname of the ALB created as part of the Opal deployment by running `kubectl get ingress -A`.
**Once your DNS record is created, you should now be able to access Opal at your desired hostname. Log in and invite your team!**
### Optional: Access via VPN (e.g. Cloudflare Access, Twingate)
If your users will be accessing your Opal instance via a VPN, please ensure that you've configured it to point to the ALB.