> ## Documentation Index
> Fetch the complete documentation index at: https://docs.opal.dev/llms.txt
> Use this file to discover all available pages before exploring further.
# Install Opal using Helm
Normally, our distribution platform Replicated uses [KOTS](https://docs.replicated.com/intro-kots) to manage deployments and updates in self-hosted clusters. If you’d prefer to avoid using KOTS, you can alternatively manage deployments yourself using Helm. This will require more work to configure Opal correctly, but will allow greater control over the resources you deploy.
## Initial setup
To start, make sure you finish the Infrastructure Setup sections in the [AWS Setup Guide](/docs/self-host-opal-aws-guide#1-infrastructure-setup) or [GKE Setup Guide](/docs/self-host-opal-gke-guide#1-infrastructure-setup).
Next, you’ll need to access Replicated's customer-facing download portal. This lists the available versions of Opal, and has instructions and credentials for Helm installs. Opal support will provide you with access to this download portal.
Log in to the download portal and select the **Existing cluster with Helm** installation option. It'll look like this:
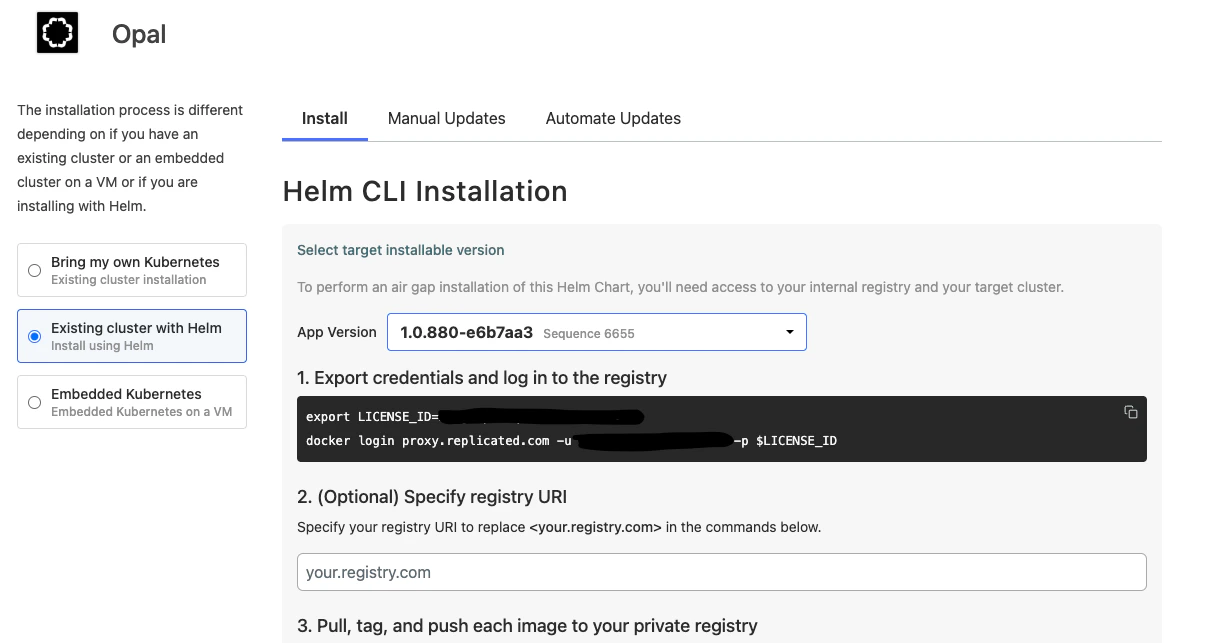 From here, you can either
* [Pull images directly](/docs/install-opal-using-helm#pull-images-from-opals-registry) from Opal’s registry OR
* [Use a private Docker registry](/docs/install-opal-using-helm#use-a-private-docker-registry)
We recommend using Opal’s registry unless you have specific security concerns that require you to use a private registry.
### Pull images from Opal’s Registry
1. Copy the license ID from step 1 in the download portal:
```shell shell theme={null}
export LICENSE_ID=
```
2. Log in to Replicated’s Helm registry, using the command in step 4 of the download portal:
```shell shell theme={null}
# check the instructions in the download portal for the email to use here
helm registry login registry.replicated.com --username --password $LICENSE_ID
```
3. Continue with the following [Configure and Install via Helm](/docs/install-opal-using-helm#configure-and-install-via-helm) steps.
### Use a private Docker registry
1. Create the following repositories in your private registry:
```bash theme={null}
fluent-bit
ld-relay
opal-migrate
opal-web_backend
redis
redis-sentinel
```
2. Ensure your cluster is setup with default credentials to pull images from your private registry.
3. Proceed with *all* of the steps from the Replicated download portal. When you reach steps 6 and 7 to download and edit `values.yaml`, continue with the following [Configure and Install via Helm](/docs/install-opal-using-helm#configure-and-install-via-helm) steps.
# Configure and Install via Helm
Refer to the following annotated `values.yaml` file when you’re ready to configure your values for the Opal chart. Take note of the comments, and fill in anything with ``.
```yaml yaml theme={null}
env:
# These are required for your environment to function correctly, and for us to push feature flags to you
environment: on_prem
onPremCustomerName:
# Leave these values as-is
authIssuer: https://auth.opal.dev/
authProvider: AUTH0
authAudience: https://opal.dev
redisHost: opal-web-redis-master
redisPort: 6379
# This will forward logs from your instance of Opal to us, making it easier for us to debug issues.
# Set this to "false" if you'd like to disable log forwarding.
# Either way, ensure it's a string, not a raw boolean
enableRemoteLogging: "true"
# Fill these in appropriately for the db instance you set up
postgresUser: postgres
postgresPassword:
postgresDb: opal
postgresHost:
postgresSslMode: "require"
postgresPort: 5432
# Generate secret values for these, and save them somewhere secure.
authTokenEncryptionKey:
csrfAuthenticationKey:
databaseEncryptionKey:
opalApiEncryptionKey:
secureCookieHashkey:
# You may alternatively point to an existing secret for these, like so:
# authTokenEncryptionKey:
# secretKeyRef:
# name: "mySecretName"
# key: "authTokenEncryptionKey"
# A DNS name you own that you will use to access Opal.
hostname:
# Optional. Set this to have pods use an existing service account in your cluster. Otherwise, omit this.
serviceAccount:
# This configures an SMTP provider for your instance of Opal to use for sending email notifications
# If set to false, Opal uses its default external service for sending emails
smtpEnable: true
smtpServer:
smtpPort:
# You may also enable authentication for your customer SMTP server by setting this to true
# If you do this, set the username + password below, and make sure smtpPort is set to 465
smtpAuthEnable: false
smtpUsername:
smtpPassword:
# Set smtpEncryptionEnabled to true to enable SMTP encryption. serverPort 465 uses SMTPS and serverPort uses STARTTLS
smtpEncryptionEnabled: false
# Optional. Enables async data exports backed by an S3 bucket. Omit this block entirely to leave the feature off.
# See https://docs.opal.dev/docs/configure-async-exports-storage for how to provision the bucket and IAM user.
exportStorage:
bucketName:
region:
accessKey:
secretKey:
image:
# Leave these two as-is to use Opal's image registry directly
repository: proxy.replicated.com/proxy/opal-onprem/179751979675.dkr.ecr.us-east-2.amazonaws.com
useReplicatedPullSecret: true
# If using a private image registry, use the following instead:
# repository:
# useReplicatedPullSecret: false
# Set these `registry` values to the same as `image.repository` above
redis:
image:
registry: proxy.replicated.com/proxy/opal-onprem/179751979675.dkr.ecr.us-east-2.amazonaws.com
# Omit pullSecrets on each of these if using a private registry
pullSecrets:
- replicated-pull-secret
redis-sentinel-event-streaming:
image:
registry: proxy.replicated.com/proxy/opal-onprem/179751979675.dkr.ecr.us-east-2.amazonaws.com
pullSecrets:
- replicated-pull-secret
sentinel:
image:
registry: proxy.replicated.com/proxy/opal-onprem/179751979675.dkr.ecr.us-east-2.amazonaws.com
pullSecrets:
- replicated-pull-secret
# Setting `enabled` to true will deploy an Ingress resource you can use to route traffic to Opal
# If you disable this, you will need to create your own ingress that routes traffic to the `opal-web` service
ingress:
enabled: true
# Always leave `override=true`
override: true
overrideAnnotations:
# Here, you should fill in annotations that will link your ingress to the load balancer you created in your cloud provider
# For AWS, this will look something like:
# kubernetes.io/ingress.class: alb
# alb.ingress.kubernetes.io/scheme: internet-facing
# alb.ingress.kubernetes.io/certificate-arn:
# For GCP, this will look something like
# ingress.gcp.kubernetes.io/pre-shared-cert: opal-replicated
# kubernetes.io/ingress.global-static-ip-name: opal-replicated
# If you need to turn off log-forwarding, set `enabled` to false here, and omit the other fields.
log-forwarder:
enabled: true
customer:
# Optional. This runs a LaunchDarkly Relay Proxy alongside Opal so feature flag evaluations continue working during a LaunchDarkly outage.
ld-relay-proxy-mode:
enabled: true
```
Once you’ve configured your values.yaml, run the `helm install` command from the final step in your download portal:
From here, you can either
* [Pull images directly](/docs/install-opal-using-helm#pull-images-from-opals-registry) from Opal’s registry OR
* [Use a private Docker registry](/docs/install-opal-using-helm#use-a-private-docker-registry)
We recommend using Opal’s registry unless you have specific security concerns that require you to use a private registry.
### Pull images from Opal’s Registry
1. Copy the license ID from step 1 in the download portal:
```shell shell theme={null}
export LICENSE_ID=
```
2. Log in to Replicated’s Helm registry, using the command in step 4 of the download portal:
```shell shell theme={null}
# check the instructions in the download portal for the email to use here
helm registry login registry.replicated.com --username --password $LICENSE_ID
```
3. Continue with the following [Configure and Install via Helm](/docs/install-opal-using-helm#configure-and-install-via-helm) steps.
### Use a private Docker registry
1. Create the following repositories in your private registry:
```bash theme={null}
fluent-bit
ld-relay
opal-migrate
opal-web_backend
redis
redis-sentinel
```
2. Ensure your cluster is setup with default credentials to pull images from your private registry.
3. Proceed with *all* of the steps from the Replicated download portal. When you reach steps 6 and 7 to download and edit `values.yaml`, continue with the following [Configure and Install via Helm](/docs/install-opal-using-helm#configure-and-install-via-helm) steps.
# Configure and Install via Helm
Refer to the following annotated `values.yaml` file when you’re ready to configure your values for the Opal chart. Take note of the comments, and fill in anything with ``.
```yaml yaml theme={null}
env:
# These are required for your environment to function correctly, and for us to push feature flags to you
environment: on_prem
onPremCustomerName:
# Leave these values as-is
authIssuer: https://auth.opal.dev/
authProvider: AUTH0
authAudience: https://opal.dev
redisHost: opal-web-redis-master
redisPort: 6379
# This will forward logs from your instance of Opal to us, making it easier for us to debug issues.
# Set this to "false" if you'd like to disable log forwarding.
# Either way, ensure it's a string, not a raw boolean
enableRemoteLogging: "true"
# Fill these in appropriately for the db instance you set up
postgresUser: postgres
postgresPassword:
postgresDb: opal
postgresHost:
postgresSslMode: "require"
postgresPort: 5432
# Generate secret values for these, and save them somewhere secure.
authTokenEncryptionKey:
csrfAuthenticationKey:
databaseEncryptionKey:
opalApiEncryptionKey:
secureCookieHashkey:
# You may alternatively point to an existing secret for these, like so:
# authTokenEncryptionKey:
# secretKeyRef:
# name: "mySecretName"
# key: "authTokenEncryptionKey"
# A DNS name you own that you will use to access Opal.
hostname:
# Optional. Set this to have pods use an existing service account in your cluster. Otherwise, omit this.
serviceAccount:
# This configures an SMTP provider for your instance of Opal to use for sending email notifications
# If set to false, Opal uses its default external service for sending emails
smtpEnable: true
smtpServer:
smtpPort:
# You may also enable authentication for your customer SMTP server by setting this to true
# If you do this, set the username + password below, and make sure smtpPort is set to 465
smtpAuthEnable: false
smtpUsername:
smtpPassword:
# Set smtpEncryptionEnabled to true to enable SMTP encryption. serverPort 465 uses SMTPS and serverPort uses STARTTLS
smtpEncryptionEnabled: false
# Optional. Enables async data exports backed by an S3 bucket. Omit this block entirely to leave the feature off.
# See https://docs.opal.dev/docs/configure-async-exports-storage for how to provision the bucket and IAM user.
exportStorage:
bucketName:
region:
accessKey:
secretKey:
image:
# Leave these two as-is to use Opal's image registry directly
repository: proxy.replicated.com/proxy/opal-onprem/179751979675.dkr.ecr.us-east-2.amazonaws.com
useReplicatedPullSecret: true
# If using a private image registry, use the following instead:
# repository:
# useReplicatedPullSecret: false
# Set these `registry` values to the same as `image.repository` above
redis:
image:
registry: proxy.replicated.com/proxy/opal-onprem/179751979675.dkr.ecr.us-east-2.amazonaws.com
# Omit pullSecrets on each of these if using a private registry
pullSecrets:
- replicated-pull-secret
redis-sentinel-event-streaming:
image:
registry: proxy.replicated.com/proxy/opal-onprem/179751979675.dkr.ecr.us-east-2.amazonaws.com
pullSecrets:
- replicated-pull-secret
sentinel:
image:
registry: proxy.replicated.com/proxy/opal-onprem/179751979675.dkr.ecr.us-east-2.amazonaws.com
pullSecrets:
- replicated-pull-secret
# Setting `enabled` to true will deploy an Ingress resource you can use to route traffic to Opal
# If you disable this, you will need to create your own ingress that routes traffic to the `opal-web` service
ingress:
enabled: true
# Always leave `override=true`
override: true
overrideAnnotations:
# Here, you should fill in annotations that will link your ingress to the load balancer you created in your cloud provider
# For AWS, this will look something like:
# kubernetes.io/ingress.class: alb
# alb.ingress.kubernetes.io/scheme: internet-facing
# alb.ingress.kubernetes.io/certificate-arn:
# For GCP, this will look something like
# ingress.gcp.kubernetes.io/pre-shared-cert: opal-replicated
# kubernetes.io/ingress.global-static-ip-name: opal-replicated
# If you need to turn off log-forwarding, set `enabled` to false here, and omit the other fields.
log-forwarder:
enabled: true
customer:
# Optional. This runs a LaunchDarkly Relay Proxy alongside Opal so feature flag evaluations continue working during a LaunchDarkly outage.
ld-relay-proxy-mode:
enabled: true
```
Once you’ve configured your values.yaml, run the `helm install` command from the final step in your download portal:
 # Update Helm Installations
For subsequent updates to your Opal cluster, log back in to your download portal and select the **Manual Updates** tab at the top. Set the current and update versions from the dropdowns:
# Update Helm Installations
For subsequent updates to your Opal cluster, log back in to your download portal and select the **Manual Updates** tab at the top. Set the current and update versions from the dropdowns:
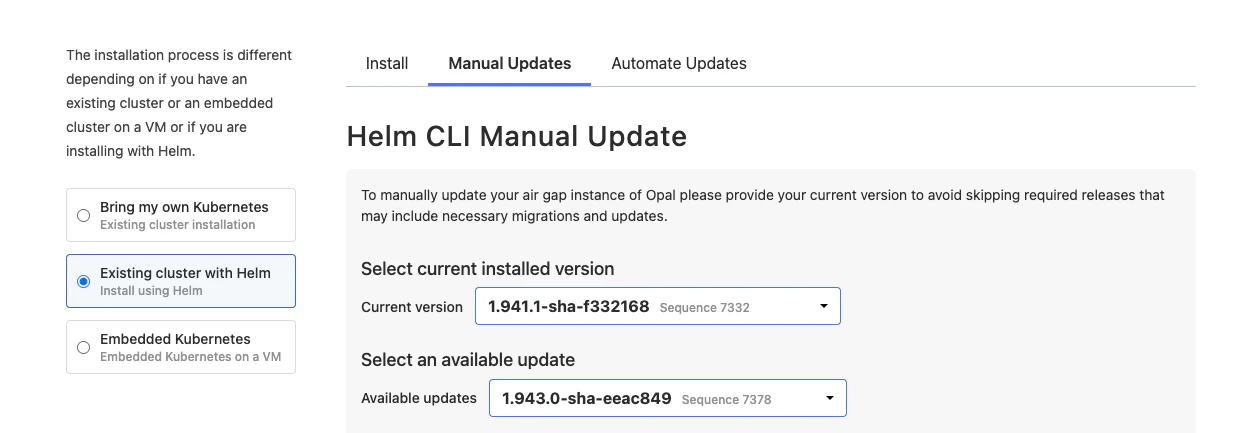 If you’re using a private registry, you’ll need to re-run the commands to pull, retag, and push images to your private registry. We recommend you run these via a script or other automation.
Finally, run the `helm upgrade` command from the final step in your download portal:
If you’re using a private registry, you’ll need to re-run the commands to pull, retag, and push images to your private registry. We recommend you run these via a script or other automation.
Finally, run the `helm upgrade` command from the final step in your download portal:
 # Migrate from a KOTS-Based Installation
If you previously installed Opal using KOTS and want to manage your deployment with Helm, you can perform a one-way migration. This will not cause any downtime for your cluster, but **will not** be reversible.
First, follow the [Initial Setup](/docs/install-opal-using-helm#initial-setup) instructions above. Once you reach [Configure and Install via Helm](/docs/install-opal-using-helm#configure-and-install-via-helm), skip that section and follow the steps below instead.
1. Pull your cluster’s current Helm values into a local file:
```shell shell theme={null}
helm get values opal-web -n -o yaml > values-from-kots.yaml
```
2. Scale down the KOTS pods:
```shell shell theme={null}
kubectl -n opal-onprem scale deploy kotsadm --replicas=0
kubectl -n opal-onprem scale sts kotsadm-minio --replicas=0
kubectl -n opal-onprem scale sts kotsadm-rqlite --replicas=0
```
3. Use `helm list` to check the currently installed version of opal:
```bash bash theme={null}
$ helm list -n
NAME NAMESPACE REVISION UPDATED STATUS CHART APP VERSION
opal-web opal-onprem 1 - deployed opal-web-1.944.0-sha-8d4530d 1.944.0-sha-8d4530d
```
Copy the value under `APP VERSION` for the step below
4. Run a Helm upgrade to take over the chart’s resources:
```shell shell theme={null}
helm upgrade opal-web oci://registry.replicated.com/opal-onprem/stable/opal-web -n --version --values values-from-kots.yaml --take-ownership
```
Once this is complete, you can update your Helm installation in the future by following the instructions in [Update Helm Installations](/docs/install-opal-using-helm#update-helm-installations) above.
You can also finish cleaning up the kubernetes resources created by KOTS by running the following:
```shell shell theme={null}
kubectl -n delete deployment kotsadm;
kubectl -n delete statefulset kotsadm-minio;
kubectl -n delete statefulset kotsadm-rqlite;
kubectl -n delete service kotsadm;
kubectl -n delete service kotsadm-minio;
kubectl -n delete service kotsadm-rqlite;
kubectl -n delete service kotsadm-rqlite-headless;
kubectl -n delete persistentvolumeclaim kotsadm-minio-kotsadm-minio-0;
kubectl -n delete persistentvolumeclaim kotsadm-rqlite-kotsadm-rqlite-0;
kubectl -n delete role kotsadm-role;
kubectl delete clusterrolebinding kotsadm-rolebinding;
kubectl delete clusterrole kotsadm-role;
kubectl -n delete serviceaccount kotsadm;
```
***
# Migrate from a KOTS-Based Installation
If you previously installed Opal using KOTS and want to manage your deployment with Helm, you can perform a one-way migration. This will not cause any downtime for your cluster, but **will not** be reversible.
First, follow the [Initial Setup](/docs/install-opal-using-helm#initial-setup) instructions above. Once you reach [Configure and Install via Helm](/docs/install-opal-using-helm#configure-and-install-via-helm), skip that section and follow the steps below instead.
1. Pull your cluster’s current Helm values into a local file:
```shell shell theme={null}
helm get values opal-web -n -o yaml > values-from-kots.yaml
```
2. Scale down the KOTS pods:
```shell shell theme={null}
kubectl -n opal-onprem scale deploy kotsadm --replicas=0
kubectl -n opal-onprem scale sts kotsadm-minio --replicas=0
kubectl -n opal-onprem scale sts kotsadm-rqlite --replicas=0
```
3. Use `helm list` to check the currently installed version of opal:
```bash bash theme={null}
$ helm list -n
NAME NAMESPACE REVISION UPDATED STATUS CHART APP VERSION
opal-web opal-onprem 1 - deployed opal-web-1.944.0-sha-8d4530d 1.944.0-sha-8d4530d
```
Copy the value under `APP VERSION` for the step below
4. Run a Helm upgrade to take over the chart’s resources:
```shell shell theme={null}
helm upgrade opal-web oci://registry.replicated.com/opal-onprem/stable/opal-web -n --version --values values-from-kots.yaml --take-ownership
```
Once this is complete, you can update your Helm installation in the future by following the instructions in [Update Helm Installations](/docs/install-opal-using-helm#update-helm-installations) above.
You can also finish cleaning up the kubernetes resources created by KOTS by running the following:
```shell shell theme={null}
kubectl -n delete deployment kotsadm;
kubectl -n delete statefulset kotsadm-minio;
kubectl -n delete statefulset kotsadm-rqlite;
kubectl -n delete service kotsadm;
kubectl -n delete service kotsadm-minio;
kubectl -n delete service kotsadm-rqlite;
kubectl -n delete service kotsadm-rqlite-headless;
kubectl -n delete persistentvolumeclaim kotsadm-minio-kotsadm-minio-0;
kubectl -n delete persistentvolumeclaim kotsadm-rqlite-kotsadm-rqlite-0;
kubectl -n delete role kotsadm-role;
kubectl delete clusterrolebinding kotsadm-rolebinding;
kubectl delete clusterrole kotsadm-role;
kubectl -n delete serviceaccount kotsadm;
```
***